
Related Manuals for Trivisio Colibri-Wireless

Summary of Contents for Trivisio Colibri-Wireless
- Page 1 User Manual Colibri-Wireless Inertial Motion Tracker Version 1.0 Subject to technical modifications Copyright: : Lux Prototyping S.A.R.L., 23, rue des Bateliers, ,6713 Grevenmacher, Luxembourg 2015/02/24 Table of Contents...
-
Page 2: Table Of Contents
Table of Contents..........................2 1.1 Inteded Use............................3 1.2 Advice..............................3 1.3 Warning for Electrical Products....................... 3 General Operating Instructions......................4 2.1 Parts of the Colibri Wireless System....................4 2.2 Colibri wireless tracker........................4 2.3 USB Dongle............................6 Setup for the Wireless Network (quick setup)................. -
Page 3: Inteded Use
Inteded Use The product is designed to measure inertial movements and to transfer acceleration, angular rate and magnetic field via a wireless dongle to a PC. Power is supplied by a lithium polymer battery. Advice To ensure the correct position of the device during the measurement session, make sure that the tracker is securely attached to object or body being measured. -
Page 4: General Operating Instructions
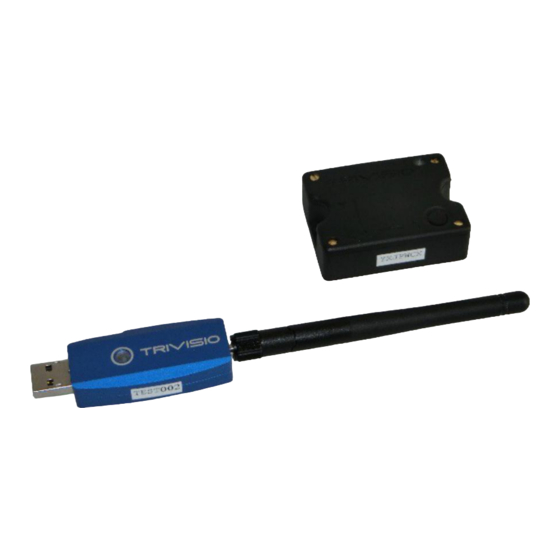
General Operating Instructions Parts of the Colibri Wireless System This system contains: 1.Colibri wireless tracker (sometimes also called “Node”) (up to 10 trackers per USB dongle) 2.USB dongle (sometimes also called “Gate” 3.Micro USB charger (chargers may vary) Colibri wireless tracker Getting to know the Colibri wireless tracker. - Page 5 2.Status LED Displays the status of the tracker. LED colour is battery state: Green: (when connected to USB): tracker is on and fully charged. Green: (when NOT connected to USB): tracker is on. Orange: tracker is charging. Red: battery is low. LED flashing is tracker's mode: Steady: tracker is in stand-by mode.
-
Page 6: Usb Dongle
USB Dongle Getting to know the USB dongle: 1.USB Connector Connects to you Desktop or mobile PC USB port. (sometimes also called “Gate”) 2.Status LED Displays the status of the dongle. Standby: Green: Solid: dongle is ready for use. Green/Orange: Flashing:RF Channel change. -
Page 7: Setup For The Wireless Network (Quick Setup)
“ColibriAPI Documentation”, which can be found in the installation folder (Start, Programs, ColibriAPI x.x.yyyyyyyy (zz-bit)* or downloaded separately from our website www.trivisio.com. 4.Connect the USB dongle to a free USB port on your pc. Push the power button on the tracker for one second. - Page 8 Colibri GUI - brief description: A. USB dongle with serial number B. Tracker with serial number C. Refresh. To search for new switched on trackers. D. RF channels: To check for free frequencies in the frequency range of the 2,4 Ghz Band. E.
- Page 9 Your Colibri GUI should look like this: Use “Tools”>” Multiorientation” to test the tracker. Magnetometer calibration The Colibri sensors are factory calibrated and tested before being shipped. However, the magnetic calibration is very sensitive to environmental changes. Especially metal and electromagnetic fields emitted by other devices can influence the quality of the tracking results.
- Page 10 1.Choose the tracker that you want to calibrate. (Magnetometer calibration must be done for every tracker separately). 2. Choose settings from the context menu. Colibri Wireless User Manual...
- Page 11 3.Choose Calibration Values from the left upper corner. 4.Click “Start” to start to calibration procedure 5.Start calibration. After the countdown, 3 progress bars will increment successively. 6.During this process, slowly rotate sensors in all directions. We suggest to perform 3 full turns in horizontal plane around Z, X and Y axes.
- Page 12 9.Save in case of good calibration. 10.Use “Tools”>” Multiorientation” to check the sensor. Colibri Wireless User Manual...
-
Page 13: Colibri Gui
Colibri GUI Colibri GUI is used to configure the Colibri trackers, to check the battery level, to perform magnetometer calibration and so forth. Top Menu Network To establish a new network. Load from Hardware To load a configuration previously created from an USB dongle. Open…... - Page 14 ITEM Add Node To add to network a new node. (May be added a node to a gate). Add Gate To setup a new wireless gate. Delete To delete nodes and gates from the “create network here” box. Tools Quick Configuration After placing the trackers and dongles icons in the “Create network here”...
-
Page 15: Available Devices Box
Available devices box Here are all trackers and dongles listed that are recognised by the Colibri GUI software. Let’s have a closer look at the devices recognised by the software: ID: Displays the type and/or the serial number RF#: Radio channel of the dongles or trackers (notice: only if a wireless sensor is connected via USB, is the RF# being displayed here. -
Page 16: Create Network Here Box
Example of one tracker connected to USB and also via wireless connection with one dongle. A. Shows a wireless tracker connected via USB. The USB icon is showing at the top- left corner of the red square.1 shows the amount of trackers connected via USB. WKFNOAM is the serial number of the tracker. -
Page 17: Multiorientation
Multiorientation Multiorientation is a data-capturing and visualization tool. When you run it via “Tools”>” Multiorientation” menu, it starts with current parameters. By default, it only shows a rotating color cube for every sensor. You may customize Multiorientation view using “Tools”>” Multiorientation…” customizing Multiorientation show plots Shows oscilloscope-like window with possibility to see plots of measurements –... - Page 18 Running Multiorientation Multiorientation dialog has several alignment options in menu: Reset No alignment is used Align Heading and object combination. Heading Set yaw to zero. Object Set pitch and roll to zero (horizontal orientation). New X-axis is the projection of sensor's X-axis to horizontal plane. Save Save alignment to sensor's flash memory and quit Multiorientation Colibri Wireless User Manual...
-
Page 19: Settings
4.5 Settings With “Tools”>” Settings” you may change settings of one or all sensors in network. Right- click one of nodes in the Network window, and choose “Settings”. You will see multi- group Settings dialog, with settings of the chosen node. From the left you see the list of settings groups. -
Page 20: Magnetometer Calibration
Magnetometer calibration Often users need to calibrate magnetic sensor at his place. It's necessary after embedding sensor in calibration will change user's system, containing electronics and iron details. Magnetometer Alignment, Gain and Offset values. Delay gives you some time to prepare devices before calibration starts, for example walk away from PC or from big iron objects. -
Page 21: Resetting Gyro Offsets
Resetting Gyro Offsets Gyroscope offsets can change over time and due to varying temperature during operation. Big gyro offsets will lead to orientation drift if you do not use magnetometers, or to greater noise in orientation, so you may want to reset it. To do so choose the reset time (the longer, the better), push Start and leave sensors motionless. - Page 22 Channels are in range from 2 to 81. It corresponds to 2.402 . . . 2.481 GHz. Please see correspondence of Wi-Fi and Colibri channels at following figure (picture by wikimedia.org): Colibri Wireless User Manual...
-
Page 23: Multi Dongle Operation
Multi Dongle Operation If you want to use more than 10 trackers at one location, it is necessary to use a dongle link cable. Colibri dongle Master Slave cable Colibri Wireless User Manual... - Page 24 Colibri Master Slave configuration 1.You have to configure the channels of the colibri so that you have at least 20 space between both dongles. For example, dongle one set to channel 25, dongle two set to channel 45. 2.Set one dongle to master the other so slave via the “create Network here box” sync parameter. 3.Configure max 10 trackers to channel 25 and the other 10 trackers to channel 45.
-
Page 25: Software Development Kit (Sdk)
“ColibriAPI Documentation”. This manual describes the API and structure of the Colibri software. The manual can be found in the installation folder (Start, Programs, ColibriAPI x.x.yyyyyyyy (zz-bit) or downloaded separately from our website www.trivisio.com. Maintenance and Cleaning Instructions To clean the trackers and dongles, use a damp cloth. Do not use any kind of cleaning liquids . -
Page 26: Troubleshooting
Charge the battery for 2 turn on hours Dongle don´t Wrong RF Do procedure describe in find any Channel set in 5.6 Setup Radio Channels trackers tracker or dongle If you have still problems write a e-mail to: info@trivisio.com Colibri Wireless User Manual... -
Page 27: Returning Used Electronic Devices In Eu Countries
(Ruecknahme und Entsorgung von Elektro- und Elektronikaltgertaeten) and European WEEE (Waste Electrical and Electronic Equipment) electronic used devices from private households can be returned free of charge. For details please contact your local distributor directly Trivisio Prototyping GmbH (www.trivisio.com). Colibri Wireless User Manual... -
Page 28: Technical Data
10 Technical Data Tracker Specifications Accelerometer Scale: ±6 g Resolution: 13-bit Gyroscope Scale: ±2000 °/s Resolution: 16-bit Magnetic sensor Scale: ±1.3 Ga Resolution: 12-bit Temperature sensor Accuracy: ±0.5 °C Operation Temperature: 0 to+55 °C (self-powered) 0 to+40 °C (charging) Working frequency 100 Hz Orientation accuracy Pitch/ Roll: 0.5 °... -
Page 29: Rohs
11 RoHS RoHS Certificate of Compliance Trivisio Prototyping GmbH hereby declares and certifies that the motion sensors Colibri- wireless are manufactured RoHS compliant according to the definitions and restrictions given by the European Parliament (Directive 2002/95/EC) and the Council of January 27, 2003 on the restriction of the use of certain hazardous substances in electrical and electronic equipment, except as those noted below.
Need help?
Do you have a question about the Colibri-Wireless and is the answer not in the manual?
Questions and answers