Advertisement
Assembly Instructions & User's Manual
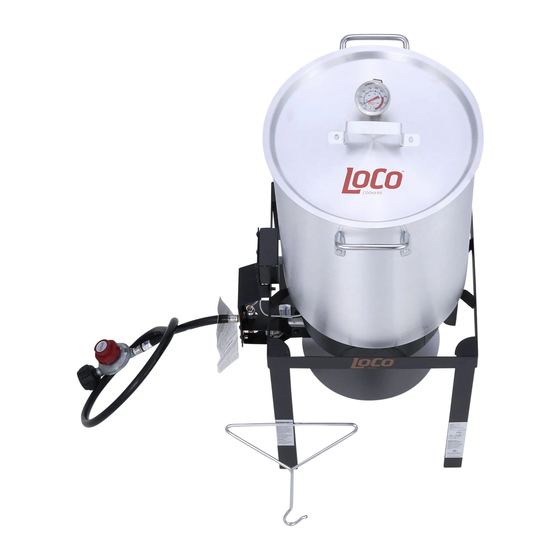
Turkey Fryer
Model# LCPTFK
LCPTFK36
Keep this manual for future reference
Warning:
READ INSTRUCTION MANUAL BEFORE ATTEMPTING TO ASSEMBLE OR
OPERATE THIS PRODUCT.
Adult assembly required.
Keep screws and parts out of reach of children.
Customer Service: 800-391-0436, 8:00am to 5:00pm,
Monday thru Friday Eastern Standard Time
(Made in China)
Advertisement

Related Manuals for LOCO COOKERS LCPTFK


Summary of Contents for LOCO COOKERS LCPTFK
- Page 1 Assembly Instructions & User’s Manual Turkey Fryer Model# LCPTFK LCPTFK36 Keep this manual for future reference Warning: READ INSTRUCTION MANUAL BEFORE ATTEMPTING TO ASSEMBLE OR OPERATE THIS PRODUCT. Adult assembly required. Keep screws and parts out of reach of children.
- Page 2 WARNINGS SAFETY SYMBOLS: When using this appliance, basic safety precautions should always be observed. Read and understand the meaning of these symbols before assembling and using this appliance. DANGER Indicates a hazardous situation, which if not avoided, will result in death or serious injury. WARNING Be alert to the possibility of serious personal injury if the instructions are not followed.
-
Page 3: Table Of Contents
TABLE OF CONTENTS Warnings....................2, 4-9 Exploded View....................10 Parts List....................11-12 Hardware....................13 Assembly Instructions................13-14 Operating/Cooking Instructions.............15-17 Care and Maintenance................18-19 Warranty Information..................20 NOTE: Before beginning assembly of product, make sure all parts are present. Compare parts with package content list and hardware contents. If any part is missing or damaged do not attempt to assemble the unit. -
Page 4: Warnings
WARNINGS SAVE THESE INSTRUCTIONS Read and understand all instructions before assembling and using this appliance. Follow all warnings while using this appliance. Failure to follow these instructions could result DANGER If you smell gas: If possible, immediately turn off gas supply to the appliance by turning the LP tank valve clockwise (right). - Page 5 WARNINGS appliance until the cooking liquid has cooled to less than 1 DO NOT Allow the cooking vessel to cool to 1 This appliance will e hot du ing and a te use Use insulated oven mitts o gloves to p otect om hot su aces o splatte om cooking liquids losed toed shoes should always e wo n du ing ope ation o this appliance...
- Page 6 WARNINGS ONE USED. Replacement pressure regulator and hose assemblies must be those supplied by the manufacturer. NEVER use a cooking vessel larger than the capacity and diameter recommended by the manufacturer. proper water levels. and severe burns from water splatter. Avoid bumping of or impact with the appliance to prevent spillage or splashing of hot cooking liquid.
- Page 7 WARNINGS: LP TANK DANGER Indicates a hazardous situation, which if not avoided, will result in death or serious injury. 1. Do not store a spare LP gas cylinder under or near this appliance. 2. NEVER fill the cylinder beyond 80 percent full. 3.
- Page 8 WARNINGS: LP TANK Regulator Nipple must be centered into the LP tank valve CONNECTING REGULATOR TO LP TANK: Straight Coupling Nut 1. Place LP tank on a secure, level and stable surface. 2. Turn control knob to the “OFF” position. 3.
- Page 9 WARNINGS: LP TANK REGULATOR HOSE ASSEMBLY CHECK: WARNING Before each use, check to see if there is evidence of abrasion, wear, cuts or leaks on the hose. If damage is evident, the hose must be replaced prior to appliance use. DISCONNECTING REGULATOR FROM THE LP TANK: 1.
-
Page 10: Exploded View
DANGER NEVER allow this appliance to operate unattended. Failure to fo or burn hazard that could cause property damage, personal injur the appliance, move everyone to safety and immediately contact CO2 extinguisher or preferably a Class “K” extinguisher. Special care must be taken to understand the manufacturers instructions and be prepared to operate the appropriate extinguisher prior to using this appliance. -
Page 11: Parts List
PARTS LIST NOTE: Wash all parts that will come in contact with food or water with warm soapy water, rinse and towel dry. Stand... - Page 12 PARTS LIST Match Lighter Burner Mounting Plate Connecting piece Heat Shield Burning system Hanger Thermometer Poultry Stand...
-
Page 13: Hardware
HARDWARE M4 x 25 Bolt M4 x 10 Bolt ASSEMBLY INSTRUCTIONS STEP 1 Attach the burner fixing plate (7) to the stand (5) with four M4 x 10 bolts (BB). STEP 2 Take down the nut from burner, store the nut for next procedure use.Put the protruding bolt on the burner through the hole on the burner fixing plate (7), attach the burning system (10) to the... - Page 14 ASSEMBLY INSTRUCTIONS STEP 3 Protruding Bolt Put the hole on the upper of the connecting piece (8) through the protruding bolt on the burner, tighten them with the nut which took down in step 3. STEP 4 Attach the heat shield (9) to the connecting piece (8) with one M4 x 10 bolt (BB).
-
Page 15: Operating/Cooking Instructions
OPERATING/COOKING INSTRUCTIONS WARNING When using the Turkey Fryer please keep in mind that it is important to never fill the appliance over the marked “Max Fill” line. Doing so could result in the unit becoming top heavy and creating an unsafe condition. Never overfill the cooking vessel with more oil, grease or water than specified by vessel ●... - Page 16 Min Fill Line Do Not Exceed 18 lb. Turkey LCPTFK: For turkeys up to 15 lbs, This fryer is equipped with a temperature control it is recommended to use the shut-off valve. If the oil gets too hot it will shut-off basket.
- Page 17 OPERATING/COOKING INSTRUCTIONS Step 6: When food is done, turn fryer OFF. Always turn propane cylinder valve OFF then turn the regulator control knob OFF. Allow fryer and oil to cool completely. Never attempt to drain oil or move cooking vessel until oil has cooled below 115 F (45 C) - Severe burns could result.
-
Page 18: Care And Maintenance
CARE AND MAINTENANCE HOW TO CLEAN: CAUTION Allow unit to fully cool (1 before performing any cleaning. Proper care and appliance maintenance will keep your product operating smoothl Keep appliance area clear and free from combustible materials, gasoline, and other flammable vapors and liquids. - Page 19 CARE AND MAINTENANCE SUGGESTED CLEANING MATERIALS: Hot water Mild dishwashing liquid detergent Soft, nylon cleaning pad DANGER NEVER insert any tool or foreign object into the valve outlet or safety relief valve. You may damage ersonal injury or death. CAUTION lockages by inspecting and cleaning burner and manifold tube regularly.
-
Page 20: Warranty Information
WARRANTY INFORMATION The appliance has been manufactured under the highest standards of quality and workmanship. We warrant to the original consumer/purchaser that all aspects of this product will be free of defects in material and workmanship for one (1) year from the date of purchase. A replacement for any defective part will be supplied free of charge for installation by the consumer.
Need help?
Do you have a question about the LCPTFK and is the answer not in the manual?
Questions and answers