Table of Contents
Advertisement
Quick Links
LightBug Zero & Pro
User Manual
Due to software updates, your experience of the software interface (including
but not limited to software features, user interfaces, and interaction
experiences) may differ from the interface presented in this manual. The
software interface is subject to change as we continuously work on providing
you with the best experience!
Advertisement
Table of Contents

Related Manuals for LightBug Zero


Summary of Contents for LightBug Zero
- Page 1 LightBug Zero & Pro User Manual Due to software updates, your experience of the software interface (including but not limited to software features, user interfaces, and interaction experiences) may differ from the interface presented in this manual. The software interface is subject to change as we continuously work on providing...
-
Page 2: Table Of Contents
Step 1: Entering Serial Numbers Step 2: Setting up your Data Plan Step 3: Adding billing information Adding more trackers to your account: Configuring your LightBug Tracker using the setup wizard: Configuration Mode Easy Mode Step 1: Customise your device... - Page 3 Step 1: Customise your device Step 2: Motion Detection Motion Detection: Enabled Home Setup - Wifi Network Motion Detection: Disabled Using the LightBug App and Web Portal The Map Map View Settings Getting Device Information & Location History Settings Configuration Notifications...
- Page 4 Change Account Password Geofences Create a Geofence Delete Geofence Edit Geofence How Things Work Under the Hood How the Location Technologies Work Simple Troubleshooting Why are location updates not instant? Why is my tracker not transmitting? Page LightBug User Manual...
- Page 5 Why is my tracker giving inaccurate locations? Why is my battery not lasting as long as advertised? Page LightBug User Manual...
-
Page 6: Meet Lightbug
Meet LightBug LightBug Zero Page LightBug User Manual... -
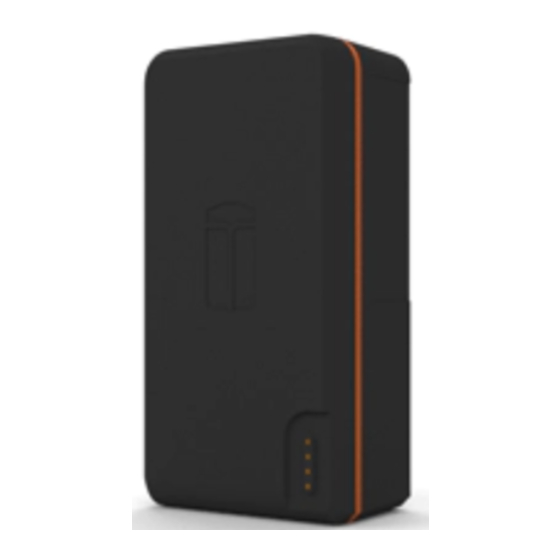
Page 7: Lightbug Pro
LightBug Pro Page LightBug User Manual... - Page 8 LED Indicators The LEDs indicators can be found on the side of the Zero and Pro. The small icons above each of the indicators show what information they display. Quick Button Press Pressing the button the tracker for less than 1 second will display the following information (from left to right).
- Page 9 GSM signal* – this indicator shows the GSM signal strength. It glows solid orange when operational, but glows solid red when GSM is unavailable. GSM may not be available in areas with poor cell phone coverage. *The signal indicators are for diagnostic purposes only. Page LightBug User Manual...
-
Page 10: Getting Your Tracker Ready For Initial Use
Charging your tracker You will need to charge your tracker as follows before initial use: The LightBug Zero needs to be charged for at least 3 hours. The LightBug Pro needs to be charged for at least 5 hours. The LightBug Zero and the LightBug Pro can be charged using the included magnetic Micro USB charging cable either via wall adapter or via USB port. - Page 11 1st LED light blinking orange – the device is 0%-25% charged and charging 2nd LED light blinking orange – the device is 25%-50% charged and charging 3rd LED light blinking orange – the device is 50%-75% charged and charging Page LightBug User Manual...
- Page 12 1-4 of the battery LEDs will glow orange: 1 LED – device is 0%-25% charged 2 LEDs – device is 25%-50% charged 3 LEDs – device is 50%-75% charged 4 LEDs – device is 75%-100% charged Page LightBug User Manual...
-
Page 13: Activating Your Tracker
Activating your tracker To activate your tracker, you will need to download the LightBug App on your smartphone or visit our web portal: https://lightbug.cloud/ Creating an account: Once you have downloaded the LightBug App or visited our web portal, you will need to register an account if you do not already have one. - Page 14 Page LightBug User Manual...
-
Page 15: Linking Your First Tracker To Your Account
Step 1: Entering Serial Numbers Enter your tracker Serial Number. The serial number is on the back of the LightBug Zero and on the side of the LightBug Pro. Hint: If you have Bluetooth enabled while using the LightBug App, it will automatically detect the device serial number and fill it in for you. - Page 16 Page LightBug User Manual...
-
Page 17: Step 2: Setting Up Your Data Plan
Choose a data plan. You can change your plan and billing period later on. Note: The Standard Data Plan allows for up to 6 location updates per day and disables motion detection, while the Unlimited Data Plan has no restrictions. Page LightBug User Manual... -
Page 18: Step 3: Adding Billing Information
Add your billing information so that your tracker will remain active after your free trial period. Caution: Your LightBug tracker will not activate if you do not add your billing information. You will not be charged until your free trial period is over. -
Page 19: Adding More Trackers To Your Account
Adding more trackers to your account: If you would like to add more trackers to the same account, you will need to be logged into the desired account and then follow the steps outlined in this section of the User Manual. Page LightBug User Manual... - Page 20 Bluetooth safe zone, tracker alarm and ranging functionality. Pairing your tracker via BlueTooth It is not possible to pair your tracker on the Lightbug web portal, you must install the Lightbug App to pair and use these features.
- Page 21 Page LightBug User Manual...
- Page 22 Make a note of the passkey, and select ‘Use paired phone as safezones’ if you would like to receive reduced location updates when the tracker is in range of your smartphone. Press ‘Pair’. Page LightBug User Manual...
- Page 23 Instead, it will show the tracker’s Bluetooth name, which begins with ‘LB’ as shown below. Your Lightbug GPS tracker is now paired to your smartphone as shown on the App. Page LightBug User Manual...
- Page 24 Bluetooth settings. Step 1: Smartphone’s Bluetooth settings Keep the noted passkey, leave the Lightbug App and go to your smartphone’s Bluetooth settings and select your tracker. Hint: The device’s name will start with ‘LB’...
- Page 25 Step 2: Pair the tracker A pop-up page will appear, enter the noted passkey and press ‘Pair’. The tracker will now show as connected on the Bluetooth settings page. Page LightBug User Manual...
- Page 26 Page LightBug User Manual...
- Page 27 3. Restart the Lightbug App Force close the Lightbug App and restart. The tracker will now show as connected on the App. Page LightBug User Manual...
-
Page 28: Configuring Your Lightbug Tracker Using The Setup Wizard
Configuring your LightBug Tracker using the setup wizard: You can always change the settings on your tracker via the Settings tab: Page LightBug User Manual... -
Page 29: Configuration Mode
first. Advance mode set-up will not be covered in this manual. (Use at your own risk) Easy Mode Based on our experience, Easy Mode is designed to provide the most optimised settings for common use cases. Page LightBug User Manual... -
Page 30: Step 1: Customise Your Device
Step 1: Customise your device Give your tracker a name and dot colour so you can quickly identify it if you have more than one tracker on the same account. Page LightBug User Manual... -
Page 31: Step 2: Select The Device Mode
If you decide that the “Long Battery Life” mode is best for you, then follow the steps directly below. If you would prefer the “Motion Tracking” mode, skip to the specific steps for that plan. Page LightBug User Manual... -
Page 32: Easy Mode: Long Battery Life
Examples of when this will be useful are: Page LightBug User Manual... -
Page 33: Strict Budget
This reduces the maximum amount of power each update can take, extending the guaranteed minimum life, but it will not work for devices in average to poor signal areas. Page LightBug User Manual... - Page 34 Caution: Up to 80% of updates may be dropped with Strict Budget enabled. Note: These settings are automatically saved and will be applied at the next location update. Alternatively, to apply the new settings immediately, press the button on your tracker for 3 seconds. Page LightBug User Manual...
-
Page 35: Easy Mode: Motion Tracking
firmware updates. Home Setup - Wifi Network If your device is often at home, ignoring motion detection when in range of your home Wi-Fi network can help Page LightBug User Manual... - Page 36 Note: These settings are automatically saved and will be applied at the next location update. Alternatively, to apply the new settings immediately, press the button on your tracker for 3 seconds. Page LightBug User Manual...
-
Page 37: Flexible Mode
Flexible Mode This mode gives you a little more flexibility with the settings but is still easy to set up. Page LightBug User Manual... -
Page 38: Step 1: Customise Your Device
Step 1: Customise your device Give your tracker a name and dot colour so you can quickly identify it if you have more than one tracker on the same account. Page LightBug User Manual... -
Page 39: Step 2: Motion Detection
At this step, you can choose whether the device should increase its reporting frequency when moving. If enabled, you will have the option to adjust motion sensitivity. This will change how sensitive your LightBug tracker is to motion. Motion Detection: Enabled This step allows you to configure the desired update rate... - Page 40 Beacon Rate: This is the rate at which the tracker will send a location update when no motion is detected. This is used to confirm that the tracker is operational and enables the tracker to download any setting changes or firmware updates. Page LightBug User Manual...
-
Page 41: Home Setup - Wifi Network
Note: These settings are automatically saved and will be applied at the next location update. Alternatively, to apply the new settings immediately, press the button on your tracker for 3 seconds. Page LightBug User Manual... -
Page 42: Motion Detection: Disabled
This will be a fixed location update rate. Note: These settings are automatically saved and will be applied at the next location update. Alternatively, to apply the new settings immediately, press the button on your tracker for 3 seconds. Page LightBug User Manual... -
Page 43: Using The Lightbug App And Web Portal
Using the LightBug App and Web Portal The LightBug App is available for both Android and iOS devices. You can also access your account from any browser (including smartphone browsers) by visiting https://lightbug.cloud/ Caution: The web portal works and functions exactly as the LightBug App, but you will only receive notifications to... -
Page 44: The Map
The Map The app automatically opens to the Map page. Here you can see all your devices at their latest positions on the Map. Page LightBug User Manual... -
Page 45: Map View Settings
Map View Settings To change the Map view settings, click on the layer icon Here you have different viewing options: Page LightBug User Manual... - Page 46 Caution: Please note that this information is sent along with every location update, meaning if your last location update was 2 days ago, the battery status you are seeing is what it was 2 days ago. Page LightBug User Manual...
- Page 47 Page LightBug User Manual...
-
Page 48: Getting Device Information & Location History
Getting Device Information & Location History You can get more information about the device by selecting it: Page LightBug User Manual... - Page 49 Page LightBug User Manual...
- Page 50 The blue circle will fill up with colour as you get closer to the tracker. We recommend slowly walking around and using the bible circle to get a better idea of where the tracker is. Page LightBug User Manual...
- Page 51 Note: Bluetooth cannot be used to reliably yield a direction. It uses signal strength to determine if you are close or far from the tracker. Page LightBug User Manual...
- Page 52 This will show as ‘off’, ‘searching’, ‘locked in’ or ‘no signal’. Network Status: whether the tracker is communicating via GSM (2G or 4G). This will show as ‘off’, ‘searching’, ‘connected’ or ‘no signal. Page LightBug User Manual...
-
Page 53: Settings
Configuration The Configuration page will allow you to update your tracker’s settings. You can find a step-by-step guide on how Page LightBug User Manual... -
Page 54: Notifications
Configuration section of this User Manual. Notifications The Notification page allows you to manage your alerts and notifications. Page LightBug User Manual... - Page 55 Page LightBug User Manual...
-
Page 56: Status Alerts
Tampering is detected alert will trigger when possible device tampering is detected. Delivery To update how you are notified, you will need to go to the Account tab. There you can enable mobile push notifications, email alerts and API push notifications. Page LightBug User Manual... -
Page 57: Zones
You can set up alerts for when your device enters/leaves this specific area. Tags This feature enables you to create tags for your trackers so that the tags appear on your device list, reports and help you with future searches. Page LightBug User Manual... - Page 58 Page LightBug User Manual...
-
Page 59: Data Plan
Data Plan The Data Plan page allows you to manage your trackers, subscription and billing information. Page LightBug User Manual... -
Page 60: Updating Billing Information
Updating billing information If you wish to update your billing details, you can do so here. Page LightBug User Manual... - Page 61 Enter the card details of the account you now wish to be billed from. Remember to tap ‘save’ so that your new billing information is updated. Page LightBug User Manual...
-
Page 62: Adding More Trackers To Your Account
‘Add new device’. Enter the serial number of the device and click ‘Add’. If you would like to update the settings of this tracker, follow the steps outlined here. Page LightBug User Manual... -
Page 63: Changing Data Plan
Select the plan that you would like the device to be on. Note: The Standard Data Plan will allow for up to 6 location updates per day and the motion detection feature will be disabled. This plan is designed for long-term asset tracking. Page LightBug User Manual... - Page 64 Page LightBug User Manual...
-
Page 65: Deactivating Your Tracker
Deactivating your tracker If you would like to stop any further billing, follow these simple steps: Page LightBug User Manual... - Page 66 The pop-up will prompt you to confirm that you would like to cancel the service. Page LightBug User Manual...
-
Page 67: Reactivating Your Tracker
Reactivating your tracker If you would like to reactivate your tracker, follow these simple steps: You will see a selection of data plans and their prices. Select the plan that you would like the device to be on. Page LightBug User Manual... -
Page 68: Reports
Reports Reports are a great tool to get meaningful data from the location history. You can access the Reporting tab by clicking here: Page LightBug User Manual... -
Page 69: General Reports
6) Speeding Report: This report allows you to set the maximum speed for each tracker and display all the instances where the maximum speed has been exceeded. Page LightBug User Manual... -
Page 70: Zone Reports
(idling) and stationary with ignition off. 2) Vehicle Summary: This is a summary report showing: ➢ Number of trips ➢ Total trip time and average ➢ Total trip distance and average Page LightBug User Manual... -
Page 71: Sensor Reports
This shows the battery voltage over time and the number of points sent during a selected timeframe. Note: You can also see a graphical representation of this data by clicking on this icon on the tab: Page LightBug User Manual... -
Page 72: Setting Up Automatic Report Delivery
Setting Up Automatic Report Delivery Automatic reports can be emailed to you for all the devices on your account by following the steps below: 1) Choose the report type. 2) Click on the mail icon. Page LightBug User Manual... - Page 73 Page LightBug User Manual...
- Page 74 3) Enable automatic route reports and complete the required information. To save the automatic report delivery, click ‘done’. Page LightBug User Manual...
-
Page 75: Exporting Reports
4) Confirm the details of the scheduled report delivery by clicking ‘save’. Exporting Reports You can export Reports by following the steps below: 1) Choose the report type. 2) Click on the highlighted The report will download as an Excel file. Page LightBug User Manual... -
Page 76: Notifications
Notifications The notifications tab allows you to see a log of the notifications triggered within the selected dates and times. Page LightBug User Manual... -
Page 77: Account
Account My Account This tab allows you to set account preferences, delete your data or change your password. Page LightBug User Manual... -
Page 78: Preferences
Hide Wi-Fi Locations: Hide the Wi-Fi-based locations that the tracker has collected. Please note this option is only available for certain trackers. This option will not stop the tracker from sending these locations, it will only stop displaying them. Page LightBug User Manual... -
Page 79: Details
If you wish to update your email address, you will need to contact us directly. To update your billing information, click . This will redirect you to the Settings page. You can find steps on how to update your billing information here. Page LightBug User Manual... -
Page 80: Log Out
You can add a new device to your LightBug account by clicking . You can find the steps to add a new device here. Log Out This will log you out of your account. Page LightBug User Manual... -
Page 81: Notifications
Notifications Customise how you would like to be notified of alerts. Page LightBug User Manual... - Page 82 Enabling ‘Mobile Push’ will send alerts as notifications to your smartphone. Caution: Mobile Push alerts do not work for the web portal. You will need to download the LightBug App on your smartphone for this to work. Enabling ‘Email’ will allow you to set which email you would like to receive the alerts on.
-
Page 83: Change Account Password
Change Account Password Here you can change your password. Note: If you have forgotten your password or you are having any difficulty with this, please contact us. Page LightBug User Manual... -
Page 84: Geofences
Geofences Here you can view, edit and delete all your geofence (also known as GPS safe-zones). Create a Geofence To create a new geofence, click on the icon. Page LightBug User Manual... - Page 85 ➢ Is outside the geofence ➢ Is inside the geofence ➢ Crosses the boundary of the geofence Additional Conditions: You can add conditions where an alert will only be triggered if these conditions are met. Page LightBug User Manual...
- Page 86 Devices Here you can enable the alert for all devices on your account. Alternatively, you can enable the alert for specific trackers only by selecting the required tracker. This tracker will be added to the selection. Page LightBug User Manual...
- Page 87 Boundary Here is where you create the geofence. Just follow the simple steps below: 1. Locate the area you would like the geofence to be. You can use the search bar to help you with this. Page LightBug User Manual...
- Page 88 2. Choose the shape of geofence 3. Tap the Map to add points and create your geofence. The safe zone can be a standard or custom irregular shape by joining up the points. Page LightBug User Manual...
- Page 89 4. Click the first point in the geofence to confirm the shape. The geofence will turn blue to confirm that it is now saved. Page LightBug User Manual...
-
Page 90: Delete Geofence
Delete Geofence If you wish to delete a geofence, click. Edit Geofence Edit the geofence and make the needed changes by following the steps outlined above. Page LightBug User Manual... -
Page 91: How Things Work Under The Hood
How Things Work Under the Hood How the Location Technologies Work LightBug trackers utilize three location technologies in this order: 1) GNSS location: This is the most accurate location type utilises satellites different constellations: GPS, GLONASS, Galileo, Beidou for the best accuracy). It requires a direct line of sight with the sky to work. -
Page 92: Simple Troubleshooting
This will not affect your saved settings. How long you press and hold the button on your Lightbug tracker affects the actions performed. Quick Button Press... - Page 93 15 Second Button Press Pressing and holding the button for 15 seconds will force a hard reset (this will update any pending settings, but not affect saved settings). This button press recommended facing network related Page LightBug User Manual...
-
Page 94: Why Are Location Updates Not Instant
Force a location update (hold tracker button for 3 seconds) Perform a reset (hold tracker button for 15 seconds) Ensure the tracker is in an area with good GSM coverage Place the tracker outside for 5 minutes after completing all the above Page LightBug User Manual... - Page 95 Where the tracker is mounted: with a clear line of sight with the sky, the tracker will use less power per location update Is the tracker indoors? If the tracker is indoor, more power will be used as the tracker will try to look for Page LightBug User Manual...
- Page 96 Motion sensitivity: maybe your tracker is sending more location updates than it should because the motion sensitivity is too high. This usually occurs when the tracker is stationary but still sending location updates. Reduce the motion sensitivity via your flexible configurations page. Page LightBug User Manual...
Need help?
Do you have a question about the Zero and is the answer not in the manual?
Questions and answers