Table of Contents
Advertisement
Available languages
Available languages
Quick Links
Advertisement
Table of Contents

Related Manuals for eKuore EK3011


Summary of Contents for eKuore EK3011
- Page 1 Pulse oximeter User Manual EK3011...
- Page 2 ESPAÑOL...
- Page 3 Se puede usar tanto en operaciones, como en post-operatorios, durante la hospitalización para monitorizar al paciente y conocer su estado en todo momento. El pack incluye: • eKuore Pulse oximeter [EK3011] • Sensor SpO • 2 pinzas [-] • Funda [-]...
- Page 4 ESPAÑOL ADVERTENCIAS • El pulsioxímetro está pensado sólo como un complemento en la evaluación del paciente. Debe utilizarse cuando el paciente presenta signos y síntomas clínicos. El dispositivo no está destinado a ser utilizado como tratamiento. • Cuando se utiliza el pulsioxímetro junto con el equipo de cirugía eléctrica, el usuario debe prestar atención y garantizar la seguridad del paciente. •...
- Page 5 ESPAÑOL • Nunca utilice agentes de limpieza/desinfección distintos de los recomendados. • Por favor, corte la corriente antes de limpiar el pulsioxímetro. Nunca permita que se desinfecte el pulsioxímetro a alta presión y temperatura • AVISO • No coloque el sensor de SpO2 en las extremidades con un catéter arterial o una jeringa venosa. •...
-
Page 6: Dispositivo Y Accesorios
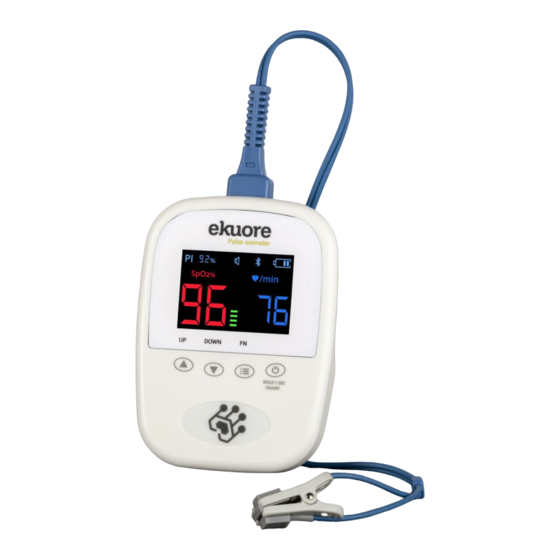
ESPAÑOL Dispositivo y accesorios Enchufe sensor SpO con pinza Pulsioxímetro Alarmas Bluetooth Valor del índice Estado de de perfusión la batería Valor PR Valor de SpO 2. Abajo 3. Botón función (FN) 4. Botón encendido* 1. Arriba Indicador del pulso cardiaco *Apagado: mantener pulsado durante 3 segundos... - Page 7 ESPAÑOL Preparar el dispositivo Montaje Colocación al paciente 1. Introduce la conexión del sensor en el enchufe del Coloque el sensor en la parte correcta del cuerpo del paciente pulsioxímetro. (oreja o lengua). 2. Coloque las pilas (Ver apartado “Colocación de las pilas“).
-
Page 8: Descargar La Aplicación
ESPAÑOL Descargar la aplicación Descargue la APP “eKuore Vet” de forma totalmente gratuita en su smartphone o tablet. Para descargarla busque eKuore Vet App. Conexión Bluetooth El icono Bluetooth de la pantalla indica el estado de la conexión. si el icono Bluetooth: No se muestra Bluetooth no está... -
Page 9: Primera Conexión
ESPAÑOL Primera conexión 1. Abra “eKuore Vet” app. 2. Pulse el botón de encendido. Si todavía no ha conectado el sensor al pulsioxímetro, conéctelo y coloque la pinza al paciente como se explica en la sección “Preparara el dispositivo”. Asegúrese de que el Bluetooth está activado en ambos dispositivos para una correcta conexión. -
Page 10: Funciones Principales
ESPAÑOL Funciones principales Hospitalización Operación Este modo sirve para monitorizar al paciente durante el Este modo se usa durante las operaciones, saltarán alertas postoperatorio. Controla los niveles de saturación de oxígeno visuales y sonoras como en el modo hospitalización, cuando en sangre y la frecuencia cardiaca, cuando los niveles estén los niveles estén fuera del rango configurado. - Page 11 ESPAÑOL Configuraciones Desde el dispositivo Mantenga presionado el botón FN para entrar en el modo Configuración. Puede configurar un total de siete parámetros. Para seleccionar los diferentes parámetros, pulse el botón FN. Pulse los botones de “Arriba” y “Abajo” para escoger los valores de cada parámetro.
-
Page 12: Colocación De Las Pilas
ESPAÑOL Colocación de las pilas 1. Empuje hacia la derecha la barra de bloqueo y abra la tapa de las pilas. 2. Coloque las pilas haciendo coincidir los símbolos “+“ y “-“ de las pilas con los del dispositivo. 3. Cierre con la tapa de las pilas. Es importante que coloque bien los electrodos negativos y Barra de bloqueo positivos de las pilas. -
Page 13: Limpieza Y Desinfección
ESPAÑOL Limpieza y desinfección Limpieza 1. Limpie el pulsioxímetro con un paño suave o de algodón humedecido con agua. 2. Seque el exceso de agua con un paño suave. 3. Deje el dispositivo secar al aire. Desinfección Los desinfectantes recomendados son: 70% etanol, 70% isopropanol, desinfectantes con solución glutaraldehído (2%). -
Page 14: Solución De Problemas
ESPAÑOL Solución de problemas PROBLEMA POSIBLE MOTIVO SOLUCIÓN 1. Instalación incorrecta del sensor de SpO2 o 1. Coloque el sensor adecuado en el lugar correcto del colocación incorrecta del sensor en el paciente. paciente e inténtelo de nuevo. El SpO2 y PR no se 2. - Page 15 +5~+40ºC inalámbrica (Distancia menor de 10m) Transporte y almacenaje -10~+50ºC Humedad Funcionamiento 15%~80% (sin condensación) Transporte y almacenaje 10%~90% (sin condensación) Presión atmosférica Más información sobre garantía en www.ekuore.com/garantia Funcionamiento 860hPa~1060hPa PRODUCTO PARA USO EXCLUSIVO VETERINARIO Transporte y almacenaje 700hPa~1060hPa...
- Page 16 ENGLISH...
- Page 17 It can be used in both operations and postoperative during hospitalization to monitor the patient’s condition. The pack includes: • eKuore Pulse oximeter [-] • SpO sensor [-] • 2 clamps [-] • Case [-]...
- Page 18 ENGLISH CAUTION • The pulse oximeter is intended only as an adjunct in the patient assessment. It should be used when the patient presents clinical signs and symptoms. The device is not intended to be used as a treatment. • When using the pulse oximeter together with the electrical surgery equipment, the user must pay attention and ensure the safety of the patient. •...
- Page 19 ENGLISH • Never use cleaning agents/disinfectants other than the recommended. • Please shut off the power before clean the pulse oximeter. Never permit high-pressure and high-temperature disinfection of the pulse oximeter. NOTICE • Do not place the SpO2 sensor in the extremities with an arterial catheter or a venous syringe. •...
-
Page 20: Device And Accessories
ENGLISH Device and accessories Socket sensor and clamp Pulse oximeter Buzzer Bluetooth Perfusion Battery index value status PR value value 2. Down button 3. Function (FN) button 4. Power button* 1. Up button Pulse rate indicator *Power off: hold the button for 3 seconds... -
Page 21: Preparing The Device
ENGLISH Preparing the device Assembly Application to the patient 1. Insert the plug of the sensor into the socket of the pulse Install the sensor on the appropriate part of the patient’s body oximeter. (tongue or ear). 2. Put the batteries. (Read the “Battery installation“ section) -
Page 22: Download The App
ENGLISH Download the App Download the “eKuore Vet” App for free on your smartphone or tablet. To download, search for eKuore Vet App. Bluetooth connection The Bluetooth icon displayed on the screen shows the status of the connection. If the Bluetooth icon: Not displayed Bluetooth is enabled. -
Page 23: First Connection
3. Accept the terms of use and privacy policy. 4. Log in with your Apple (iOS) or Google (Android) account. In the app’s main menu, a list of eKuore veterinary devices will be displayed. 5. Find pulse oximeter in the device list and tap on ‘Connect’. -
Page 24: Main Functions
ENGLISH Main functions Hospitalization Operation This mode is used to monitor the patient during the This mode is used during operations, visual and audible alerts postoperative period. It controls blood oxygen saturation levels will jump, as in hospitalization mode, when levels are outside and heart rate. - Page 25 ENGLISH Settings From the device Hold the FN button for system displays Settings interface. You can set a total of seven parameters. To browse through the different parameters, press the “FN” button. Press the “UP” and “DOWN” button to choose the values for each Parameter 2.
-
Page 26: Battery Installation
ENGLISH Battery installation 1. Push the locking bar to the right, and then open the battery cover. 2. Install batteries into the slots per the “+” and “-” symbol. 3. Put the battery cover. You must correctly install the positive and negative electrodes of batteries. -
Page 27: Cleaning And Disinfection
ENGLISH Cleaning and disinfection Cleaning 1. Clean the pulse oximeter with cotton or soft cloth moistened with water. 2. Dry the excess of water with a soft cloth. 3. Allow the pulse oximeter to air dry. Disinfection The recommended disinfectants include: 70% ethanol, 70% isopropanol, glutaraldehyde (2%) solution disinfectants. -
Page 28: Troubleshooting
ENGLISH Troubleshooting TROUBLE POSSIBLE REASON SOLUTION 1. Improper SpO2 sensor installation or 1. Please attach the proper sensor to the incorrect sensor placement on the animal. proper site on the animal and try again. The SpO2 and PR can’t be 2. - Page 29 Bluetooth Class II Operation (Distance less than 10m) Transportation and storage -10~+50ºC Humidity Operation 15%~80% (noncondensing) Transportation and storage 10%~90% (noncondensing) Atmospheric pressure Operation 860hPa~1060hPa More information about warranty at www.ekuore.com/en/warranty EXCLUSIVE USE FOR VETERINARY FIELD Transportation and storage 700hPa~1060hPa...
- Page 30 Pulse oximeter w w w. e k u o r e . c o m info@ekuore.com +34 961 156 738 ANDROID...
Need help?
Do you have a question about the EK3011 and is the answer not in the manual?
Questions and answers