Table of Contents
Advertisement
Quick Links
Item #1005 588 347
1005 588 364
Model #CX242DDWTEVB
CX30BD-2SPDEVB
USE AND CARE GUIDE
WHOLE HOUSE FANS
CX30BD-2SPDEVB
CX242DDWTEVB
Questions, problems, missing parts? Before returning to the store,
call Everbilt Customer Service
8 a.m. - 7 p.m., EST, Monday - Friday, 9 a.m. - 6 p.m., EST, Saturday
1-877-527-0313
HOMEDEPOT.COM
THANK YOU
We appreciate the trust and confidence you have placed in Everbilt through the purchase of this whole house fan. We strive to
continually create quality products designed to enhance your home. Visit us online to see our full line of products available for your
home improvement needs. Thank you for choosing Everbilt!
Advertisement
Table of Contents

Related Manuals for Everbilt CX242DDWTEVB


Summary of Contents for Everbilt CX242DDWTEVB
- Page 1 THANK YOU We appreciate the trust and confidence you have placed in Everbilt through the purchase of this whole house fan. We strive to continually create quality products designed to enhance your home. Visit us online to see our full line of products available for your...
-
Page 2: Table Of Contents
Care and Cleaning ....... . . 13 Package Contents – CX242DDWTEVB ....4 Package Contents –... -
Page 3: Warranty
Warranty The manufacturer extends this warranty to the original retail purchaser of its model or, if this unit is purchased and installed by a new home builder, then to the original owner of the home. No subsequent purchaser of the unit or of a home in which it is installed is entitled to any of the benefits of this warranty. -
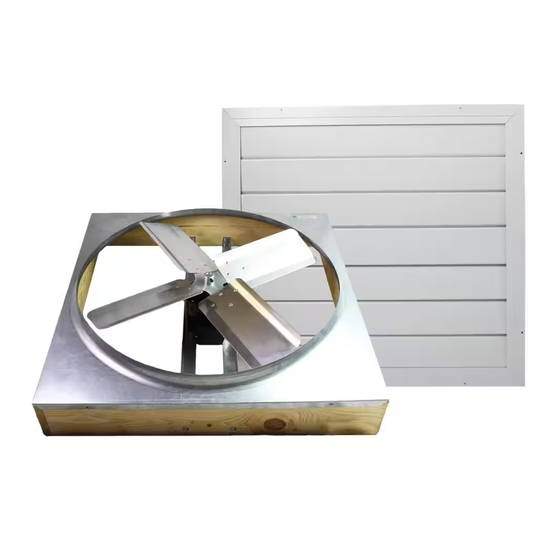
Page 4: Package Contents - Cx242Ddwtevb
Part Description Part Description Part Description CX30BD-2SPDEVB fan ON/OFF switch Switch plate cover Shutter assembly HIGH/LOW switch Wood screws PACKAGE CONTENTS – CX242DDWTEVB Part Description Part Description Part Description CX242DDWTEVB fan ON/OFF switch Switch plate cover Shutter assembly HIGH/LOW switch... -
Page 5: Deciding On A Joist-In Or Joist-Out Installation
Model Number Fan Size Shutter Rough Opening Attic Space Required Net Free Exhaust Area (L X W) (Minimum) (Minimum) CX242DDWTEVB 24 in. 28 X 26 in. 1,200 sq. ft. 8-10 sq. ft. CX30BD-2SPDEVB 30 in. 32-1/4 in. X 29-1/2 in. -
Page 6: Installation - Joist-In
Installation - Joist-in Preparing the shutter opening Cutting the shutter opening □ Find a spot in the center of the hallway, drill a hole and □ Cut through the ceiling along the lines using a circular saw. feed a wire through to mark it. Measure the depth of the drywall and adjust the saw so you only cut the drywall and avoid the joists. - Page 7 Installation - Joist-in (continued) Preparing and installing the fan assembly CX242DDWTEVB (DIRECT DRIVE) CX30BD-2SPDEVB (BELT DRIVE) □ Remove the fan blade and wire the motor first. See Step 7 □ Remove the hardware and remount the motor on the top on page 8.
- Page 8 Installation - Joist-in (continued) Wiring the fan GROUND IMPORTANT: All wiring supplies and installations must meet HIGH or exceed the requirements of local electrical and fire codes. Wire the fan to a 120 V, 60 Hz circuit only, using 14-3 two- conductor wiring with ground.
-
Page 9: Installation - Joist-Out
Installation - Joist-out Preparing the shutter opening Cutting the shutter opening □ Find a spot in the center of the hallway, drill a hole and □ Cut through the ceiling along the lines using a circular saw. feed a wire through to mark it. Measure the depth of the drywall and adjust the saw so you only cut the drywall and avoid the joists. - Page 10 Installation - Joist-out Framing the shutter opening Installing the facing □ Use lumber of the same dimensions as your ceiling joists □ Use 2 X 6 boards to create a square with the inside and fasten the boards to the edges of the frame opening dimensions being the same distance as the shortest using #12D nails.
- Page 11 Installation - Joist-out (continued) Preparing and installing the fan assembly CX242DDWTEVB (DIRECT DRIVE) CX30BD-2SPDEVB (BELT DRIVE) □ Remove the fan blade and wire the motor first. See Step 8 □ Remove the hardware and remount the motor on the top on page 12.
- Page 12 Installation - Joist-out (continued) Wiring the fan GROUND IMPORTANT: All wiring supplies and installations must meet HIGH or exceed the requirements of local electrical and fire codes. Wire the fan to a 120 V, 60 Hz circuit only, using 14-3 two- conductor wiring with ground.
-
Page 13: Operation
Operation Whole House Fans cool your home by pulling in fresh, cooler air from outside through open windows and doors. For the best operation and most efficient cooling in a multi-story home, open windows on alternate levels. CAUTION: NEVER operate the fan without open windows or doors. -
Page 14: Troubleshooting
Troubleshooting Problem Solution □ Ensure that there is a proper electrical connection. The fan will not turn on. □ Check the breaker in the main fuse panel. □ Ensure that the belt is intact and/or installed (CX30BD-2SPDEVB belt-drive unit only). □... - Page 16 Questions, problems, missing parts? Before returning to the store, call Everbilt Customer Service 8 a.m. - 7 p.m., EST, Monday-Friday, 9 a.m. - 6 p.m., EST, Saturday 1-877-527-0313 HOMEDEPOT.COM Retain this manual for future use.
Need help?
Do you have a question about the CX242DDWTEVB and is the answer not in the manual?
Questions and answers