Table of Contents
Advertisement
Quick Links
Advertisement
Table of Contents

Related Manuals for i4Technology BugHunter Professional BH-03


Summary of Contents for i4Technology BugHunter Professional BH-03
-
Page 2: Table Of Contents
CONTENTS 1 Specification and operation ........................ 5 1.1 Application area ........................... 5 1.2 Technical features ........................6 1.3 Device components ........................7 1.4 Internal design and operating ....................... 7 2 Correct use ............................10 2.1 Operating restrictions ........................10 2.2 Before operating .......................... 10 2.3 Intended usage .......................... - Page 3 Main advantages of BugHunter BH-03 over similar devices 1. The declared and real characteristics of the device are in strict conformity. 2. It covers the entire range of wireless “bugs” working frequencies (from 10 to 3500 MHz). 3. High sensitivity (throughout all the frequencies of the claimed frequency range). 4.
- Page 4 Attention! Read carefully and follow the rules, restrictions and instructions contained in this manual to increase the lifespan of the equipment and to use it more effectively. The manufacturer's warranty will become invalid prematurely if the user of the equipment does not follow the storage and transportation instructions.
-
Page 5: Specification And Operation
1 Specification and operation Application area 1.1.1 This device allows users to monitor the signal strength ranging from 10 to 3500 MHz and can also be used to detect transmitting devices, such as “bugs”, wireless microphones, wireless spy cams, portable radio sets, working cellphones, cellular signal killers and suppressors, etc., within the area nearby. -
Page 6: Technical Features
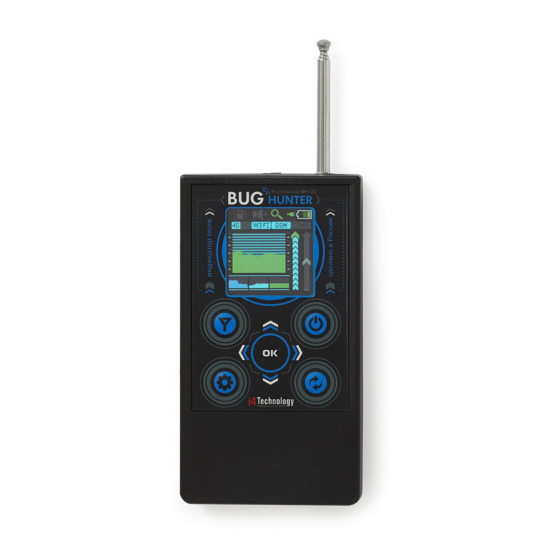
1.2 Technical features 1.2.1 The Picture 1 below illustrates the physical configuration of the product. Pic. 1. Physical configuration 1.2.2 The table below gives the information about technical features of the product. Description Value 105х58х18,5 Dimensions, mm, not more than Weight with batteries, kg, max 0,11 DC supply voltage (two AAA batteries), V... -
Page 7: Device Components
- from 2 accumulators of ААА type (2400 mA/h) 1.3 Device components 1.3.1 The table below gives the information of components of the product and the delivery set. № Description Quantity Note BugHunter Professional BH-03 Accumulator of ААА type installed Charging unit Power cord Earphones Shipping box User manual INTK.411153.006 RE... - Page 8 micro-USB connector (item 6) for the charging unit are placed in the case. Picture 2 illustrates the main parts scheme. Pic. 2. Scheme of main components 1.4.2 Picture 3 illustrates the display in the “search mode” During the measurement process, the average (item 1) and peak (item 2) values of the received signal strength are being constantly displayed on the screen.
- Page 9 At the same time the device displays on the screen the filter state (switched on/off, item 7), vibroindication state (switched on/off, item 8), adjusted sound mode (mute, sound indication or feedback, item 9), current operating mode (“search” or “security”, item 10), and the selected type of power supply (item 11).
-
Page 10: Correct Use
2 Correct use 2.1 Operating restrictions 2.1.1 Keep the battery compartment and battery contacts clean. 2.1.2 Change discharged batteries and recharge accumulators on time. Before recharging accumulators installed into the product’s case, ensure that there are 2.1.3 rechargeable batteries not the galvanic batteries installed. It’s prohibited to charge the galvanic batteries, you must renew them. - Page 11 Pic. 6. Screen in the “search” mode 2.3.2 User settings 2.3.2.1 Filters adjustment This option allows user to reduce the interference of Wi-Fi access points and cellular stations signals, making the search of radio transmitting devices easier. - Press button to display the main menu screen (Pic. 7); Pic.
- Page 12 - return to the main menu by pressing «◄» button to continue adjustment or to quit right to the “search” mode by short pressing button button. Pic. 8. Filters adjustment Notification: 1. There is button to gain quick access to this option (avoiding main menu). 2.
- Page 13 Pic. 9. Sound adjustment - you can choose one of three available sound modes by pressing «▲» and «▼»; - confirm the selection of another sound mode if it’s needed by pressing button, after doing this the selected bar will glow; - return to the main menu by pressing «◄»...
- Page 14 - return to the main menu by pressing «◄» button to continue adjustment or to quit right to the “search” mode by short pressing button or button. Pic. 10. Power supply selection Notification: The selected type of power supply is displayed in the top bar of the screen: - rechargeable type of power supply (accumulator) is selected, the charging is possible (the plug lights green);...
- Page 15 - you can select one of three available timeout values by pressing «▲» button or«▼» button; - confirm the selection of another timeout value by pressing button, after doing this the selected bar will glow; - return to the main menu by pressing «◄» button to continue adjustment or to quit right to the “search”...
- Page 16 - vibroindication is on; - vibroindication is off. 2.3.3.2.6 Quick guide - Press and hold button for 2 seconds to call the help menu. Text information shown in the Picture 13 will be displayed on the screen; To perform Filter button, Main screen automatic Mode change button,...
- Page 17 Pic. 14. Switching to the “security” mode notification Next you’ll see the animation displayed within the graphs drawing zone. After animation the screen will turn off. Pic. 15. Switching to “security” mode animation When the device is in the “security” mode, the notification appears on the screen periodically (Pic.16): Pic.
- Page 18 Pic. 17. Notification of switching to the “search” mode 2.3.3.2 “Search” mode 2.3.3.2.1 Graphical presentation of information “Search” mode is the main operating mode used to search for radio transmitting devices indoors. Main elements of “search” mode graphic interface are shown in the picture 18. Pic.
- Page 19 Pic.18) is for storing and displaying radio environment condition for longer period of time (45 seconds). For your convenience the history graph is divided into three 15 seconds blocks. 2.3.3.2.2 Sensitivity and vibroindication engagement threshold adjustment Within the searching process you will need to adjust the device sensitivity (scale item 4, Pic. 18) and (if needed) the vibroindication engagement threshold (scale item 6, Pic.
- Page 20 maximum appears, reduce sensitivity further and search the location of closer distance of 5.. 10 cm to find the location of the signal source more accurately. Picture 19 illustrates the typical view of the screen while approaching to the radio transmission source if this method is used. Pic.
- Page 21 Pic. 20. Digital transmitter in work In this case decrease the sensitivity by pressing «▼» button to the level on which the blue graph of peak values doesn’t “go into overdrive”. You may also fold down the antenna completely or partially.
-
Page 22: Maintenance
3 Maintenance Keep the product clean. Periodically remove the dust by dry and clean cloth. Keep the product from strokes and mechanical damage. Recharge accumulators timely. The power level is indicated by the filling level and the color of battery sign located in the top bar of the screen. You should charge the accumulators as follows: Plug the supplied charger to the device jack (item 6, Pic.2) using supplied cord. -
Page 23: Package And Transportation
5 Package and transportation Every Product delivery set (see Table 2) is packaged in individual corrugated fiberboard box. The moving of contents of the box is not allowed. The packaged products are put into cargo corrugated containers according to the GOST 22637. Packaged products can be transported by train or by trucks in covered trucks or containers or by air transport in pressurized modules. -
Page 24: Acceptance Certificate
Bug Detector BugHunter Professional BH-03 6 Acceptance certificate Anti-spy bug detector BugHunter Professional BH-03‚ 4224-002-64062607-2011 Serial number_______________ Date of manufacture_______________ is manufactured and accepted according to the valid technological documents and considered exploitable. QC stamp _______________ 7 Manufacturer’s warranty 7.1 Manufacturer warrants that the Product satisfies the requirements of the TC 4224-002- 64062607-2011 under observance of operation, storage and transportation regulations indicated on exploitative documents. -
Page 25: Warranty Card
8 Warranty Card Product name: Anti-spy bug detector BugHunter Professional BH-03 Manufacturing number ______________________________________________________________________ Manufacture date ______________________________________________________________________ QC stamp ___________________________________________________________________________ Sale Date _________________________________________________________________________ Vendor’s stamp and signature ______________________________________________________________ The customer does not have any claims on quality of the Product and the contents of delivery.
Need help?
Do you have a question about the BugHunter Professional BH-03 and is the answer not in the manual?
Questions and answers