Table of Contents
Advertisement
Quick Links
Advertisement
Table of Contents

Subscribe to Our Youtube Channel
Related Manuals for Xomax S64


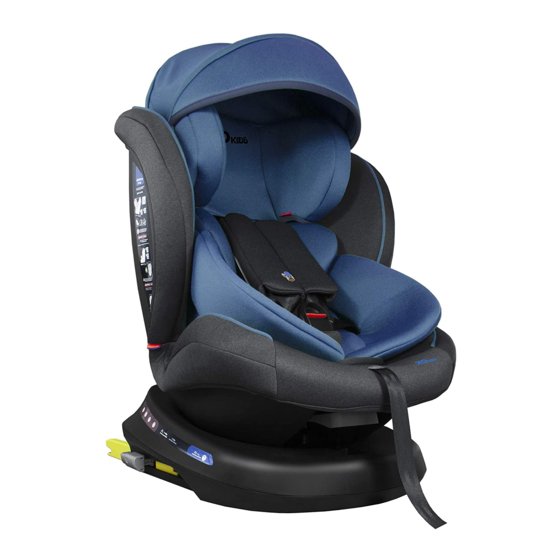
Summary of Contents for Xomax S64
- Page 1 CHILD RESTRAINT SYSTEM PRODUCT TYPE: S64 0+I II III 0-36kg...
-
Page 2: Table Of Contents
INSTRUCTION 6.1.2 Installed in Rearward Facing Position with 1.Notice..............ISOFIX and Top Tether Group 0+I(0-18kg)..... 20 2.Structure Name............. 6.2 Installed in Forward facing position....22 3.Product Information..........6.2.1 Group I(9-18kg)..........22 4.Warning..............6.2.1.1 Installed in Forward facing position with Belt 5.Safety Seat Use Method........ -
Page 3: Notice
INSTRUCTION 1.NOTICE Only suitable if the approved vehicles are fitted with lap/3 point/static/with retractor safety-belts, approved to UN/ECE Regulation No. 16 or other This child restraint is classified for “Semi-universal” 1. This is an ISOFIX CHILD RESTRAINT equivalent standards. This is a “Universal” child restraint. It is approved to use and is suitable for the seat positions of SYSTEM. -
Page 4: Structure Name
INSTRUCTION 3.PRODUCT INFORMATION 2.STRUCTURE NAME This product is a 360 degree rotating child restraint system. The following information can help you better understand this Headrest product. Height Adjuster Tested and approved according to ECE R44/04 Headrest Belt Guidance Harness connector Seat Cover Body Weight Installation method... -
Page 5: Warning
INSTRUCTION 4.WARNING NEVER use this child restraint with any other base Make sure any straps holding the restraint to the DO NOT use the child restraint system without the except ones that the manufacturer permits. IMPORTANT! Please carefully read and make vehicle should be tight.Any straps restraining the child cover. -
Page 6: Safety Seat Use Method
INSTRUCTION 5.SAFETY SEAT USE METHOD 5.1.2 When using as Semi-Universal category 5.2 How to use the harness buckle 5.1 Install Location (Group 0+I II III), this child restraint system is Hold the two buckle tongues together. 5.1.1 When using as Universal categort (Group 0+ I II III), suitable for seat belt models equipped with the Make sure the right side is up. -
Page 7: Adjust The Height Of Headrest And Shoulder Belts
INSTRUCTION 5.4 Adjust Safety Belt Lengthen 5.3 Adjust the height of headrest and shoulder belts A Tighten Safety Belt Pull up shoulder belt and the lap belt will If the height of headrest or shoulder belt is tighten, then pull crotch belt to tighten safety inconsistent with the required height, Pull the belt. -
Page 8: Adjust The Seat Rotation Angle
INSTRUCTION When the seat is rotated to 90 , as shown in figure a, 5.5 Adjust the seat rotation angle 5.6 Adjust the Angle of the Child Safety Car Seat the child can be placed on the safety seat. Press the rotate button to rotate the child safety seat Pull the recline handle up which is in the bottom of body NOTE! The car cannot be placed in this position when 360 degrees. -
Page 9: Removing 5-Point Harness, Sleeping Pad And 5-Piont Harness
INSTRUCTION 5.7 Removing 5-Point Harness , sleeping pad and 5-piont harness Installation of Step 1: Turn the child safety seat to the back, Installation of forward facing rearward facing According to the sequence of in picture A, the two shoulder belts from the metal link. Group 0+I(0-18kg) Group I(9-18kg) Remove the shoulder belt from the harness connector,... -
Page 10: Removing The Fabric Cover
INSTRUCTION 5.8 Removing Triangle Pad and 5.9 Removing the Fabric Cover Step 2: push the buckle down from the front of the seat, angle. Later fix the seat in the rearward facing position. Sleeping Pad and lift the cushion cloth cover, 1. -
Page 11: Installed In Rearward Facing Position With Isofix And Top Tether Group 0+I(0-18Kg)
INSTRUCTION Note: Once the safety belt of some models is 6.1.2 Installed in Rearward Facing Position with pulled out a certain length, If you need to increase ISOFIX and Top Tether the pull-out length, it will not be achieved. Group 0+I(0-18kg) In this case, the seat belt must be fully rolled up Put the ISOFIX insert guide into the two ISOFIX and pulled out again to the required length. -
Page 12: Installed In Forward Facing Position
INSTRUCTION 6.2 Installed in Forward facing position Pull out the top tether,and press the release Another Side along upper inside. Lap belt pass 6.2.1 Group I(9-18kg) button, pull the top tether long enough to hang the through Belt Guidance on both sides. 6.2.1.1 Installed in Forward facing position with Belt latch on the back of the car seat. -
Page 13: Group Ii Iii(15-36Kg)
INSTRUCTION 6.2.2 Group II III(15-36kg) First pull out the belt from the belt ALR. Diagonal belt through the same side of belt guidance , lap belt 6.2.2.1 Installed in forward facing position with ISOFIX through the same side of belt guidance , then pull connector and Belt or only Belt the diagonal belt and lap belt together through another... -
Page 14: Installed In Forward Facing Position With Isofix Connector, Belt And Top Tether
INSTRUCTION 7. CARE AND MAINTENANCE 6.2.2.2 Installed in forward facing position with ISOFIX First pull out the belt from the belt ALR. Diagonal belt connector, Belt and Top Tether through the same side of belt guidance , lap belt Periodically inspect your child seat for worn or Put the ISOFIX insert guide into the two ISOFX through the same side of belt guidance , then pull... -
Page 15: Main Technical Parameter
INSTRUCTION CLEANING THE HARNESS AND SHELL 8.MAIN TECHNICAL PARAMETER Sponge clean using warm water and mild soap; do Length not use any other cleaning agents. Width: 440mm STORAGE Height: 577-774mm Store in a safe, dry place and away from heat and direct sunlight.
Need help?
Do you have a question about the S64 and is the answer not in the manual?
Questions and answers