Table of Contents
Advertisement
XM-KI360
ISOFIX child seat with
top tether
Groups 0, I, II and III.
For babies and children
from 0 to 36 kg.
Manual
Attention
Please read all instructions before using the child car seat and
always keep this in place so that the safety of your child will
not be compromised. Your XOMAX Customer service or your
specialist dealer can be contacted for questions regarding the
Child seat gladly for you there.
Advertisement
Table of Contents

Related Manuals for Xomax XM-KI360


Summary of Contents for Xomax XM-KI360
- Page 1 Please read all instructions before using the child car seat and always keep this in place so that the safety of your child will not be compromised. Your XOMAX Customer service or your specialist dealer can be contacted for questions regarding the...
-
Page 3: Table Of Contents
XM-KI360 Introduction INTRODUCTION.............2 Important safety instructions ........3 Overview ............... 7 Positioning ............... 8 Installation ..............9 ISOFIX and Top Tether Installation ....... 9 Rotate child seat up to 360° ........11 Installation group 0 ( up to 10 Kg) ....... 12 Installation Group I (9-18 Kg) ...... -
Page 4: Introduction
XM-KI360 Introduction Thank you for choosing to purchase a XOMAX I'll tell you what we've decided about the child seat. This child seat is designed for babies and children up to 36Kg and complies with the ISOFIX standard Groups 0, I, II and III. -
Page 5: Important Safety Instructions
XM-KI360 Important safety instructions Make sure to install the child seat only as follows in the notes. To ensure the safety to ensure your child's safety, please read all of the Notes in this manual and the notes in the Your vehicle's installation manual of child restraint systems carefully. - Page 6 XM-KI360 Please also observe the safety instructions on the » Use of child restraint systems in the Operating manual of your vehicle. Attention: A proper fastening of the » child seat is unavoidable, otherwise there is no Danger to life.
- Page 7 XM-KI360 The lap belt must be pulled down correctly. » to provide a secure foothold. Before each journey, make sure that the child seat » is permanently installed, nothing wobbles and no parts are trapped by the door or other seats.
- Page 8 XM-KI360 It's not advisable to use a child seat to buy, because » also invisible damages could pose a significant security risk represent. Replace the child seat if it is defective, » is damaged, worn or if parts are missing.
-
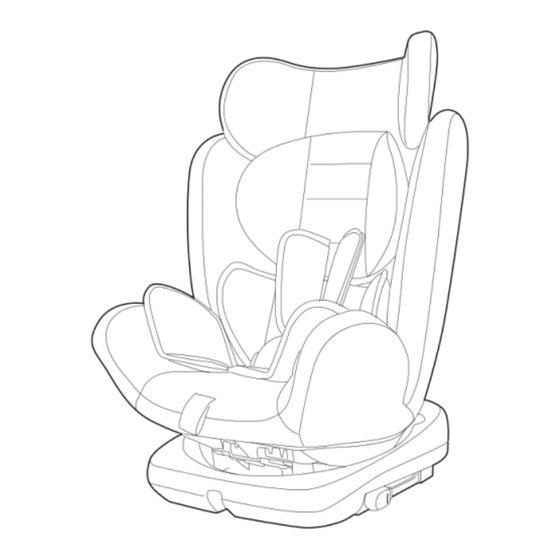
Page 9: Overview
XM-KI360 Overview head cushion side pads seat base adjustment belt turning device base handle seat belt seat cushion headrest back support ISOFIX rails top tether device seat belt headrest adjustment handle... -
Page 10: Positioning
XM-KI360 Positioning The child seat may only be opened to the front. » directional vehicle seats without activated airbag can be installed. Please note the correct installation method for » your child's weight class. Direction admissibly inadmissible Forward facing seat... -
Page 11: Installation
XM-KI360 Installation The child seat must be secured with the ISOFIX » anchorage and the Top Tether device installed will be. Also note the positioning options on page 8. Observe the correct installation method for » your child's weight class. - Page 12 XM-KI360 snap the hooks at the end of the ISOFIX rails into the ISOFIX anchors. press the two red buttons on the ISOFIX rails at the same time and slide the seat on. the back of the seat. the Top Tether anchors can be found either at the top or at the bottom near the rear parcel shelf (type 1), on the vehicle floor behind the seat (type 2)
-
Page 13: Rotate Child Seat Up To 360
XM-KI360 hook the Top Tether Hook into the Top Tether anchor of your vehicle. ROTATE CHILD SEAT UP TO 360° The child seat can be adjusted at the base by up to 360° around its own axis. This enables the child seat to be installed with a View against the direction of travel. -
Page 14: Installation Group 0 ( Up To 10 Kg)
XM-KI360 INSTALLATION GROUP 0 ( UP TO 10 KG) do not turn the seat while it is still in position has been fi xed and the rails are extended backwards as described in the chapter "Child seat for up to 360°... -
Page 15: Installation Group I (9-18 Kg)
XM-KI360 INSTALLATION GROUP I (9-18 KG) install ISOFIX (fig. 1) and Top Tether such as in chapter "ISOFIX and Top Tether Installation" described on page 9 to the forward directional vehicle seat. place the child in the seat and buckle the seat and put it on properly with the help of the 5-point harness. -
Page 16: Installation Size Ii (9-18Kg) And Iii (22-36Kg)
XM-KI360 INSTALLATION GR. II (9-18KG) AND III (22-36KG) install ISOFIX and Top Tether as described in the Chapter "ISOFIX and Top Tether Installation" on Page 9 described on the front directional vehicle seat. remove the 5-point seat belt as described in the chapter on "Removing the belt"... -
Page 17: Remove Belt
XM-KI360 Removing the belt remove the Velcro fastened Belt pad. at the bottom of the back you will find the belt connection plate, from which you remove all 5 belts. remove the connection plate and pull out the the belts through the belt slots on the seat... -
Page 18: Adjusting The Headrest Height
XM-KI360 Adjusting the headrest height Remember to adjust the height of the headrests and » the Adjust the belt height to the size of your child. The height of the headrest can be adjusted by pulling it out of the adjustment knob and at the same time after Sliding the headrest up or down adjusted will be. -
Page 19: Belt Buckle Application
XM-KI360 Belt buckle Use BUCKLE BELT bring the two upper latch tongues together. slide both latch tongues into the belt buckle. until you hear a click. Always make sure that the straps are properly fastened are fastened by tightening the straps according to the pull up. -
Page 20: Tighten Belts Tighter
XM-KI360 Pull belts tighter pull the shoulder straps upwards in order to fasten the Lap belts too tight. then pull on the adjustment belt (see picture) in order to also the to tighten the shoulder straps. the straps must be tightened as tightly as possible will be. -
Page 21: Loosen Belts
XM-KI360 Loosen belts to loosen the straps, press the strap adjustment knob at the front of the seat (under the cover). Press the adjustment knob downwards, with your other hand while you fasten the shoulder straps carefully in your direction. -
Page 22: Cleaning The Cover
XM-KI360 Cleaning the cover Important: Important: Please do not use the child seat in general without reference. However, the reference can be for cleaning. Please clean the child seat and the covers only with mild soap and warm water (max. 30°C) degree, in no case with bleaching agents, or acidic soap. - Page 23 XM-KI360 Do not place heavy objects on it. » The covers can be removed and replaced with a mild » the product in hand wash. The covers must not be washed in the dryer. » Please not wring to keep the shape.
-
Page 24: Warning
WARNING Please read all instructions in detail before you put the child seat into operation. Also read the instructions in the manual of your vehicle. Rear-facing child seats may be mounted on not used together with an airbag in any case will be.
Need help?
Do you have a question about the XM-KI360 and is the answer not in the manual?
Questions and answers