Table of Contents
Advertisement
Quick Links
Advertisement
Table of Contents

Subscribe to Our Youtube Channel
Related Manuals for Influx Technology ReXgen

Summary of Contents for Influx Technology ReXgen
- Page 1 User Guide ReXgen-Manual www.influxtechnology.com...
-
Page 2: About This Manual
The content of this document including all brands and trademarks and possibly protected by third-party rights are subject without limitation to the terms of the valid trademark law and intellectual property rights of their respective registered owner. © 2020 INFLUX TECHNOLOGY. All rights reserved. CONTACT ADDRESS Influx Technology Ltd... -
Page 3: Safety Instructions
The following formatting and symbols will help you recognize the purpose of each paragraph: WARNING DANGER Severe injury or death. Probability: possible CAUTION Slight or medium injury. Probability: possible ATTENTION! Property damage Notes • Important usage instructions/notes/limits. © 2020 Influx Technology | Version 1.2... -
Page 4: Table Of Contents
HARDWARE ..............................12 2.2.1 INSTALLATION ............................12 2.2.2 ENCLOSURE ............................13 2.2.3 CABLES ..............................13 2.2.4 INDICATOR ELEMENTS – LED’S ......................14 2.2.5 ACCESSORIES ............................15 GETTING STARTED ..............................15 CONNECTING THE DEVICE ..........................15 © 2020 Influx Technology | Version 1.2... - Page 5 SOFTWARE INSTALLATION ..........................16 DRIVER INSTALLATION ..........................18 FIRMWARE UPDATE ............................19 ANNEXURES ................................20 DIGITAL INPUT FUNCTION ..........................20 CERTIFICATIONS ............................21 FCC ..................................21 CE ..................................22 ROHS ..................................23 CAN OVERVIEW ............................. 24 © 2020 Influx Technology | Version 1.2...
-
Page 6: Overview Of The Device
1. OVERVIEW OF THE DEVICE This chapter gives an overview of the device, its operating elements and functions as well as the intended use of the device. Along with the free, user-friendly configuration software, the standalone ReXgen logger comes with the following advantages: ▪... -
Page 7: General Information
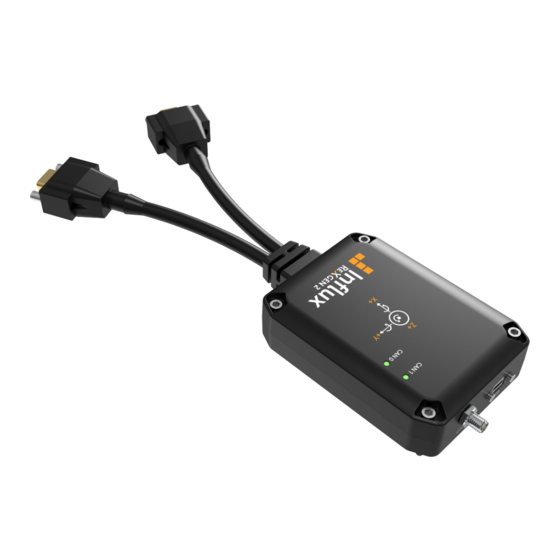
1 – External GNSS antenna connector. 5 – Mounting Holes. 2 – Micro USB connector. 6 – Channel 1 Connector. 3 – Channel 1 LED. 7 – Channel 0 Connector. 4 – Channel 0 LED. 1.1.2 PRODUCT DRAWINGS © 2020 Influx Technology | Version 1.2... -
Page 8: Technical Specification
Trigger on DM1 counter. Data Storage format FAT32, Log files accessible via ReXdesk software File Format Supported ASAM MDF (.mf4), CSV, MATLAB, ASC, BLF Data Logger Configuration Supplied with Influx ReXdesk configuration software, XML based © 2020 Influx Technology | Version 1.2... -
Page 9: Electrical Data
SD memory card. The device is tolerable to all harsh environments that require an IP65 class protection. It can be easily mounted and integrated with your vehicle /machine. © 2020 Influx Technology | Version 1.2... -
Page 10: Liability & Warranty
1.1.6 LIABILITY & WARRANTY Influx Technology assumes no liability for damages caused by normal wear, installation errors, operating or maintenance faults. This is also applicable when the user modifies the devices, any accessories, or the software without the prior approval of Influx Technology. -
Page 11: Service & Support
ReXgen with custom baud rates and modify advanced bit timings. ReXdesk also allows the user to configure ReXgen with CAN & J1939 filters. All logged data is saved to the secure embedded memory. The user can configure triggers based on CAN IDs, parameter values &... -
Page 12: Hardware
Always ensure to mount the device in a way that minimizes vibration exposure and accounts for the IP rating of the device. ReXgen is supplied with 4 screws to assist you with the mounting process. © 2020 Influx Technology | Version 1.2... -
Page 13: Enclosure
An external active antenna with a supply voltage of 3V is required for GNSS data logging. It is to be ensured that the antenna is properly connected at all times and that it is not loose when the ReXgen is powered on. Operation with a loose antenna or without the antenna entirely can lead to GNSS data loss. -
Page 14: Indicator Elements - Led's
Signal Pin 2 2.2.4 INDICATOR ELEMENTS – LED’S 2 LEDs are installed on the ReXgen device for indicating the CAN/CAN FD logging activity. LED 1 - Channel 0 - Green LED 2 - Channel 1 - Amber Blinking – Logging Bold –... -
Page 15: Accessories
3.1.2 CAN / CAN FD ReXgen can be interfaced to the CAN/CAN FD bus from which data is to be logged using D-Sub 9 connector A or connector B. The CAN-high and CAN-low from the vehicle or machine terminals must match the CAN- high and CAN-low terminal of the ReXgen. -
Page 16: Analog & Digital Input
3.1.3 ANALOG & DIGITAL INPUT ReXgen supports 2 analog inputs in the range of +/- 10 V. The 2 analog inputs are interfaced to the ReXgen via a D-Sub 9 connector B. ReXgen also supports two digital inputs. The digital inputs are interfaced to the ReXgen via a D-Sub 9 connector A. - Page 17 • To continue with the installation of ReXdesk on your system click ‘Next’. • Once the installation is complete, this window will appear. • Click ‘Finish’ to close the window. ReXdesk is now successfully installed on your system. © 2020 Influx Technology | Version 1.2...
-
Page 18: Driver Installation
3.3 DRIVER INSTALLATION To install the ReXgen driver, locate the ReXgen Drivers installer from the start menu. Notes •Before proceeding with the installation, please ensure that you have acquired administrative privileges. Run the ReXgenInstaller.exe file. • To continue with the installation of ReXgen device driver on your system click ‘Next’. -
Page 19: Firmware Update
• Click ‘Next’ to continue the installation process. • Once the installation is complete this window will appear. • Click ‘Finish’ to close the window. The ReXgen driver is now successfully installed on your system. FIRMWARE UPDATE All newly released firmware updates will be available in www.influxtechnology.com... -
Page 20: Annexures
The Digital Input Output pins will consider voltages below 0.8V to be low and above 2.5V to be high. Examples of how you could utilise the I/O pins if configured as inputs are shown below. © 2020 Influx Technology | Version 1.2... -
Page 21: Certifications
4.2 CERTIFICATIONS © 2020 Influx Technology | Version 1.2... - Page 22 © 2020 Influx Technology | Version 1.2...
-
Page 23: Rohs
ROHS © 2020 Influx Technology | Version 1.2... -
Page 24: Can Overview
• Maximum speed achievable is 1Mbps. • Maximum length achievable is 500 metre at a lower speed of 125 Kbps. • Bus should be terminated at both ends with 120-ohm resistance. © 2020 Influx Technology | Version 1.2... - Page 25 Removal of one node will not affect the communication in the bus. CAN Baudrate Maximum Bus Length 1 Mbits/s 25 m 500 kbit/s 100 m 250 kbit/s 250 m 125 kbit/s 500 m © 2020 Influx Technology | Version 1.2...
- Page 26 Influx Technology Headquaters, UK Office Suite 22, Building 03 Millbrook Proving Ground, Station Lane Millbrook Bedford MK45 2JQ Telephone: +44 (0) 1525 842504 Sales: sales@influxtechnology.com Influx Big Data Solutions Pvt Ltd, India Krishvi, Ground Floor, Old Airport Road, Domlur, Bangalore,...
Need help?
Do you have a question about the ReXgen and is the answer not in the manual?
Questions and answers