
Related Manuals for Lancaster CBF054 037P


Summary of Contents for Lancaster CBF054 037P
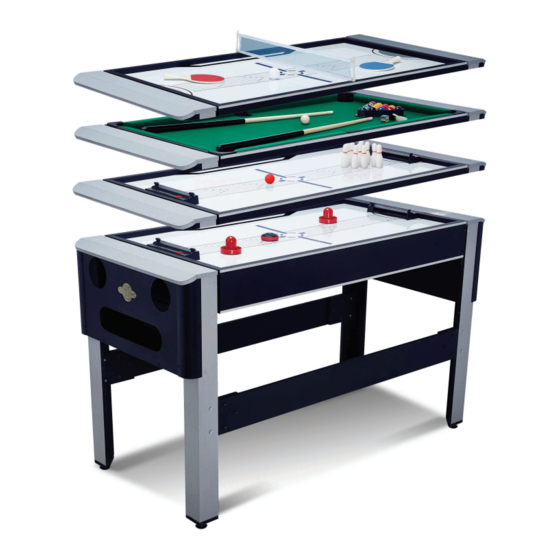
- Page 1 MODEL CBF054_037P SPREETAIL Assembly Instructions Please mention model # CBF054_037P_V1 877-472-4296 www.wearespreetail.com...
- Page 2 Consumer Service Department. Please be aware of your product’s Limited Warranty for the return/refund policy from the store, We, at Lancaster, cannot handle the product which is out of product’s limited warranty since we only provide available parts. Thank you!
-
Page 3: Tools Required
English TOOLS REQUIRED Phillips Screwdriver - Not Included Standard (Flat Head Screwdriver) - Not Included Allen Key - Included Power Tools: Set to Low Torque RECOMMENDED Electric Screwdrivers may be helpful during assembly; however, please set a low torque and use extreme caution. High Torque Over Tightened IMPORTANT NOTICE This product is intended for INDOOR use only. -
Page 4: Parts Identifier
English PARTS IDENTIFIER PART NUMBER FOR FIG. 1 FIG. NUMBER PART QUANTITY PART NAME Mainframe FOR FIG. 4 FOR FIG. 16 FOR FIG. 8 FOR FIG. 7 Billiards Playfield Top Rail Ball Shelf End Apron - A FOR FIG. 8 FOR FIG. - Page 5 English ACCESSORIES FOR FIG. 20 FOR FIG. 19 FOR FIG. 22 FOR FIG. 19 Bowling Set Hover Puck USB Power Cord Pusher FOR FIG. 17 FOR FIG. 17 FOR FIG. 17 FOR FIG. 17 Billiard Ball Set Triangle Brush FOR FIG. 17 FOR FIG.
-
Page 6: Before Assembly
English PRE-INSTALLED PARTS FOR FIG. 1 FOR FIG. 6 FOR FIG. 13 Locking Seat 5/16" T - Nut 1/4" T - Nut BEFORE ASSEMBLY Find a clean, level place to begin the assembly of your product. Verify that you have all listed parts as shown on the part list pages. If any parts are missing, call our customer service. CBF054_037P (Continued on the next page) www.wearespreetail.com... - Page 7 English ASSEMBLY FIG. 1 Pre-installed FIG. 2 CBF054_037P (Continued on the next page) www.wearespreetail.com...
- Page 8 English ASSEMBLY FIG. 3 Note: Tighten it well by hand. FIG. 4 CBF054_037P (Continued on the next page) www.wearespreetail.com...
- Page 9 English ASSEMBLY FIG. 5 FIG. 6 Pre-installed 13 & CBF054_037P (Continued on the next page) www.wearespreetail.com...
- Page 10 English ASSEMBLY FIG. 7 IMPORTANT: Make sure that the Pin from the Locking Pin is in the direction that is shown. Locking Pin Note: Be sure that the holes are on the outside. FIG. 8 CBF054_037P (Continued on the next page) www.wearespreetail.com...
- Page 11 English ASSEMBLY FIG. 9 FIG. 10 CBF054_037P (Continued on the next page) www.wearespreetail.com...
- Page 12 English ASSEMBLY FIG. 11 7 & FIG. 12 FIG. 10 Assembly FIG. 11 Assembly CBF054_037P (Continued on the next page) www.wearespreetail.com...
- Page 13 English ASSEMBLY FIG. 13 Pre-installed FIG. 14 FIG. 12 Assembly CBF054_037P (Continued on the next page) www.wearespreetail.com...
- Page 14 English ASSEMBLY FIG. 15 Note: Keep the Locking Pins (20) open. Note: Close the Locking Pins (20) to secure the Mainframe (1). CBF054_037P (Continued on the next page) www.wearespreetail.com...
- Page 15 English ASSEMBLY FIG. 16 FIG. 17 GAME 1: BILLIARD CBF054_037P (Continued on the next page) www.wearespreetail.com...
- Page 16 English ASSEMBLY FIG. 18 Note: Keep the Locking Pins (20) open. Note: Close the Locking Pins (20) to secure the Mainframe (1). CBF054_037P (Continued on the next page) www.wearespreetail.com...
- Page 17 English ASSEMBLY FIG. 19 ON/OFF Switch IMPORTANT: To operate the Hover Puck MADE IN CHINA (26), just turn on the Switch on the DC 6V underside of Hover Puck to the ON C H A R G E R I N position.
- Page 18 English ASSEMBLY FIG. 21 Note: Be sure to remove the Hockey Goal setup before attaching the Table Tennis Net & Post. GAME 4: TABLE TENNIS CBF054_037P (Continued on the next page) www.wearespreetail.com...
- Page 19 English HOVER PUCK TO CHARGE FIG. 22 MADE IN CHINA DC 6V C H A R G E R I N USB Power (Not Included) Charging in Note: Plug the USB Power Cord (27) into Note: Insert USB Power Cord the back of the Hover Puck (26).
- Page 20 www.wearespreetail.com...
Need help?
Do you have a question about the CBF054 037P and is the answer not in the manual?
Questions and answers