
Related Manuals for GreenWorks GPW2000-1RBSC


Summary of Contents for GreenWorks GPW2000-1RBSC
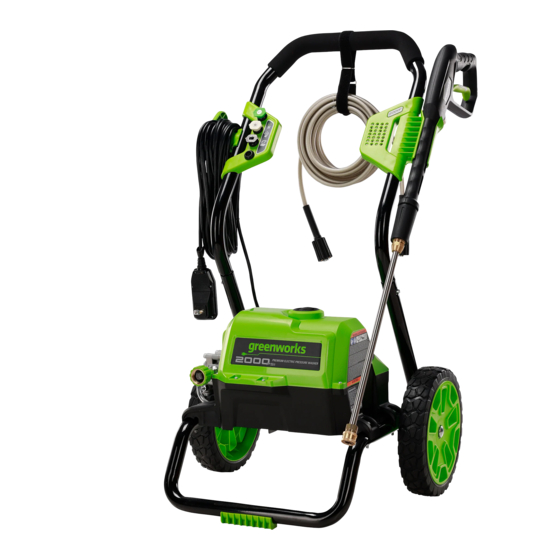
- Page 1 GPW2000-1RBSC PRESSURE WASHER OPERATOR MANUAL LAVADORA A PRESIÓN MANUAL DEL OPERADOR PWA201...
-
Page 2: Table Of Contents
English Install the upper handle........7 Description......... 4 Install the spray gun holder....... 8 Purpose.............. 4 Install the power cord storage arm....8 Product overview..........4 Install the high pressure hose......8 General power tool safety Operation........... 8 warnings..........4 Connect the water supply to the machine ..8 General power tool safety warnings.... -
Page 3: Description
English DESCRIPTION concerning use of the machine by a person responsible for their safety. Children should be supervised to ensure that they do not play with the machine. PURPOSE • Learn the machine's applications and limitations as well The machine is used to used to clean vehicles, boats, as the specified potential hazards related to this tool by buildings, porches, decks, patios, and driveways. -
Page 4: Pressure Washer Safety Warnings
English • Inspect extension cords periodically and replace if the parts they replace. A doubleinsulated product is damaged. Keep handles dry, clean, and free from oil or marked with the words “DOUBLE INSULATION” or grease. “DOUBLE INSULATED.” PRESSURE WASHER SAFETY EXTENSION CORDS WARNINGS •... -
Page 5: Risk Levels
English Symbol Explanation SYM- SIGNAL MEANING To reduce the risk of injection or in- jury, never direct a water stream to- CAUTION (Without Safety Alert Sym- wards people or pets or place any bol) Indicates a situation that body part in the stream. Leak ing ho- may result in property dam- ses and fittings are also capable of age. -
Page 6: Unpack The Machine
English 1. Push the end of the spray wand (4) into the gun handle (2). 2. Turn the spray wand (4) clockwise until the tabs lock into position. WARNING Make sure that the connection has no leakage. INSTALL THE WHEELS WARNING Keep the extension cord clear of the working area. -
Page 7: Install The Spray Gun Holder
English INSTALL THE SPRAY GUN 3. Install and tighten the other end of the high pressure hose (1) onto the water outlet (17). HOLDER OPERATION WARNING Make sure that all the connections are tight and have no leakage before operation. CONNECT THE WATER SUPPLY TO THE MACHINE For easy operation, please use a self-coiling garden hose (not... -
Page 8: Use The Spray Gun
English CHANGE THE NOZZLE 4. Install and tighten the end of the garden hose (18) to the water inlet connector (8). CAUTION There must be a minimum of 10 ft of free hose between the water inlet and the water supply. USE THE SPRAY GUN WARNING Before you change the nozzle:... -
Page 9: Start The Machine
English WARNING SPRAY TIP APPLICATION If you do not use the machine: Black - Soap spray tip • Stop the machine. • The black soap spray tip, is used for soap application. Soap is applied un- • Turn the water supply off. der low pressure high volume for op- •... -
Page 10: Transportation And Storage
English TROUBLESHOOTING If there is too much pump pressure, the nozzle can become clogged, you can feel a pulsing sensation while you pull the gun trigger. PROBLEM POSSIBLE SOLUTION CAUSE 5.1.1 REMOVE THE NOZZLE The motor does The power switch Set the power 1. -
Page 11: Technical Data
English PROBLEM POSSIBLE SOLUTION PROBLEM POSSIBLE SOLUTION CAUSE CAUSE The water supply Open water suppy The motor buzzes, The supply volt- Make sure that on- is not sufficient. fully. Make sure but you can not age is low. ly the pressure the garden hose is start the machine. -
Page 12: Limited Warranty
(3) years against defects in materials, parts or workmanship. Greenworks, at its own discretion, will repair or replace any and all parts found to be defective, through normal use, free of charge to the customer. -
Page 13: Exploded View
English EXPLODED VIEW ITEM NO. PART NO. DESCRIPTION 331031635AB Upper handle 349011635 Pull handle foam 349011824 Belt 311251635 Spray gun holder 322011628 Screw 322021822 Bolt 311381635 Nozzle storage panel C1102273-00 40°Spray tip C1105672-00 25°Spray tip 34139319 Turbo nozzle 341111635 Cord arm basement 341013231 Power cord storage 322351635... - Page 14 English 341072583 Right frame pad 3320303 Screw 3410801 Cord clamp 322021923 Screw 341021635AB Lower housing C3203033-01 Lower handle 32222301A Bolt S1300072-00 Pipe strap 34900365 Suction hose C4102954-00 Suction hose connector 322011635 Screw 341161635A Frame foot pad 3320643 Split pin 32908301A Washer C4102173-00 Wheel...
- Page 15 English 33201671 Spray tip cleaning tool C4100526-00 Switch knob...
- Page 16 Español Instale las ruedas..........22 Descripción........18 Instalación del manillar superior..... 22 Finalidad............18 Instale el soporte de la pistola de Descripción general del producto....18 pulverización........... 22 Advertencias generales de Instale el brazo para enrollar el cable seguridad para herramientas eléctrico............22 eléctricas...........18 Instale la manguera de alta presión....22 Advertencias de seguridad generales para...
-
Page 17: Descripción
Español DESCRIPCIÓN El término “herramienta eléctrica” empleado en las advertencias se refiere a su herramienta eléctrica con funcionamiento de red (con cable). FINALIDAD ADVERTENCIAS DE SEGURIDAD Este aparato se usa para limpiar vehículos, barcos, edificios, porches, cubiertas, patios y caminos de entrada. GENERALES PARA HERRAMIENTAS ELÉCTRICAS Indicado solo para el uso doméstico, no apto para el uso... -
Page 18: Advertencias De Seguridad Para Limpiadores A Presión
Español cable para desconectarlo. Mantenga el cable alejado del AVISO calor y bordes afilados. Desconecte siempre primero el Para reducir el riesgo de electrocución, mantenga todas las alargador de la toma de corriente antes de desconectar el conexiones secas y alejadas del suelo. No maneje el cable producto del alargador. -
Page 19: Símbolos En El Producto
Español • No permita que niños menores de 14 años utilicen esta Símbolo Explicación herramienta. Los niños de 14 años y mayores deben leer y ¡Advertencia! Nunca apunte la pisto- entender las instrucciones de funcionamiento y las la hacia personas, animales, el cuerpo normas de seguridad que se encuentran en este manual y de la máquina, la fuente de alimenta- deben recibir formación y supervisión por parte de uno de... -
Page 20: Propuesta 65
Español 2.10 PROPUESTA 65 AVISO Mantenga el cable de extensión fuera del área de trabajo. AVISO Coloque el cable de modo que no pueda engancharse con Este producto contiene una sustancia química conocida en maderas, herramientas u otras obstrucciones mientras está el estado de California como causante de cáncer, defectos trabajando con el aparato. -
Page 21: Instale Las Ruedas
Español INSTALE LAS RUEDAS 1. Los casquillos de los tornillos del soporte de la pistola de pulverización (2) deben estar alineados con los orificios para tornillos del manillar superior (5). 2. Pase los tornillos (16) a través de los casquillos y apriételos con un destornillador Phillips (no incluido). -
Page 22: Conecte El Suministro De Agua Al Aparato
Español CONECTE EL SUMINISTRO DE USE LA PISTOLA DE AGUA AL APARATO. PULVERIZACIÓN Para facilitar su funcionamiento, utilice una manguera de jardín autoenrollable (no suministrada). AVISO Cuando utilice una manguera autoenrollable, asegúrese de que la manguera no está atascada. AVISO •... -
Page 23: Ponga La Herramienta En Marcha
Español 3. Suelte el cuello de conexión rápida (21) para acoplar la AVISO boquilla (11). Antes de cambiar la boquilla: PONGA LA HERRAMIENTA EN 1. Apriete el gatillo de la pistola para liberar la presión del MARCHA agua. 2. Bloquee el botón de seguridad del gatillo de la pistola. 3. -
Page 24: Mantenimiento
Español MANTENIMIENTO 5.1.2 LIMPIE LA BOQUILLA 1. Utilice un clip de papel enderezado o la herramienta de AVISO limpieza (23) para limpiar la punta del pulverizador (11). Antes del mantenimiento, asegúrese de 2. Purgue y limpie los materiales no deseados del interior de la boquilla (11) utilizando la manguera de jardín (18). -
Page 25: Resolución De Problemas
Español RESOLUCIÓN DE PROBLEMA CAUSA POSI- SOLUCIÓN PROBLEMAS El suministro de Abra el grifo de PROBLEMA CAUSA POSI- SOLUCIÓN agua no es sufi- agua por comple- ciente. to. Asegúrese de que la manguera El motor no arran- El interruptor está Sitúe el interruptor de jardín no está... -
Page 26: Datos Técnicos
(3) años frente a defectos en materiales, nuye por el alarga- gador eléctrico y piezas o mano de obra. A su entera discreción Greenworks dor eléctrico. conecte la máqui- reparará o sustituirá cualquiera y todas las piezas que resulten... -
Page 27: Vista En Despiece
Español Dirección en EE.UU.: Greenworks Tools P.O. Box 1238 Mooresville, NC 28115 VISTA EN DESPIECE ARTÍCULO N.º N.º DE PIEZA DESCRIPCIÓN CANT. 331031635AB Manillar superior 349011635 Espuma de agarre del manillar 1 349011824 Correa 311251635 Soporte de la pistola de pul- verización... - Page 28 Español 322351635 Tornillo C6300183-00 Cable de alimentación 34146363 Abrazadera del cable 341003231 Deflector de aire 33302365 Clavija-U 311231635 Conector de la entrada de agua 341062583 Almohadilla izquierda del ar- mazón 341072583 Almohadilla derecha del ar- mazón 3320303 Tornillo 3410801 Abrazadera del cable 322021923 Tornillo 341021635AB...
- Page 29 Español 34125304 Cubierta 36511154 Tapón de conexión 341022583 Caja de conexiones 32209302A Tornillo 363021628 Interruptor de encendido 341023231 Nivel del interruptor 34216301A Junta tórica 341033231 Tapa de la caja de conexiones 32223301A Tornillo 31140363AB Conjunto de la pistola de pul- verización 311452302 Conjunto de la varilla pulveri-...
Need help?
Do you have a question about the GPW2000-1RBSC and is the answer not in the manual?
Questions and answers
The small pressure hose in front of the machine, what is it used for? It looks like it is attached to the motor, but the end is free, not attached to anything.