Table of Contents
Advertisement
Quick Links
Advertisement
Table of Contents

Subscribe to Our Youtube Channel
Related Manuals for blupura FONTEMAGNA


Summary of Contents for blupura FONTEMAGNA
- Page 1 FONTEMAGNA VENDING...
- Page 3 Index • BEFORE INSTALLING THE WATER COOLER • RECOMMENDATIONS FOR SAFEGUARDING THE ENVIRONMENT • DECLARATION OF CONFORMITY • ASSOCIATIONS • INTERNATIONAL AWARDS • PRECAUTIONS AND GENERAL RECOMMENDATIONS • DESCRIPTION OF THE UNIT • DESCRIPTION OF THE KEYPAD • TECHNICAL FEATURES •...
-
Page 4: Before Installing The Water Cooler
Before installing the water cooler Congratulations for choosing a BLUPURA product. We have designed and manufactured this product with great care to ensure that it will dispense water of the highest quality. In order to get the most out of your water cooler, please read the instructions in... -
Page 5: Recommendations For Safeguarding The Environment
Recommendations for safeguarding the environment Packaging materials The packaging materials are 100% recyclable. Please follow the local guidelines on waste disposal. For safety reasons keep the packaging material out of the reach and sight of children. Scrappage The water cooler is made using recyclable material. This unit is marked in compliance with European Directive 2002/96/EC on Waste Electrical and Electronic Equipment (WEEE). -
Page 6: Declaration Of Conformity
Declaration of conformity D.M. 174 UNI EN ISO 9001:2015 UNI EN ISO 14001:2015 rosso 032 c Materials compliant for contact with drinking water This unit is intended for the dispensing of drinking water, and so the materials that enter into direct contact with water meet the criteria for food-grade components pursuant to the current legislation. - Page 7 Associations International Awards 2015 - BEST PROMOTION OF HEALTH AND HYDRATION EUROPEAN AQUA AWARDS 2015, ROME 2015 - BEST ENVIRONMENTAL PRACTICE/GREEN INITIATIVE EUROPEAN AQUA AWARDS 2015, ROME 2014 - BEST PROMOTION OF HEALTH AND HYDRATION EUROPEAN AQUA AWARDS 2014, BUDAPEST 2013 - BEST PRODUCT INNOVATION EUROPEAN AQUA AWARDS 2013, BERLIN 2012 - BEST ENVIRONMENTALLY FRIENDLY PRACTICE...
-
Page 8: Precautions And General Recommendations
Precautions and general recommendations Always connect the water cooler to a water main that supplies drinking water only. Before each installation, the unit must be sanitized by an authorized technician. After installation, ensure that the unit is not resting on the power cable. -
Page 9: Description Of The Unit
Description of the unit A new, high-quality product with state-of-the-art technology and cutting- edge design. The main features of the unit are as follows: • Refrigerant system with natural gas, the first water cooler to use a gas with a global-warming potential of almost zero.. -
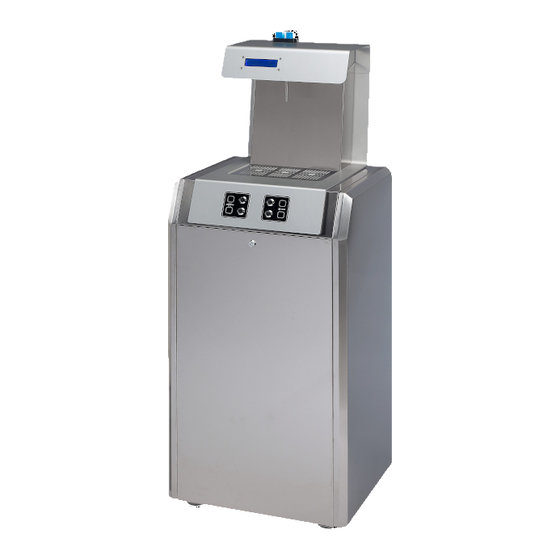
Page 10: Front View
Front View Keypad Payment display Front panel security lock Dispensing nozzle Rear wheels Payment reader Adjustable front feet Drip tray... -
Page 11: Rear View
Rear view Drip tray waste pipe Ø40 mm Top section Drinking water inlet pipe Ø3/8” Top section screws (Ø9,5 mm) for mod. 150 or Ø5/16’’ (Ø8 mm) for mod. 80 Ice bank overflow outlet pipe Hinges OD17xID12 mm Power cable Rear panel... -
Page 12: Description Of The Keypad
Description of the keypad P.1/P.2 Cold sparkling water dispensing buttons P.3/P.4 Cold still water dispensing buttons The water cooler is equipped with a VOLUMETRIC dispensing system. The dispensing quantities are easily PROGRAMMABLE during installation. On turning on the unit, the default settings are as follows: the upper buttons dispense 50 cl of water (a cupful), whereas the lower buttons dispense 100 cl. - Page 13 Technical Features – Technical Data Plate [mod. Fontemagna Vending] 16 Year of manufacture 03 Month of manufacture 00700 Serial number...
- Page 14 Technical Features - dimensions (mm) [mod. Fontemagna Vending]...
-
Page 15: Technical Data Sheet
Technical data Fontemagna Fontemagna sheet Vending Vending 150 lt 80 lt 150 lt/h 80 lt/h Cooling capacity Max continuous 80 lt 45 lt dispensing 5°-12°C * Water temperature Dual-coil ice bank Cooling system Single-coil ice bank 18 lt 14 lt... -
Page 16: Installation
Installation Unpacking Remove the front part (where it states FRONT) and the cover of the wooden cage. Remove the cardboard box and the internal protective packaging by sliding them up and over the top. Once you have unpacked the unit, ensure that it is not damaged. -
Page 17: Siting The Unit
Siting the unit Wear safety gloves when handling the unit. Take care when touching the metal parts, which could be sharp. Site the unit away from sources of heat. The floor model has two rear wheels and two adjustable front feet. Leave at least 4 inch around the unit to Fig. - Page 18 Connection to the mains water supply Caution! To connect the water cooler to the mains water supply, you will need to use a new set of connectors (joints, gaskets and pipes). Do not use a set of connectors that has already been used elsewhere.
-
Page 19: Electrical Connection
Electrical connection The connections must comply with local regulations. The grounding of the unit is a legal requirement. Connect the power cable (1) to a socket. Turn the unit on by selecting the “I” position on the main on/off rocker switch (2). -
Page 20: Operation
Operation With the unit in stand-by mode, the payment display located above the dispensing zone will show the following message: READY <TIME> If payment has been enabled (see section “4. Enabling/disabling payment”, page 24), the lower line on the display will show the following scrolling message: INSERT CARD With this status, the unit is ready to dispense water. - Page 21 Electronic programming (ver. CITYEXT 1.09B) For the management of the payment and water-dispensing circuit, the unit features a programming button panel that is not accessible by users since it is located within the unit. During programming, messages are shown on the frontal display above the dispensing zone and the unit cannot be used to dispense water.
- Page 22 The programming button panel does not respond to the pressing of any buttons in this phase Press the button on the dispensing panel corresponding to the quantity to be modified and press it again when the desired level has been reached. Repeat this procedure for all of the quantities to be modified.
- Page 23 When accessing this menu, the programming button panel LEDs remain constantly lit. Starting from CLOCK SETTING, if no button is pressed for at least 1 minute the unit will automatically return to stand-by mode. OFF Menu From stand-by mode, press buttons 5 and 3 for around 1 second. All of the LEDs on the programming button panel will turn off.
- Page 24 SPARKLING 1.0 L PRODUCT NAME 6 SPARKLING 1.5 L On the Fontemagna Vending with 4 dispensing buttons (2 for still water and 2 for sparkling water) “product 3” and “product 6” do not correspond to any of the buttons. Press button 5 to move on to the subsequent functions 4.
- Page 25 0,50 PRODUCT PRICE 6 0,50 On the Fontemagna Vending with 4 dispensing buttons (2 for still water and 2 for sparkling water) “product 3” and “product 6” do not correspond to any of the buttons. Press button 5 to move on to the subsequent functions.
- Page 26 SIMULTANEOUS DISPENSING DISABLED On Fontemagna Vending leave the setting on DISABLE (or set it manually by pressing the button 1) and press the button 5 to confirm. DISPENSING PAUSE During normal operation of the machine, the user can suspend the supply of water by pressing the dispensing key a second time.
-
Page 27: Factory Reset
Factory reset 1. With the machine off, press buttons 1,3 and 5. 2. Turn on the payment circuit leaving pressed the buttons above; on the display appears CITYEXT 1.09B 3. Continue holding the keys until on the display the message appears PRESET VALUES COMPLETED The LEDs on the keypad are off. - Page 28 Installation of the CO cylinder (FIZZ model) Once the unit is connected to the mains water and electricity, and the ice-bank tank has been filled, you can install the E290 food-grade carbon dioxide (CO cylinder. Models 150lt/h are equipped with a CO pressure reducer with two gauges.
-
Page 29: Handling The Gas Cylinders
Handling the gas cylinders All of the cylinders must be fitted with a valve protector cap, which must be on tight at all times when the cylinder is not in use. Valve connection The cylinders must be handled with care. It is essential to avoid: clashes with other cylinders or surfaces;... - Page 30 Filtration (optional) Everpure 4C filter On request, the unit can be fitted with an Everpure 4C filter. MAIN FEATURES This filter removes the odour and flavour of chlorine and other contaminants that can alter the taste of the water. The Precoat microfiltration system removes impurities and particles with dimensions of 0.5 microns and above.
- Page 31 Filtration (optional) UV sterilizing filter Alongside the Everpure 4C filter, it is also possible to have your water cooler fitted with a UV-C (λ=254 nm) sterilizing filter. The UV-C light emitted by the special 12W mercury vapour lamp is lethal for all micro- organisms (bacteria, viruses, mould, algae, etc.);...
-
Page 32: Sanitization - Notes
This operation must be carried out by the BLUPURA Reseller or by qualified technical personnel who have completed specific training courses on hygiene and sanitization. - Page 33 Management of alarms and malfunctions • If there is no water flowing into the unit, the payment display will show the following message: ALARM PORTION CONTROL In such cases, the unit cannot dispense water. To restore normal functionality, check that all of the manual inlet valves are open, that the mains supply is working and that there are no blockages of any sort on the tubes of the unit.
-
Page 34: Ordinary Maintenance
Ordinary maintenance External cleaning of the unit To clean the unit, use the BLUSTEEL ULTRAMICROFIBRA cloth (code 190094), which is specifically designed for our products. Alternatively, you can use a soft cloth and a dedicated product for the cleaning of stainless steel. To remove limescale, use a slightly acidic product (e.g. -
Page 35: Service History
Service history Installation Technician Date Notes Signature Maintenance Technician Date Notes Signature... -
Page 36: Warranty Conditions
Warranty conditions This unit is guaranteed by BLUPURA for a period of two years from the date of purchase. The warranty entitles the owner to the free-of-charge repair of the unit by our company or the free-of-charge replacement of any parts that have been shown to have manufacturing defects. - Page 39 160358 - Rev. 00 - 13/05/2016 - 10:02...
- Page 40 Blupura srl - Registered office - Via F.lli Brancondi, 56 60025 Loreto (AN) Italy - Headquarters - Via Erideo Marinucci, 2/4 62019 Recanati (MC) Italy Tel +39 071 9710080 Fax +39 071 9710084 info@blupura.com www.blupura.com...
Need help?
Do you have a question about the FONTEMAGNA and is the answer not in the manual?
Questions and answers