Table of Contents
Advertisement
Available languages
Available languages
Quick Links
Advertisement
Chapters
Table of Contents

Related Manuals for Microlife BP3GQ1-3P


Summary of Contents for Microlife BP3GQ1-3P
- Page 2 Important Product and Safety Information Follow Instructions for Use. This document provides important product operation and safety information regarding this Blood Pressure Monitor. Please read this document thoroughly before using the device and keep for future reference. This blood pressure monitor is an automatic digital blood pressure measur- ing device for use by adults on the upper arm at home or in the doctor’s office.
- Page 3 Service the device when being used or when power is supplied. When the device is not in use and power is removed, cuff assembly, batteries and AC adapter (if applicable) may be replaced by the user with Microlife supplied replacements. No other parts/components are accessible.
- Page 4 Avoid storage in direct sunlight. Use this device in a moving vehicle; inaccurate measurements may result. Use third party accessories. Only use Microlife authorized accessories, such as cuffs or AC adapters, as those not approved for use with the device may provide inaccurate measurements, injury, and/or damage the device.
- Page 5 (2) this device must accept any interference received, including interference that may cause undesired operation. Changes or modifications to the product are not approved by Microlife USA and could void the user's authority to operate the equipment under FCC jurisdiction.
- Page 6 the user is encouraged to try to correct the interference by increasing the distance between the product and the affected device; or if applicable, reorientation the receiving antenna, or moving the product’s power plug to another receptacle.
-
Page 7: Table Of Contents
Automatic Blood Pressure Monitor Instruction Manual Table of contents 1. Introduction 1.1. Your automatic blood pressure monitor 2. How is blood pressure measured? 2.1. What is blood pressure, and why does it fluctuate? 2.2. Measurement guidelines 2.3. What can I do to change my blood pressure? 3. -
Page 8: Introduction
1. Introduction 1.1. Your automatic blood pressure monitor Your blood pressure monitor is a fully automatic digital blood pressure measuring device for use by adults on the upper arm at home or in your doctor’s office. It enables very fast and reliable measurement of the systolic and diastolic blood pressure as well as the pulse by way of the oscillometric method. - Page 9 If you have blood pressure values that are too low (i.e., systolic values under 105 mmHg and/or diastolic values under 60 mmHg), consult your physician. Even with normal blood pressure values, a regular self-check with your blood pressure monitor is recommended. You can detect possible changes in your values early and react appropriately.
-
Page 10: What Can I Do To Change My Blood Pressure
2.3. What can I do to change my blood pressure? a) Consult your doctor. b) Increased blood pressure values (various forms of hypertension) are associated with considerable health risks over time. Arterial blood vessels in your body are endangered due to constriction caused by deposits in the vessel walls (arteriosclerosis). -
Page 11: Components Of Your Blood Pressure Monitor
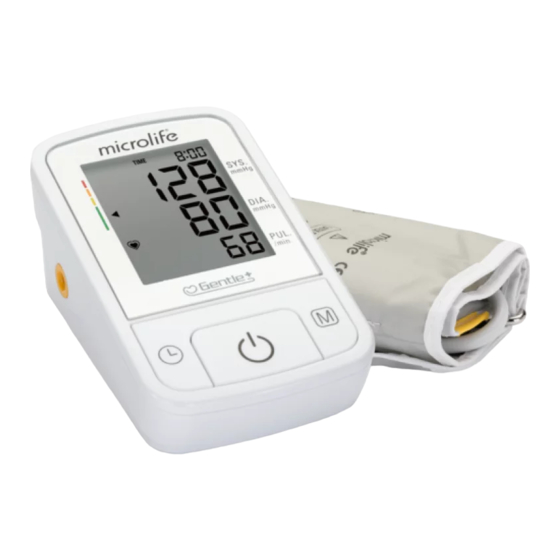
• Avoid reaching the limit of your performance. • With previous illnesses and/or an age of over 40 years, please consult your doctor before beginning your exercise routine. You must receive advice regarding the type and extent of exercise that is appropriate for you. - Page 12 AC Adapter Port Battery Indicator Date/Time Heartbeat Error 3 Systolic Error 2 Memory Irregular Heartbeat Diastolic Pulse b) Wide Range Cuff: For arm circumference 22 cm - 42 cm (8.7” - 16.5 ”) If you ever need to buy a replacement cuff, call us toll-free at 1-800-568-4147.
-
Page 13: How Do I Get Started
4. How do I get started? 4.1. Inserting the batteries After you have unpacked your device, insert the batteries. The battery compartment is located on the bottom of the device. a) Remove the battery cover. b) Insert the batteries (4 x size AA 1.5 V), observing the indicated polarity. -
Page 14: Setting The Date And Time
4.2. Setting the date and time 1. After the new batteries are activated, the year number flashes in the display. You can advance the year by pressing the "M" button. To confirm and then set the month, press the TIME button. 2. -
Page 15: Using An Ac Power Adapter (Not Included)
4.3. Using the AC power adapter (not included) You may also operate this monitor using an AC adapter. To purchase an AC adapter for this unit, call 1-800-568-4147. a) Ensure that the AC adapter and cable are not damaged. b) Plug the adapter cable into the AC adapter port on the right side of monitor. -
Page 16: How Do I Take A Measurement
5. How do I take a measurement? Please note: You should always be seated before and during measurement. 5.1. Preparing to take a measurement • Avoid eating and smoking as well as all forms of exertion directly before measurement. These factors influence the measurement result. Find time to relax by sitting in an armchair in a quiet atmosphere for about 5 minutes before your measurement. -
Page 17: Using The Cuff
5.3. Using the cuff a) Pass the end of the cuff through the flat metal ring so that a loop is formed. The hook and loop material must be facing outward. (Ignore this step if the cuff has already been prepared.) b) Slide left arm through cuff until the bottom 8.7”... -
Page 18: Taking A Measurement
Comment If it is not possible to fit the cuff to your left arm, it can also be placed on your right arm. However, all measurements should be made using the same arm. Cuff on Comparable blood pressure measurements always right arm require the same conditions (relax for several minutes before a reading). -
Page 19: Memory: Reviewing Readings
5.5. Memory: reviewing readings At the end of a measurement, this monitor automatically stores each result with date and time. This unit stores 60 memories. Viewing the stored values With the unit off, press the "M" button. The display first shows "A,"... - Page 20 Indication of a Indication of a "Pre- Indication of a "Stage 1 Indication of a "Stage 2 "Normal" Blood Hypertension" Blood Hypertension" Blood Hypertension" Blood Pressure Pressure Pressure Pressure...
-
Page 21: Irregular Heartbeat Detector
5.8. Irregular heartbeat detector The appearance of this symbol indicates that certain pulse irregularities were detected during the measurement. In this case, the result may deviate from your normal basal blood pressure – repeat the measurement. In most cases, this is no cause for concern. -
Page 22: Battery Change Indicator
5.9. Battery change indicator Batteries almost discharged When the batteries are approximately 75% used, the battery symbol will flash a few times as soon as the instrument is switched on (if at least one of the batteries still has some charge). Although the instrument will continue to measure reliably, you should obtain replacement batteries. -
Page 23: Error Messages/Troubleshooting
6. Error messages/troubleshooting If an error occurs during a measurement, the measure- ment is discontinued and a corresponding error code is displayed (example: Error no. 2). Error No. Possible cause(s)/Solutions ERR 1 The tube may have loosened, or no pulse was detected.* Ensure cuff connections are tight with proper cuff placement. - Page 24 Other possible errors and their solutions If problems occur when using the device, the following points should be checked and, if necessary, the corresponding measures are to be taken: Malfunction Remedy The display remains blank when the 1. Check batteries for the correct instrument is switched on although polarity.
-
Page 25: Care And Maintenance
7. Care and maintenance a) The cuff contains a sensitive airtight bubble. Handle this cuff carefully and avoid all types of stress through twisting or Gasoline buckling. b) Clean the device with a soft, dry cloth. Do not use gasoline, thinners or similar solvents. -
Page 26: Limited Warranty
Microlife USA Inc will investigate your concern. A monitor or accessory as defined by this warranty, determined to be out of specification, will be replaced and shipped to you at no cost. A monitor or accessory as defined by this warranty, determined to be within specification, will be returned to you with a report of findings, at no cost. -
Page 27: Technical Specifications
9. Technical specifications: Weight: ......346 g (with batteries) Size: ......82 (W) x 136 (L) x 58 (H) mm Storage temperature: . -
Page 28: How To Contact Us
10.How to contact us Microlife USA, Inc. 1617 Gulf to Bay Blvd 2nd Floor Clearwater, FL 33755 Toll Free Help Line: 1-800-568-4147 Email: custserv@microlifeusa.com Fax: (727) 451-0492 www.microlifeusa.com... - Page 29 Monitor de Presión Arterial Automatico Manual de Instrucción Modelo #BP3GQ1-3P...
- Page 30 Información importante sobre el producto y la seguridad Siga las instrucciones de uso. Este documento proporciona información importante sobre el producto y la seguridad referentes a este tensiómetro. Lea este documento completa- mente antes de utilizar el dispositivo y conserva para futuras consultas.
- Page 31 • Consulte a su médico antes de usar este dispositivo si existe alguna de las siguientes condiciones o condiciones similares: arritmias tales como extrasístoles auriculares o ventriculares o fibrilación auricular, esclerosis arterial, mala perfusión, diabetes, edad, embarazo, preeclampsia, enfermedades renales. El movimiento durante la medición, incluyendo temblores o estremecimientos, puede afectar la medición.
- Page 32 (si correspon- de) con los repuestos que suministra Microlife. No hay otras piezas ni componentes que sean de fácil acceso.
- Page 33 Uso de accesorios de terceros. Use solo accesorios autorizados de Microlife, tales como brazaletes o adaptadores de CA, porque aquellos que no cuentan con la aprobación para ser usados con el dispositivo pueden proporcionar mediciones inexactas, causar lesiones y/o dañar el dispositivo.
- Page 34 Los cambios o modificacio- nes en el productos no están aprobados por Microlife USA y pueden anular la autoridad del usuario para operar el equipo bajo la jurisdicción de la FCC.
- Page 35 Monitor de Presión Arterial Automatico Manual de Instrucción Tabla de Contenido 1. Introducción 1.1. Su monitor de presión arterial automático 2. ¿Cómo se mide la presión arterial? 2.1. ¿Qué es la presión arterial, y por qué fluctúa? 2.2. Directrices de medición 2.3.
-
Page 36: Introducción
1. Introducción 1.1. Su Monitor de Presión Arterial Automático Su monitor de presión sanguínea es un dispositivo digital, completamente automático para uso en adultos en la parte superior del brazo, tanto en el hogar como en el consultorio médico. Hace posible un rápida y confiable lectura de la presión arterial sistólica y diastólica, como también del pulso, por medio del método de oscilación. -
Page 37: Qué Se Puede Hacer Para Cambiar La Presión Arterial
mmHg, consulte a su médico. Un auto-examen periódico es necesario. Si los valores de su presión sanguínea son demasiado bajos (ej., Valores sistólicos por debajo del 150 mmHg y/o valores diastólicos por debajo de 60 mmHg), consulte con su médico. Aún con valores normales de presión, se recomienda un auto-control regular con su monitor de presión sanguínea. - Page 38 Además, el corazón sufriría daños con el aumento de la presión sanguínea. c) Hay diferentes causas de presión alta. Diferenciamos entre común primaria (esencial) hipertensión y secundaria hipertensión. Esta última se debe al mal funcionamiento de los órganos específicos. Por favor consulte con su médico para obtener información sobre los posibles orígenes de su presión arterial alta.
-
Page 39: Componentes De Su Monitor De Presión Arterial
3. Componentes de su monitor de presión arterial a) Unidad de medida Botón de memoria Conección del Brazalete Botón de (amarillo) Encendido/ Apagado Indicador de riesgo de Botón de hora hipertensión y fecha Portal Adaptador CA... - Page 40 Fecha/Hora Indicator de la bateríia Latido del corazon Error 3 Sistolica Error 2 Memoria Latido irregular Diastolica Pulso b) Brazaletes – amplia gama, fácil ajustar Para brazos de circunferencia 22-42 cm o 8.7”-16.5” (incluido) Si es necesario comprar un brazalete de reemplazo, llámenos al número gratuito 1-800-568-4147.
-
Page 41: Cómo Se Empieza
4. ¿Cómo se empieza? 4.1. Inserción de baterías Una vez desempaquetado el aparato, inserte primero las baterías. El compartimento de la batería está situado en la parte inferior del aparato. a) Remueva la cubierta de las baterías. b) Inserte las baterías (4, "AA" 1.5 V), observando la indicada polaridad (+ - ). -
Page 42: Ajuste De La Fecha Y Hora
4.2. Ajuste de la fecha y la hora 1. Después de que las baterías nuevas están activadas, el número del año parpadea en la pantalla. Usted puede avanzar el año presionando el botón de la memoria "M". Para confirmar y luego ajustar el mes, presione el botón de la HORA. -
Page 43: Utilización De Un Adaptador De Corriente Alterna (Ca, No Incluido)
4.3. Utilización de un adaptador de corriente alterna (CA, no includio) Usted también puede utilizar este monitor con un adaptador de corriente alterna. Para comprar un adaptor de corriente alterna para este monitor, llama 1-800-568-4147. a) Asegúrese que tanto el cable como el adaptador no se encuentren dañados. -
Page 44: Cómo Se Toma Una Medida
5. ¿Cómo se toma una medida? Nota: Usted siempre debe estar sentado antes y durante la medición. 5.1. Preparándose para tomar una medida • Evite comer y fumar como también toda forma de ejercicio inmediata- mente antes de la medición. Estos factores influencian el resultado de la medición. -
Page 45: Uso Del Brazalete
5.3. Uso del brazalete a) Pase el extremo de la breazalete a través del pasador de metal para formar un lazo. El material de gancho y bucle debe quedar orientada hacia afuera. (Ignore este paso si la brazalete ya ha sido preparada). 22 - 42 cm b) Deslice el brazalete en su brazo izquierdo. -
Page 46: Tomando Una Medida
Nota Si no es posible colocarse el brazalete en el brazo izquierdo, también se puede colocar en el derecho. Sin embargo, todas las mediciones deben ser tomadas en el mismo brazo. Para poder comparar Brazalete en el las lecturas obtenidas se requiere que siempre se brazo derecho cumplan las mismas condiciones (relajarse por varios minutos antes de la medición). -
Page 47: Memoria - La Revisión De Las Lecturas
5.5. Memoria – la revisión de las lecturas Al final de una medición, este monitor almacena automá- ticamente cada resultado con la fecha y la hora. Esta unidad guarda 60 memorias. Visualización de los valores almacenados Con la unidad apagada, presione el botón "M." La pantalla le enseñará... -
Page 48: Indicador De Riesgo De Hipertensión
5.7. Indicador de riesgo de hipertensión Las barras en el lado izquierdo de la pantalla muestran el alcance de la presión arterial. Dependiendo de la altura de la barra, la lectura está dentro de los parámetros normales (verde), al borde (amarillo) o en peligro (naranja y roja). -
Page 49: Detector De Latido Irregular
5.8 Detector de latido irregular La aparición de este símbolo indica que un pulso irregular se detectaron durante la medición. En este caso, el resultado puede desviarse de su presión arterial basal normal – repita la medición. En la mayoría de los casos, esto no es motivo de preocupación. -
Page 50: Indicador De Cambio De La Batería
5.9. Indicador de cambio de la batería Baterías casi completamente descargadas. Cuando las baterías están aproximadamente 75% descargados, se podrá observar el símbolo de las baterías centelleando en la pantalla al momento de encender la unidad. A pesar de que el instrumento continuará... -
Page 51: Mensajes De Error/Solución De Problemas
6. Mensajes de error/solución de problemas Si ocurre un error durante la medición, la misma será descon- tinuada y el código de error correspondiente se observará en la pantalla (ej., Error no. 2). Error No. Posible(s) causa(s)/solución(es) ERR 1 El tubo pudo haberse aflojado, no se detectó Pulso.* Asegúrese de que las conexiones de la bocamanga estén en posición correcta. - Page 52 Otros posibles errores y soluciones Si aparecen problemas al usar el aparato, deben comprobarse los siguien- tes puntos y, si es necesario, deben tomarse las medidas correspondientes: Mal funcionamiento Solución 1. Revise la polaridad de las baterías La pantalla permanece 2.
-
Page 53: Cuidado Y Mantenimiento
7. Cuidado y mantenimiento a) Las bocamangas contienen burbujas de aire muy sensitivas. Manéjelas con cuidado para evitar todo tipo de stress al doblarlas o abrocharlas. Gasoline b) Limpie el dispositivo con un paño limpio y seco. No use ninguna clase de solventes ni gasolina. -
Page 54: Garantía Limitada
Por favor usar la información de servicio al cliente de Microlife USA Inc., para cualquier reclamo de garantía. Le solicitamos por favor que nos... -
Page 55: Especificaciones Técnicas
9. Especificaciones técnicas Peso: ......346 g (con baterías) Tamaño: ......82 (W) x 136 (L) x 58 (H) mm Temperatura de almacenamiento: . -
Page 56: Como Contactarnos
10.Como contactarnos Microlife USA, Inc. 1617 Gulf to Bay Blvd 2nd Floor Clearwater, FL 33755 Línea de servicio al cliente, llame sin cargo: 1-800-568-4147 Email: custserv@microlifeusa.com Fax: (727) 451-0492 www.microlifeusa.com... - Page 57 BP3GQ1-3P-0318-2...
Need help?
Do you have a question about the BP3GQ1-3P and is the answer not in the manual?
Questions and answers