Vetus BOW PRO B Series Installation Instructions Manual
Hide thumbs
Also See for BOW PRO B Series:
- Installation instructions manual (176 pages) ,
- Installation manual (116 pages) ,
- Owner's manual (104 pages)
Table of Contents
Advertisement
Quick Links
Installatie instructies
Einbauanleitung
Instructions d'installation
Instrucciones de instalación
Installation instructions
BOWB065 - BOWB076 - BOWB090 - BOWB110 - BOWB130
Istruzioni per l'installazione
Installations instruktioner
Monteringsinstruktioner
BOW PRO 'B' Series Thrusters
65 kgf - 130 kgf - ø 185 mm
Copyright © 2020 Vetus b.v. Schiedam Holland
NEDERLANDS
ENGLISH
DEUTSCH
FRANÇAIS
ESPAÑOL
ITALIANO
DANSK
SVENSKA
NORSK
SUOMEKSI
POLSKI
Installasjonsinstrukser
Asennusohje
Instrukcja instalacji
9
21
33
45
57
69
81
93
105
117
129
020808.02
Advertisement
Table of Contents

Related Manuals for Vetus BOW PRO B Series


Summary of Contents for Vetus BOW PRO B Series
- Page 1 Instructions d’installation Monteringsinstruktioner Instrukcja instalacji Instrucciones de instalación Installation instructions BOW PRO 'B' Series Thrusters BOWB065 - BOWB076 - BOWB090 - BOWB110 - BOWB130 65 kgf - 130 kgf - ø 185 mm Copyright © 2020 Vetus b.v. Schiedam Holland 020808.02...
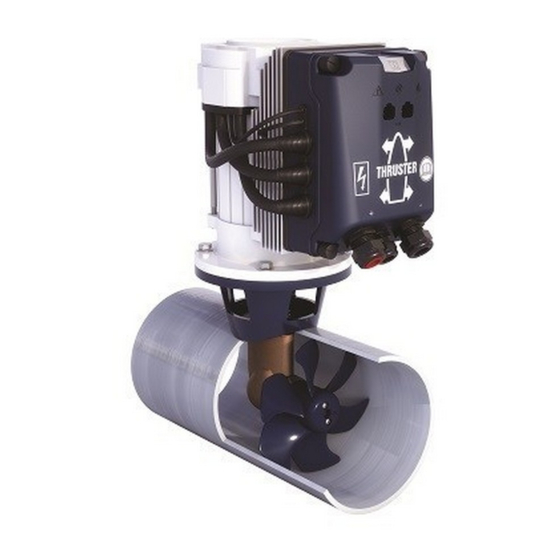
- Page 2 BOWA090 - 90 kgf - ø 185 mm - 12/24 Volt BOWA110 - 110 kgf - ø 185 mm - 12/24 Volt BOWA130 - 130 kgf - ø 185 mm - 12/24 Volt vetus® Installation instructions BOW PRO Series Thrusters: BOWB065, BOWB076, BOWB090, BOWB110 and BOWB130 020808.02...
- Page 3 Consult the ‘Owner’s Manual’ for Operation, Faults and Technical en Technische gegevens . ’ Data . Raadpleeg het 'Onderhouds- en garantieboek' voor Onderhoud . Consult the ‘Maintenance and Warranty Book’ for Maintenance . vetus® Installation instructions BOW PRO Series Thrusters: BOWB065, BOWB076, BOWB090, BOWB110 and BOWB130 020808.02...
-
Page 4: Warning Indications
. Check for possible leaks immediately the boat is relaunched . Make sure that the user of the vessel is supplied with the owner’s manual . vetus® Installation instructions BOW PRO Series Thrusters: BOWB065, BOWB076, BOWB090, BOWB110 and BOWB130 020808.02... -
Page 5: Installation Recommendations
We do not advise fitting 2 bow thrusters into one tunnel; this does ways well clear from the maximum bilge water level. not result in doubling the thrust! vetus® Installation instructions BOW PRO Series Thrusters: BOWB065, BOWB076, BOWB090, BOWB110 and BOWB130 020808.02... -
Page 6: Connection Of Thrust Tunnel To Ship's Hull
- The bars must be installed so they are perpendicular to the ex- pected waveform. vetus® Installation instructions BOW PRO Series Thrusters: BOWB065, BOWB076, BOWB090, BOWB110 and BOWB130 020808.02... -
Page 7: Installation Of The Thrust Tunnel
NOTE: The gaskets supplied are al- required. ready electrically insulated. However the bolts and the shaft need to be fit- ted with insulation material, for exam- ple nylon bushes. vetus® Installation instructions BOW PRO Series Thrusters: BOWB065, BOWB076, BOWB090, BOWB110 and BOWB130 020808.02... -
Page 8: Installation Tailpiece And Intermediate Flange
(9 - 11 ft.lbf ) Check for any leaks immediately the vessel returns to the wa- ter . *) A suitable grease is VETUS ‘Shipping Grease’ , Art. code: VSG. vetus® Installation instructions BOW PRO Series Thrusters: BOWB065, BOWB076, BOWB090, BOWB110 and BOWB130 020808.02... -
Page 9: Final Assembly
20 - 25 Nm Molykote® G-n plus *) A suitable grease is VETUS ‘Shipping Grease’ , Art. code: VSG. vetus® Installation instructions BOW PRO Series Thrusters: BOWB065, BOWB076, BOWB090, BOWB110 and BOWB130 020808.02... -
Page 10: Electrical Installation
BATSW250 is a suitable switch, which is also available in a 2-pole version, Vetus For connection diagrams, see also page 148 . part number BATSW250T. vetus® Installation instructions BOW PRO Series Thrusters: BOWB065, BOWB076, BOWB090, BOWB110 and BOWB130 020808.02... - Page 11 At one end of the chain, the power supply (5) must be connected - BPPJA - BPPPA and the terminator (8) must be connected at the other end! vetus® Installation instructions BOW PRO Series Thrusters: BOWB065, BOWB076, BOWB090, BOWB110 and BOWB130 020808.02...
-
Page 12: Checking/Test Running And Configuring The Control Panels
6.9). joystick is moved in, this can be modified as indicated in 6.9. The illustrated operations must be performed on EACH panel in- stalled . vetus® Installation instructions BOW PRO Series Thrusters: BOWB065, BOWB076, BOWB090, BOWB110 and BOWB130 020808.02... -
Page 13: Configuring A Panel For Operating A Bow Thrust- Er Or A Stern Thruster
Settings are retained even if the supply voltage is switched With a bow and stern thruster panel, together at the same helm off! station, the helm station number entered must be the same . vetus® Installation instructions BOW PRO Series Thrusters: BOWB065, BOWB076, BOWB090, BOWB110 and BOWB130 020808.02... - Page 14 Settings are retained even if the supply voltage is switched With a bow and stern thruster panel, together at the same helm off! station, the helm station number entered must be the same . vetus® Installation instructions BOW PRO Series Thrusters: BOWB065, BOWB076, BOWB090, BOWB110 and BOWB130 020808.02...
-
Page 15: Changing The Thrust Direction
The red LED setting. at the upper left will now go on and the thrust force direction is changed. vetus® Installation instructions BOW PRO Series Thrusters: BOWB065, BOWB076, BOWB090, BOWB110 and BOWB130 020808.02... - Page 16 235 (9 “) 168 (6 “) BOWB130 “) ø 185 “) “ DIA.) BOWB090 - BOWB110 - BOWB130 185 mm Tunnel 15VAC-5.7kW Motor 1 : 10 vetus® Installation instructions BOW PRO Series Thrusters: BOWB065, BOWB076, BOWB090, BOWB110 and BOWB130 020808.02...
- Page 17 0.5 - 22 ( ” ) BPPPA 85 ( 3 ” ) 55 ( 2 ” ) 111 ( 4 ” ) 0.5 - 22 ( ” ) vetus® Installation instructions BOW PRO Series Thrusters: BOWB065, BOWB076, BOWB090, BOWB110 and BOWB130 020808.02...
- Page 18 Magistrala CAN to łańcuch, do którego dołączony jest ster strumie- niowy i panele. Na jednym końcu łańcucha musi być podłączony zasilacz (5), a ter- minator (8) musi być podłączony na drugim końcu! vetus® Installation instructions BOW PRO Series Thrusters: BOWB065, BOWB076, BOWB090, BOWB110 and BOWB130 020808.02...
- Page 19 6 Control voltage fuse Fusible régulateur de tension Fusibile della tensione di comando 7 Connection cable Câble de raccordement Cavo di collegamento 8 Terminator Terminateur Terminatore vetus® Installation instructions BOW PRO Series Thrusters: BOWB065, BOWB076, BOWB090, BOWB110 and BOWB130 020808.02...
- Page 20 Panel sterowania pędnik dziobowy 4 Peräpotkurin ohjauspaneeli Panel sterowania pędnik rufowy 5 CAN-väylän syöttö Zasilanie magistrali CAN 6 Ohjausjännitteen sulake Bezpiecznik sterowania 7 Kytkentäkaapeli Kabel przyłączeniowy 8 Terminaattori Terminator vetus® Installation instructions BOW PRO Series Thrusters: BOWB065, BOWB076, BOWB090, BOWB110 and BOWB130 020808.02...
- Page 21 6 Control voltage fuse Fusible régulateur de tension Fusibile della tensione di comando 7 Connection cable Câble de raccordement Cavo di collegamento 8 Terminator Terminateur Terminatore vetus® Installation instructions BOW PRO Series Thrusters: BOWB065, BOWB076, BOWB090, BOWB110 and BOWB130 020808.02...
- Page 22 Panel sterowania pędnik dziobowy 4 Peräpotkurin ohjauspaneeli Panel sterowania pędnik rufowy 5 CAN-väylän syöttö Zasilanie magistrali CAN 6 Ohjausjännitteen sulake Bezpiecznik sterowania 7 Kytkentäkaapeli Kabel przyłączeniowy 8 Terminaattori Terminator vetus® Installation instructions BOW PRO Series Thrusters: BOWB065, BOWB076, BOWB090, BOWB110 and BOWB130 020808.02...
- Page 23 3 Fusible principal Fusible principal Fusibile principale 4 Interrupteur principal Interruptor principal Interruttore principale 5 Dynamo Dínamo Dinamo 6 Démarreur Motor de arranque Motorino di avviamento vetus® Installation instructions BOW PRO Series Thrusters: BOWB065, BOWB076, BOWB090, BOWB110 and BOWB130 020808.02...
- Page 24 1 Potkurin (tai peräpotkurin) liitäntärasia Skrzynka przyłączeniowa pędnika dziobowego (lub pędnik rufowy) 2 Akku Bateria 3 Pääsulake Główny bezpiecznik 4 Pääkatkaisin Główny przełącznik 5 Dynamo Dynamo 6 Käynnistysmoottori Rozrusznik vetus® Installation instructions BOW PRO Series Thrusters: BOWB065, BOWB076, BOWB090, BOWB110 and BOWB130 020808.02...
- Page 25 194.2 - 245.4 ft 2 x 120 mm 2 x AWG 0000 74,8 - 93,5 m 245.4 - 306.8 ft 2 x 150 mm 2 x AWG 300 MCM vetus® Installation instructions BOW PRO Series Thrusters: BOWB065, BOWB076, BOWB090, BOWB110 and BOWB130 020808.02...
- Page 26 2 x AWG 000 162,9 - 205,7 m 0 - 674.9 ft 2 x 120 mm 2 x AWG 0000 2 x 150 mm 2 x AWG 300 MCM vetus® Installation instructions BOW PRO Series Thrusters: BOWB065, BOWB076, BOWB090, BOWB110 and BOWB130 020808.02...
- Page 27 Panel supply is low Blinks double Blinks double Joystick is broken 1x (.) Joystick button is pushed Blinks fast Blinks fast inverted Disconnected from the network vetus® Installation instructions BOW PRO Series Thrusters: BOWB065, BOWB076, BOWB090, BOWB110 and BOWB130 020808.02...
-
Page 28: Bedeutung Der Led-Anzeigen
Double Double Le joystick est cassé. clignotement clignotement 1x (.) Le bouton du joystick est enclenché. Clignote Clignotement Non relié au réseau. rapidement rapide inversé vetus® Installation instructions BOW PRO Series Thrusters: BOWB065, BOWB076, BOWB090, BOWB110 and BOWB130 020808.02... - Page 29 Lampeggia due volte Il controllo joystick è rotto 1x (.) Il pulsante del joystick è premuto Lampeggia Lampeggia veloce- Non collegato alla rete velocemente mente in ordine inverso vetus® Installation instructions BOW PRO Series Thrusters: BOWB065, BOWB076, BOWB090, BOWB110 and BOWB130 020808.02...
- Page 30 Blinkar snabbt Låg matningsspänning panel Blinkar dubbelt Blinkar dubbelt Joystick är defekt 1x (.) Joystick-knappen är intryckt Blinkar snabbt Blinkar snabbt Inte ansluten till nätverket omvänt vetus® Installation instructions BOW PRO Series Thrusters: BOWB065, BOWB076, BOWB090, BOWB110 and BOWB130 020808.02...
- Page 31 Vilkkuu nopeasti Paneelin syöttöjännite alhainen Vilkkuu Vilkkuu Ohjaussauva on rikki kahdesti kahdesti 1x (.) Ohjaussauvan painiketta on painettu Vilkkuu nopeasti Vilkkuu nopeasti Ei yhteydessä verkkoon takaperin vetus® Installation instructions BOW PRO Series Thrusters: BOWB065, BOWB076, BOWB090, BOWB110 and BOWB130 020808.02...
- Page 32 Podwójne Podwójne Drążek sterowniczy jest zepsuty mrugnięcie mrugnięcie Przycisk drążka sterowniczego jest 1x (.) wciśnięty Mrugnięcia szyb- Szybkie miganie Nie podłączony do sieci ko się odwracają vetus® Installation instructions BOW PRO Series Thrusters: BOWB065, BOWB076, BOWB090, BOWB110 and BOWB130 020808.02...
- Page 33 Installation instructions BOW PRO Series Thrusters: BOWB065, BOWB076, BOWB090, BOWB110 and BOWB130 020808.02...
- Page 34 Installation instructions BOW PRO Series Thrusters: BOWB065, BOWB076, BOWB090, BOWB110 and BOWB130 020808.02...
- Page 35 FOKKERSTRAAT 571 - 3125 BD SCHIEDAM - HOLLAND b.v. TEL.: +31 0(0)88 4884700 - sales@vetus.nl - www.vetus.com Printed in the Netherlands 020808.02 2020-11...
Need help?
Do you have a question about the BOW PRO B Series and is the answer not in the manual?
Questions and answers