
Related Manuals for MTH PUMPS T41 Series


Summary of Contents for MTH PUMPS T41 Series
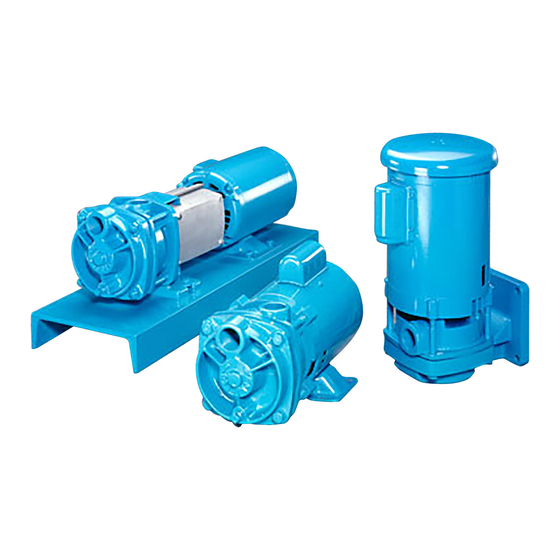
- Page 1 Section T41 Page 501 Dated January 2000 97-4622-01-588 Distributed by PumpBiz, Inc. www.pumpbiz.com 1800-PumpBiz (786-7249) T41 SERIES Pump Manual HORIZONTAL CLOSE COUPLED VERTICAL FLANGE MOUNTED FLEXIBLE COUPLED MTH PUMPS...
-
Page 2: General Instructions
Page 502 T41 SERIES 1.General Instructions HORIZONTAL CLOSE COUPLED PUMPS VERTICAL FLANGE MOUNTED CLOSE COUPLED PUMPS FLEXIBLE COUPLED PUMPS A. Inspection of Equipment lock collar, depending on the motor model is only slightly higher than the fluid B. Storage used. Applying torque to the motor fan source. -
Page 3: Installation
T41 SERIES Installation FLEXIBLE COUPLED PUMPS inlet pressure should be selected. One foundation is used as a support for the... - Page 4 Page 504 To check the ANGULAR alignment: feet so that strain and distortion will not b. Adjust the shims until the baseplate (Refer to Figure 2-5) result when the mounting bolts are is not distorted. tightened. 5. Use a section of pipe to determine if 2C Leveling (Flexible Coupled the inlet and discharge openings are Pumps Only, Refer to Figure 2-1)
-
Page 5: Operation
T41 SERIES 3.Operation If the motor operates in the wrong does not operate properly, the first thing... - Page 6 3F Cooling Water 1. Start the pump with the minimum of restarting. possible line restriction. T41 SERIES 4.Service PUMP ENDS 4E — Reassembly of the C3 and P3 Units 2. Remove the four (4) 3/8" X 4" bolts (#19) from the cover (#2).
- Page 7 Page 507 9. Remove the motor bracket. The 5. Using the 5/32" hex wrench, loosen 7. In some cases a rocking motion of the motor bracket will come loose once the set screws (#15) in the locking screwdrivers will be necessary to the shaft sleeve and rotating collar (#14), located on the shaft break the sleeve loose.
- Page 8 Page 508 c. Insert the 1" dowel and, very 5. Remove the impeller drive hub, Refer 7. Remove the motor bracket. The gently, tap the seat until it drops to Figure 4-8. Two (2) adjustable motor bracket will come loose once out.
- Page 9 Page 509 Cleanliness is imperative when working 4E Reassembly (C3 and P3) b. While holding the motor with mechanical seals. Almost bracket with the outlet port unnoticeable particles between seal All parts should be visually inspected and facing up, install two of the faces can be, and often are, the cause cleaned or replaced as outlined in 4D thru bolts into the motor face...
- Page 10 Page 510 T41 SERIES Service assembly over the sleeve until the 6. Remove the thru bolts installed in 2b. b. Lubricate the motor shaft with a spring holder rests against the Place the cover over the motor bracket small amount of glycol based shoulder of the sleeve.
- Page 11 Page 511 j. While maintaining inward 4. Install the impeller. 2. Connect all piping and fill the pump pressure on the hub, install the with fluid . impeller nut. Refer to Figure 4- a. The impeller is a slip fit and should slide on firmly but easily until it 3.
- Page 12 Page 512 T41 SERIES 4.Service BEARING PEDESTALS The disassembly and reassembly 3. 3/4" X 6" piece of water pipe for P3, procedures are broken into two sections 1-1/4" X 6" for P15. A. Preliminary covering the following units: 4. Internal snap ring plier.
- Page 13 Page 513 bearing is removed. Refer to Figure 4- and outside diameter, refer to Chart 5. Using a plastic or wooden mallet, 1, should be used between the arbor gently tap on the end of the shaft face plate and the lower bearing to until it slides out of the frame.
-
Page 14: Troubleshooting
PUMP ENDS (Final testing is done end. 1. Check to be sure that the rotating after the pump end is in place.) T41 SERIES Troubleshooting FLEXIBLE COUPLED PUMPS 4. Mechanical damage — Rotate the 5. Wrong direction of rotation — Com-... - Page 15 Page 515 3. Pump leaks — Seal or “O” rings are and now gives evidence of reduced 3. Specific gravity or viscosity too high — performance, it should be disassem- Check fluid involved. A different motor usually the problem. Disassembly bled and examined for wear after the may be necessary.
-
Page 16: Parts And Repair Services
6C Warranty Service be found in the yellow pages or by seals are stocked at MTH and are contacting MTH Pumps at 401 W. Main always available insofar as possible for All requests for warranty claims should be St. • Plano, IL 60545 Phone: 630-552- immediate shipment.
Need help?
Do you have a question about the T41 Series and is the answer not in the manual?
Questions and answers