Advertisement
FC-54P Quick Start Guide
This guide helps you install and use your FC-54P for the first time.
Go to
upgrades are available.
Scan for full manual
Step 1: Check what's in the box
FC-54P Ethernet Gateway
1 Power supply (5V DC)
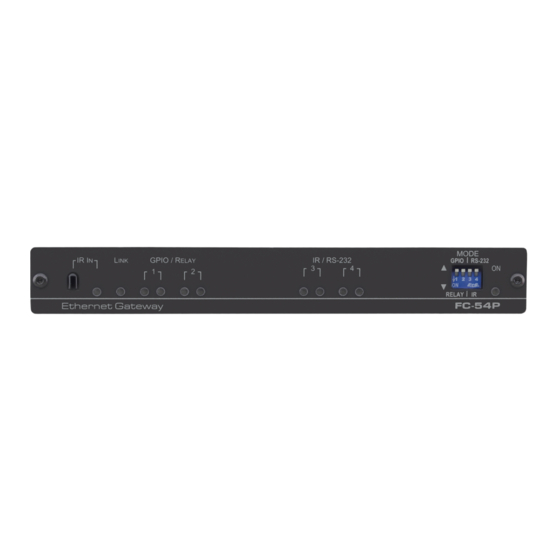
Step 2: Get to know your FC-54P
#
Feature
1
IR IN Sensor and LED
2
LINK LED
3
GPIO/RELAY 1/ 2 LED
pairs
4
IR/RS-232 3/4 LED
pairs
5
MODE DIP-switches
(Port 1 and Port 2)
6
MODE DIP-switches
(Port 3 and Port 4)
7
ON LED
FC-54P Quick Start (P/N: 2900-300626QS REV 1)
www.kramerav.com/downloads/FC-54P
4 Rubber feet
1 Quick start guide
Function
Sensor for IR learning, LED lights during activity
Shows the Ethernet link is active
Blue LED pair shows the activity status of port 1 and port 2:
When set as GPIO, the left LED of the pair indicates active IO-P1 and right LED indicates active IO-P2
When set as RELAY, the left LED of the pair indicates active Relay-P1 and right LED indicates active
Relay-P2
Blue LED pair show the activity status of port 3 and port 4:
When set as RS-232, the left LED of the pair indicates Tx and right LED indicates Rx
When set as IR, the left LED of the pair indicates IR-P1 Tx and right LED indicates IR-P2 Tx
Switch up (off) for GPIO, switch down (on) for Relay
The default setting is port 1 GPIO (up) and port 2 Relay (down)
Switch up for RS-232, switch down for IR
The default setting is port 1 RS-232 (up) and port 2 IR (down)
Lights green when the unit is on
to download the latest user manual and check if firmware
1 Bracket set
P/N:
2 9 0 0 - 3 0 0 6 2 6 QS
Rev: 1
Advertisement
Table of Contents

Summary of Contents for Kramer FC-54P
- Page 1 FC-54P Quick Start Guide This guide helps you install and use your FC-54P for the first time. Go to www.kramerav.com/downloads/FC-54P to download the latest user manual and check if firmware upgrades are available. Scan for full manual Step 1: Check what’s in the box...
- Page 2 5V DC Connector For extra power resiliency, connect to the 5V DC power supply, center pin positive. Not needed when the device is supplied power by PoE or a USB power source FC-54P Function Table Terminal Block Connections Port IO...
- Page 3 Step 3: Install the FC-54P You can attach the rubber feet and place on a table or mount the FC-54P in a rack (using an optional RK-T2B rack mount). You can also mount this Kramer MegaTOOLS™ next to a USB power source behind an AV device, in room ceiling area, on a desk top, wall or similar area.
- Page 4 Step 5: Connect the power Connect the PoE or a USB power source and/or a 5V DC power adapter to the FC-54P and plug it into the mains electricity. Step 6: Configure and operate the FC-54P Note: The FC-54P is shipped from the factory with DHCP enabled and a random IP address. To connect the FC-54P on first installation, you must identify what IP address has been automatically assigned to the FC-54P.


Need help?
Do you have a question about the FC-54P and is the answer not in the manual?
Questions and answers