CipherLab RS50 Reference Manual
Hide thumbs
Also See for RS50:
- Reference manual (31 pages) ,
- Quick start manual (2 pages) ,
- User manual (209 pages)
Table of Contents
Advertisement
Quick Links
Advertisement
Table of Contents

Subscribe to Our Youtube Channel
Related Manuals for CipherLab RS50


Summary of Contents for CipherLab RS50
- Page 1 RS50 Mobile Computer Android™ 6.0, Marshmallow Version 1.00...
- Page 2 The editorial use of these names is for identification as well as to the benefit of the owners, with no intention of infringement. CIPHERLAB logo is a registered trademark of CIPHERLAB CO., LTD.. All other brands, products and services, and trademark names are the property of their registered owners.
-
Page 3: Important Notices
Important Notices IMPORTANT NOTICES FOR USA FCC ID: Q3N-RS50 This equipment has been tested and found to comply with the limits for a Class B digital device, pursuant to Part 15 of the FCC Rules. These limits are designed to provide reasonable protection against harmful interference in a residential installation. -
Page 4: For Product With Laser
RS50 Mobile Computer FOR PRODUCT WITH LASER This laser component emits FDA / IEC Class 2 laser light at the exit port. Do NOT STARE INTO BEAM DIRECTLY. Do not aim the beam at the eyes. Any adjustments or performance excluding those specified herein ... -
Page 5: Safety Precautions
Do not use any pointed or sharp objects against the screen surface. Do not use the styluses which are not supplied or approved by CIPHERLAB CO., LTD., to prevent possible scratches to the touch screen. Water residue on the touch screen may cause abnormal behaviors or the fall of its ... -
Page 6: Scanner
RS50 Mobile Computer In order to prevent system from shutting down after the battery is drained out, keep a fresh battery for replacement at all times, or connect the mobile computer to an external power. If there are drippings or dust on the device or battery pack, wipe them away with a soft ... -
Page 7: Connection
Important Notices CONNECTION Via Bluetooth or WLAN Connection may fail when the mobile computer is around other wireless machines or power cables as the radio frequencies of those may cause interferences. If communication fails, move the devices much closer to each other, and try to ... -
Page 8: E-Label
RS50 Mobile Computer E-LABEL - 8 -... -
Page 9: Europe - Eu Declaration Of Conformity
Important Notices EUROPE - EU DECLARATION OF CONFORMITY - 9 -... - Page 10 RS50 Mobile Computer - 10 -...
-
Page 11: Release Notes
Release Notes RELEASE NOTES Version Date Notes Jun. 07, 2017 Initial release - 11 -... -
Page 12: Table Of Contents
1.2.1. Charge Mobile Computer ..................28 1.2.2. Wired Data Transmission ..................32 1.2.3 Using Wireless Networks ..................33 USING THE RS50 MOBILE COMPUTER ................... 34 2.1. Battery ........................35 2.1.1. Battery Status Indicators..................36 2.1.2. Monitor Battery Level .................... 38 2.1.3. - Page 13 RS50 Mobile Computer 2.2.2. Manage Storage Space ..................46 2.3. Touch Screen ......................53 2.3.1. Screen Brightness ....................53 2.3.2. Screen rotation ...................... 54 2.3.3. Screen Timeout Settings ..................56 2.3.4. Text Size ......................... 57 2.4. Notifications ......................58 2.4.1.
- Page 14 CONTENTS 4.2.7. Modify Wi-Fi Network ................... 119 4.2.8. Disconnect Wi-Fi Network ................... 119 4.3. Use Bluetooth ...................... 120 4.3.1. Bluetooth Profiles ....................120 4.3.2. Turn On Bluetooth ....................121 4.3.3. Change Bluetooth Name ..................122 4.3.4. Pair Bluetooth Devices ..................123 4.3.5.
-
Page 15: Introduction
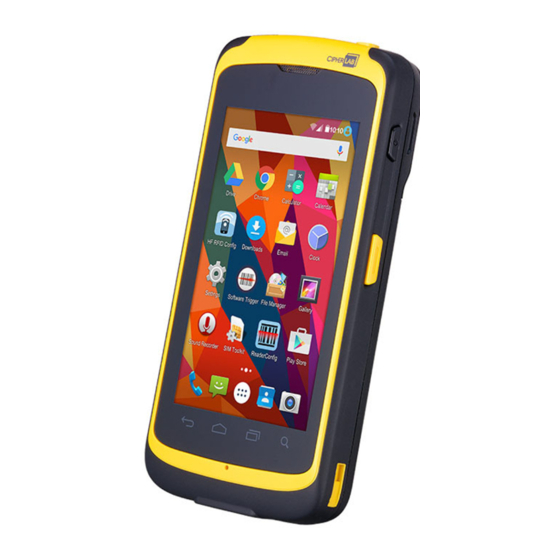
RS50 Mobile Computer INTRODUCTION The RS50 mobile computer, powered by Android™ 6.0 Marshmallow, is light-weight, easy to use, providing powerful and handy tools for the purpose of delivering flexibility in customization. Specifically designed to work as an industrial PDA, it provides rich options of data collection, voice and data communication, long-lasting working hours, and so on. -
Page 16: Features
RELATED DOCUMENTATION Log in to GoBetween to access related documentation about the RS50 mobile computer from the CipherLab Central Service (CCS) platform. Download the GoBetween desktop or mobile device application, or launch the GoBetween Lite web application from the following... -
Page 17: Quick Start
RS50 Mobile Computer Chapter 1 QUICK START This chapter helps you get ready for starting using the mobile computer. IN THIS CHAPTER 1.1 Overview ..............19 1.2 Charging & Communication .......... 28... -
Page 18: Overview
Quick Start 1.1. OVERVIEW... - Page 19 RS50 Mobile Computer Description Description Status LED Proximity+ALS Sensor Phone Receiver Power Button Side Trigger Key Charging & Communication Pins Microphone Touchscreen Scan Window Headset Jack Volume Buttons Loudspeaker Battery Latch Wrist Band Hole NFC Detection Area Battery Camera Flash...
-
Page 20: Installing Battery
Power Adaptor CipherLab approved Battery Pack 3.8V 4000mAH/3.8V 5300mAH (Standard/Extended) (Optional) rechargeable Li-ion CipherLab proprietary Approx. 5 hours/6 hours (Standard/Extended battery) via Charging time adapter Warning: For initial use, insert a charged battery, and then press the Power key to power on the... - Page 21 RS50 Mobile Computer REMOVE BATTERY Shut down this device first. Slide the key latch right; the battery will be unlocked with a click sound. Lift the battery up from its upper end.
-
Page 22: Installing Sim Card, Sam Card And Memory Card
Quick Start 1.1.2. INSTALLING SIM CARD, SAM CARD AND MEMORY CARD The RS50 mobile computer is equipped with two SIM card slots, one SAM card slot and one memory card slot. To insert the cards: Remove the battery as described in Remove Battery. - Page 23 RS50 Mobile Computer REMOVE CARDS Remove the battery. Remove the inner lid. Unlock the card hinge cover and remove the card. Replace the inner lid and the battery.
-
Page 24: Power On/Off Mobile Computer
Quick Start 1.1.3. POWER ON/OFF MOBILE COMPUTER POWER ON To power on the mobile computer, press and hold the power button located on the upper right side of the device. The mobile computer will turn on and show the Home Screen after splash screen. -
Page 25: Homescreen Selection
RS50 Mobile Computer 1.1.4. HOMESCREEN SELECTION Upon the first time you launch the system, a Select Home app window will pop up to request your immediate choice of home screen. By selecting “AppLock”, you will directly enter AppLock application (please refer to AppLock User Guide for detailed instructions on AppLock settings) to start configuring the interface provided to normal users of this device;... -
Page 26: Using Hardware Buttons
Quick Start 1.1.5. USING HARDWARE BUTTONS On the bottom of the mobile computer are three hardware buttons that deliver the following functions: Button Function Description Returns to the previous screen or closes Back button the active window or keyboard. Home button Displays the Home screen. -
Page 27: Charging & Communication
RS50 Mobile Computer 1.2. CHARGING & COMMUNICATION 1.2.1. CHARGE MOBILE COMPUTER The main battery may not be charged to full for shipment. When you first receive the kit package, you will need to charge the main battery to full before using the mobile computer. - Page 28 Quick Start USE SNAP-ON CHARGING CABLE The Snap-on Charging Cable provides a convenient way to charge your mobile computer. Fasten the Snap-on Charging Cable to the lower end of the mobile computer. Connect the other end of the cable to a USB port or the adaptor. Fix the adapter plug onto the adapter, and plug in into an electrical outlet.
- Page 29 RS50 Mobile Computer USE CHARGING CRADLE The Charging Cradle can charge your mobile computer and a spare battery at the same time. Presents charging compartment for mobile computer and spare battery Provides micro USB socket on the back for charging ...
- Page 30 Quick Start The status of the mobile computer charging is shown on the device itself; while the LED indicator on RS50 Charging Cradle shows the status of battery charging as below: Cradle LED Indicator Status Description Charging Red, solid Charging the battery...
-
Page 31: Wired Data Transmission
RS50 Mobile Computer 1.2.2. WIRED DATA TRANSMISSION Use the Snap-on cable to connect the mobile computer to your PC for data transmission. Connect your device to the computer with the supplied Snap-on cable. Swipe down from the status bar to reveal Notifications Drawer. -
Page 32: Using Wireless Networks
Quick Start 1.2.3 USING WIRELESS NETWORKS The mobile computer supports widely applied wireless technologies including Bluetooth v4.1 & v2.1+EDR, 802.11 a/b/g/n/ac, and is able to send/receive data in real time in an efficient way. Select GSM/GPRS/EDGE/WCDMA/HSPA/HSPA+/LTE modules embedded for a total wireless solution for data and voice communication. -
Page 33: Using The Rs50 Mobile Computer
RS50 Mobile Computer Chapter 2 USING THE RS50 MOBILE COMPUTER This chapter walks you through the fundamental usage and features of this device. IN THIS CHAPTER 2.1 Battery ..............35 2.2 Memory ..............44 2.3 Touch Screen ............. 53 2.4 Notifications ............... 58 2.5 Date and Time ............ -
Page 34: Battery
Using the RS50 Mobile Computer 2.1. BATTERY Main Battery The mobile computer is powered by a rechargeable 3.8V / 4000 mAh or 3.8V / 5000 mAh Li-ion battery pack. It takes approximately 4 hours to charge it to full from the power adaptor. -
Page 35: Battery Status Indicators
RS50 Mobile Computer 2.1.1. BATTERY STATUS INDICATORS The main battery pack is the only power source for the mobile computer to work. Therefore, when the main battery level goes low, you need to replace the battery pack with a charged one or charge it as soon as possible. - Page 36 Using the RS50 Mobile Computer Note: When the mobile computer is fully charged and battery level reaches 100%, the battery icon will change from to indicate charging is completed. Warning: (1) Once the battery level drops below 15%, the low battery notification will be displayed on the screen.
-
Page 37: Monitor Battery Level
RS50 Mobile Computer 2.1.2. MONITOR BATTERY LEVEL MAIN BATTERY LEVEL The main battery is the only source that feeds the mobile computer to work. It also supplies the backup battery on the main board in order to retain the data stored in DRAM. When main battery level gets low, recharge it or replace it as soon as possible. - Page 38 Using the RS50 Mobile Computer BATTERY SAVER MODE You can have the Battery saver mode automatically turned on when the main battery gets low. This mode will limit the use of location services, vibration and most background processing data. On Battery screen, tap on More and then select “Battery saver”.
- Page 39 RS50 Mobile Computer BATTERY OPTIMIZATION With Battery optimization enabled for the applications, you can make sure they stay inactive when your device is idle or when they have not been used for days. On Battery screen, tap More and then select “Battery optimization”.
- Page 40 Using the RS50 Mobile Computer LOW BATTERY ALERT The mobile computer prompts a warning notification reminding you to charge the main battery when the main battery level drops to 15% and 5%. In the meantime, the device’s status LED indicator will blink red.
-
Page 41: Replace Main Battery
2.1.3. REPLACE MAIN BATTERY When main battery level is low, follow the steps below to replace the main battery. RS50 backup battery supplies system power during battery swap. Make sure the new battery is fully-charged. Press and hold the power button on the side of the mobile computer. -
Page 42: Power Management
Using the RS50 Mobile Computer 2.1.4. POWER MANAGEMENT For any portable device, power management is a critical issue especially when you are on the road. Below are some tips to help you save battery power. Warning: Using backlight, wireless connectivity, and peripheral devices on battery power will substantially reduce battery power. -
Page 43: Memory
SD card, a microSDHC or a microSDXC card. When choosing an SD card for best compatibility and performance with RS50, please make sure of the capacity you need. For the use of SDXC card, please use a new card and make sure it has not been used in other host devices (computers, cameras, or readers). -
Page 44: Check Memory Usage
Using the RS50 Mobile Computer 2.2.1. CHECK MEMORY USAGE The memory manager can offer a glance of how the device is using its RAM. Tap All Apps | Settings | Memory to enter memory manager screen. On the main screen, it tells you not only the used and free memory space of the RAM, but how your pattern of usage has impacted the device’s overall performance. -
Page 45: Manage Storage Space
RS50 Mobile Computer 2.2.2. MANAGE STORAGE SPACE The SD card can serve as an extension of your Android device’s internal storage (which comes as 16 GB of flash memory to store the OS, applications and files) other than a portable storage place. - Page 46 Using the RS50 Mobile Computer SET UP SD CARD AS PORTABLE STORAGE Using SD card as a portable device allows you to treat it as a USB disk, by swapping it between your Android device and the computer to easily transfer files. This is quite handy when there is a need to offload files that are taking up too much storage space.
- Page 47 RS50 Mobile Computer Tap “ERASE & FORMAT” to format this card. The file format allows the card to be readable on other devices such as PC or a digital camera. At the window asking you whether to change the write disk from internal storage (default) to the SD card, tap “OK”...
- Page 48 Using the RS50 Mobile Computer CONVERT THE SD CARD TO INTERNAL STORAGE You can always convert the SD Card from portable storage to internal storage. On Storage & USB, tap the SD card radio button. Before you start, make a backup of the files on this disk if you would like to keep them.
- Page 49 RS50 Mobile Computer SET UP SD CARD AS INTERNAL STORAGE Using SD card as internal storage allows you to extend your existing device storage and to store huge applications. This SD card will be reformatted and encrypted with a file format that is not readable by another device.
- Page 50 Using the RS50 Mobile Computer To start: Insert the SD card. A notification will pop up indicating that an SD card is detected tap “SET UP”. Tap “Use as internal storage” and then “NEXT”. Tap “ERASE & FORMAT” to format this card.
- Page 51 RS50 Mobile Computer CONVERT THE SD CARD TO PORTABLE STORAGE You can always convert the SD Card from internal storage to portable storage. On Storage & USB, tap the SD card. Before you start, make a backup of the files on this disk if you would like to keep them.
-
Page 52: Touch Screen
Using the RS50 Mobile Computer 2.3. TOUCH SCREEN The mobile computer comes with a 4.7” transmissive LCD with 1280 by 720 pixels resolution (HD). The LED backlight of the screen, which helps ease reading under dim environments, can be controlled manually and automatically. -
Page 53: Screen Rotation
RS50 Mobile Computer 2.3.2. SCREEN ROTATION By default, the device automatically rotates the screen when you turn the device sideways. To switch this function on or off: Tap All Apps | Settings | Display Tap When device is rotated and then select Stay in portrait view to turn the rotation function off or tap Rotate the contents of the screen to enable it. - Page 54 Using the RS50 Mobile Computer You can entirely disable the switch on the interface to minimize the possibility of accidentally turning on the auto-rotation function. Tap All Apps | Settings | Accessibility and switch off Auto-rotate screen. By doing so, the auto-rotation option will be hidden on Quick Settings menu as well as in...
-
Page 55: Screen Timeout Settings
RS50 Mobile Computer 2.3.3. SCREEN TIMEOUT SETTINGS Tap All Apps | Settings | Display | Sleep. Select the time duration for screen timeout. -
Page 56: Text Size
Using the RS50 Mobile Computer 2.3.4. TEXT SIZE Tap All Apps | Settings | Display | Font size. Select the font size between Small, Normal, Large and Huge. -
Page 57: Notifications
RS50 Mobile Computer 2.4. NOTIFICATIONS 2.4.1. STATUS LED Two LED indicators located above the touch screen provide information about charging status, scanner light beam, and scanner "Good Read" during data collection. Indicator Status Description Green, solid Charging complete Charging Red, solid... -
Page 58: Audio
Using the RS50 Mobile Computer 2.4.2. AUDIO The speaker is used to play sounds for events, or play audio files. In addition, it can be programmed for status feedback. In noisy environments, you may consider connecting a headset instead. A headset jack is provided on the top of the mobile computer, which is a 3.5 mm DIA stereo earphone jack. -
Page 59: Sounds And Vibration
RS50 Mobile Computer 2.4.3. SOUNDS AND VIBRATION The mobile computer is integrated with a vibrator, which is software programmable for tactile feedback. This can be helpful when working in noisy environments. You may also set the mobile computer to vibrate only, in which all system sounds will be muted and replaced by the vibrator. - Page 60 Using the RS50 Mobile Computer DISABLE UNWANTED NOTIFICATIONS WITH “DO NOT DISTURB” You can temporarily disable specific notifications (vibration or sound) using “Do Not Disturb” in Quick Settings menu. What’s more, you can schedule the duration of the disabled status so that the notifications will switch to enabled state automatically based on your arrangement.
-
Page 61: Date And Time
RS50 Mobile Computer 2.5. DATE AND TIME 2.5.1. SET DATE, TIME AND TIME ZONE By default, the mobile computer automatically synchronizes the date and time to the WWAN network (if connected). To set the date and time manually: Tap All Apps | Settings | Date &... - Page 62 Using the RS50 Mobile Computer AUTOMATIC DATA & TIME You can have this device automatically synchronize with a designated NTP server: 1) Tap Automatic data & time and select Use network-provided time.
-
Page 63: Language & Keyboard Input
RS50 Mobile Computer 2.6. LANGUAGE & KEYBOARD INPUT Tap All Apps | Settings | Language & input to change the system language, default keyboard type, and configure keyboard input and speech settings. 2.6.1. CHANGE DISPLAY LANGUAGE On the Language & input screen, tap Language and then select your desired system... -
Page 64: On-Screen Keyboard
Using the RS50 Mobile Computer 2.6.2. ON-SCREEN KEYBOARD Tap a text input field to automatically open an on-screen keyboard. The virtual keyboard will vary depending on the data type (text or numbers) this field requires. SELECT KEYBOARD (INPUT METHOD) On the Language & input screen, select Current Keyboard to change your current keyboard or manage the selectable keyboards by entering “CHOOSE KEYBOARDS”... - Page 65 RS50 Mobile Computer Android provides a variety of keyboard layouts of different languages. To have more options of key layouts, for example, English (UK), you can: 1) On Language & input screen, select Gboard and then Languages. 2) On the list, disable “Use system language”.
- Page 66 Using the RS50 Mobile Computer ADJUST KEYBOARD SETTINGS To configure keyboard settings, tap and hold the comma button until a settings button appears. A menu will open, allowing you to adjust input language (if you would like to use an input language different from the system language) or keyboard settings.
- Page 67 RS50 Mobile Computer CHANGE KEYBOARD (INPUT METHOD) The input methods you enabled in Current Keyboard under Language & input are available by tapping on the on-screen keyboard. To use other input methods, simply tap it to cycle through the options.
- Page 68 Using the RS50 Mobile Computer EDIT TEXT Tap and hold text on the screen to enable a text editing menu for selecting all text, or copying and pasting text within or across applications. Some applications may use different ways to select or edit text.
- Page 69 RS50 Mobile Computer ENTER NUMBERS AND SYMBOLS The appearance of the switch button to numeric or symbol keyboard may vary; the example below demonstrates how to use the switch key to access your desired numeric or symbol keyboards from the default Gboard keyboard. To enter Numeric / Symbol keyboard, .
- Page 70 Using the RS50 Mobile Computer ENTER UPPERCASE LETTERS Tap and hold the Shift key , and tap a character key to enter an uppercase letter. The letters will return to lower case once an uppercase letter is entered. English (US) Keyboard...
-
Page 71: Sound And Volume
RS50 Mobile Computer 2.7. SOUND AND VOLUME Use the volume buttons on the left side of the mobile computer to adjust system and ringer volume. -
Page 72: Programmable Keys
Using the RS50 Mobile Computer 2.8. PROGRAMMABLE KEYS Use the volume buttons on the left side of the mobile computer to adjust system and ringer volume. Tap All Apps | Settings | Programmable keys to assign specific functions to the four programmable keys: volume up, volume down, and the left and right function keys (side keys). - Page 73 RS50 Mobile Computer ASSIGN KEYCODE Tap the key you would like to assign. A screen opens showing a list of available keycodes or applications. On the Keycodes tab page, scroll down to view the entire list of keycodes, and tap a keycode to apply.
- Page 74 Using the RS50 Mobile Computer ASSIGN APPLICATION Tap the key you would like to assign. Tap the Apps tab page to open a list of available applications. Scroll down to view the entire list of applications, and tap an application to apply.
- Page 75 RS50 Mobile Computer ASSIGN INTENT You can make use of the intent (the specific intent string should be input beforehand in the configuration xml file on your device) to assign a hardware key to launch a specific application. When you press this hardware key, this App will be launched by this intent.
- Page 76 Using the RS50 Mobile Computer IMPORT AND EXPORT SETTING After finishing configuring the keys, you can save the setting to a txt (XML format) file, allowing you to apply the same setting to other devices. To do this, tap More and then “Export”.
- Page 77 RS50 Mobile Computer To import the configuration file to be used in Programming keys, make sure the file is saved in the root folder of the device’s internal storage with the file name keys_config.txt. On the Programming keys screen, tap More and then “Import”.
-
Page 78: Data Capture
Using the RS50 Mobile Computer 2.9. DATA CAPTURE 2.9.1. BARCODE READER A selection of scan engines is available for delivering flexibility to meet different requirements. Depending on the scan engine integrated, the mobile computer is capable of scanning barcodes of a number of symbologies that are enabled by default while running the ReaderConfig application. -
Page 79: Basic Operation
Chapter 3 BASIC OPERATION This chapter describes the basic skills to work with the RS50 mobile computer, for instance, on how to operate the home screen, check system statuses and manage notifications. The add-on utilities for applications regarding data collection, processing, and transmission are introduced in the following chapters. -
Page 80: Home Screen
Basic Operation 3.1. HOME SCREEN When the mobile computer is fully charged, press the Power key for three seconds to turn on the mobile computer. A locked screen will appear. Slide the lock button in either direction to unlock the screen. - Page 81 RS50 Mobile Computer The Home Screen appears showing a status bar, shortcut icons, and a dock bar containing an All Apps button. The home screen allows multiple pages for placing shortcut icons and widgets. You may customize the home screen according to your preferences.
-
Page 82: Customize Home Screen
Basic Operation 3.1.1. CUSTOMIZE HOME SCREEN ADD APPLICATION SHORTCUT TO HOME SCREEN On the home screen you would like to customize, tap All Apps Locate the application to add, tap on and hold the application icon. The home screen will appear. Drag the application icon to your preferred position and release to have it placed. - Page 83 RS50 Mobile Computer ADD WIDGET TO HOME SCREEN Tap and hold any empty spot on the home screen. The current layout will shrink, and the available options related to home screen appear on the bottom. Tap Widgets to enter the widget selection list.
- Page 84 Basic Operation ARRANGE THE SHORTCUTS AND WIDGETS ON HOME SCREEN To move or remove a shortcut/widget, on the home screen you would like to customize, tap and hold it to enter layout edit mode, a floating option “X Remove” will appear on top of the screen, to which you can drag the unwanted shortcut to remove it.
- Page 85 RS50 Mobile Computer CHANGE HOME SCREEN WALLPAPER Tap and hold any empty spot on the home screen. Tap Wallpapers in the menu that appears. Select an image to apply as the wallpaper. Tap Set wallpaper at the bottom of the wallpaper preview screen to apply it.
- Page 86 Basic Operation CREATE FOLDER On the home screen you would like to customize, tap and hold the application shortcut you would like to move, drag the icon on the top of another icon to create a folder. As these icons overlap, a folder is created. After you let go your finger, these icons are enclosed in a circle.
- Page 87 RS50 Mobile Computer NAME A FOLDER Tap the folder you would like to name. The folder will expand from a small circle to a full rectangle to show all the shortcuts in it. Tap “Unnamed Folder” and edit the folder name.
- Page 88 Basic Operation REMOVE FOLDER Tap and hold the folder you would like to remove. Drag the folder to the top of the screen where the option “X Remove” is located. Note: Please note that, when you remove a folder, the shortcuts contained in it will be removed as well.
-
Page 89: Status Bar
RS50 Mobile Computer 3.2. STATUS BAR The left side of the status bar shows notification icons, and the right side of the status bar shows status icons. Notification Status icons 3.2.1. ICONS ON STATUS BAR STATUS ICONS Icon Description Bluetooth is on. - Page 90 Basic Operation The main battery is fully charged. The main battery is partially drained. Main battery level is very low and needs charging immediately (<5%). External power source is connected and main battery is being charged. NOTIFICATION ICONS Icon Description USB debugging mode is enabled on this device The device is performing data synchronization.
-
Page 91: Open Quick Setting Menu
RS50 Mobile Computer 3.2.2. OPEN QUICK SETTING MENU The status icons are related to essential settings regarding the device’s remaining power, Bluetooth status or Wi-Fi connectivity status. The status bar offers a quick access for you to easily make adjustments of the settings. To open Quick Setting menu, use your two fingers to swipe from the top to the bottom of the screen. -
Page 92: Open Notifications Drawer
Basic Operation 3.2.3. OPEN NOTIFICATIONS DRAWER The notifications icons on status bar inform you of the new events such as incoming calls, messages or USB connection. CHECK OUT NOTIFICATION To check out details of the events, swipe down from the status bar to open Notifications Drawer. - Page 93 RS50 Mobile Computer CLEAR NOTIFICATION To dismiss a single notification, simply swipe the notification card right or left. You can also dismiss all notifications at a time by tapping . Ongoing notifications and notifications that require subsequent activity to be cleared will remain on the list.
-
Page 94: Manage Applications
Basic Operation 3.3. MANAGE APPLICATIONS 3.3.1. APPLICATION MENU Tap All Apps on the Home screen to open the applications menu. Icon Name Description An application used to limit the system resources made AppLock available to Users Calculator Performs mathematical calculations. Calendar Creates and manages events, meetings and appointments. - Page 95 RS50 Mobile Computer Messaging Sends SMS and MMS messages. Places and receives calls, accesses voicemail, views call Phone history, manages phone contacts and adjusts phone settings. An Android built-in application for a photo and video Photos sharing and storage service developed by Google.
-
Page 96: Current Applications
Basic Operation 3.3.2. CURRENT APPLICATIONS Tap the Recent Apps button . The screen will show a list of recently used applications. On this screen, you can: SWITCH BETWEEN APPLICATIONS Swipe up or down to cycle through the listed applications; tap on your desired one to open it on the screen. -
Page 97: Suspend & Lock
RS50 Mobile Computer 3.4. SUSPEND & LOCK 3.4.1. SUSPEND DEVICE The mobile computer operates continuously once it is powered on. To minimize power consumption and prevent unintended operation, suspend the mobile computer if you are not actively using it. The mobile computer can be quickly awoken from suspend mode to operate as needed. - Page 98 Basic Operation By selecting a pattern, Voice Unlock, Pin or Password method, you can access advanced settings and Smart Lock to customize personal lock settings. Warning: To save battery power, suspend the mobile computer when not in use.
-
Page 99: Os Update
RS50 Mobile Computer 3.5. OS UPDATE Updating the operating system on the mobile computer helps maintain it at an optimized state. You may choose to update the system by establishing a wireless network connection to the Internet and downloading the update file from the OTA server. - Page 100 A window pops up asking you to input the password for system update. Please contact with support@cipherlab.com.tw for the password. Enter the password and tap OK. The mobile computer searches for an available system update file on the SD card.
-
Page 101: Back Up Your Data
RS50 Mobile Computer 3.6. BACK UP YOUR DATA With Android Backup Service, you can have your personal data (Google calendar settings, Google contacts, Chrome browser data and Gmail settings) and certain system settings under your Google account backed up (over network connection) on the cloud. This allows... -
Page 102: Reset To Factory Default
| Settings | Backup & reset and Factory data reset. Confirm the action by tapping on the buttons and input the verification code (Please to obtain your verification code). Finally, tap OK contact with support@cipherlab.com.tw to perform a factory reset. - Page 103 RS50 Mobile Computer As the mobile computer boots up for the first time after the reset, the Welcome wizard will run you through setting up the environment as well as restoring apps and data. During setup, you can tap SKIP to continue to the next step (you can finish the...
-
Page 104: Wireless Radios
Wireless Radios Chapter 4 WIRELESS RADIOS With the Wi-Fi module integrated on the mobile computer, you can configure and connect to network wirelessly. IN THIS CHAPTER 4.1 Use Wireless Wide Area Network ......... 106 4.2 Use Wireless Local Area Network (Wi-Fi) ...... 115 4.3 Use Bluetooth ............ -
Page 105: Use Wireless Wide Area Network
RS50 Mobile Computer 4.1. USE WIRELESS WIDE AREA NETWORK The mobile computer will be automatically configured to connect to your wireless service provider’s network when you insert a SIM card and turn on data connection for the first time. When a SIM card is inserted, a dialog will appear confirming the mobile carrier detected, you may tap “Touch to set up”... - Page 106 Wireless Radios EDIT ACCESS POINT NAME You may need to change the access point name according to the information obtained from your mobile carrier. Tap All Apps | Settings | More | Cellular networks | Access Point Names. Tap the button , and tap each field to input the APN name and settings obtained from your mobile carrier.
-
Page 107: Share Wwan Data
RS50 Mobile Computer 4.1.1. SHARE WWAN DATA The WWAN connection on the mobile computer can be shared to other devices. You may share internet connection with a computer or device through USB or Bluetooth tethering, or share with a maximum of eight devices by turning the mobile computer into a Wi-Fi hotspot. - Page 108 Wireless Radios USB TETHERING To share data connection through USB tethering: Connect the mobile computer with a USB cable. A USB icon will appear at the top of the screen, and in the Notifications Drawer, a description “Connected as USB Storage” will appear.
- Page 109 RS50 Mobile Computer WI-FI HOTSPOT To share data connection in the form of a Wi-Fi hotspot: Tap All Apps | Settings | More | Tethering & portable hotspot. Tap the Wi-Fi hotspot switch to enable data sharing through Wi-Fi. The mobile computer will start broadcasting its SSID for other devices to connect.
- Page 110 Wireless Radios DATA USAGE Data usage is the amount of data uploaded or downloaded on the mobile computer. Managing the data usage amount within a certain period of time is a recommended task, as an excess amount of data usage might incur additional fees from your service provider. To check wireless data usage: Tap All Apps | Settings...
- Page 111 RS50 Mobile Computer ENABLE DATA USAGE DURING ROAMING On the data usage tab page for your mobile carrier, tap More Select Cellular networks, and enable Data roaming for your mobile carrier. A dialog box appears confirming whether you would like to enable data roaming. Tap OK to confirm.
-
Page 112: Data Connection Settings
Wireless Radios 4.1.2. DATA CONNECTION SETTINGS TURN ON/OFF DATA CONNECTION To manually turn on/off mobile data connection: Tap All Apps | Settings | Data usage Select your data usage tab page for your mobile carrier. To turn on/off data connection, switch the Cellular data to the corresponding position. -
Page 113: Sim Card Settings
RS50 Mobile Computer 4.1.3. SIM CARD SETTINGS LOCK SIM CARD To lock the SIM card: Tap All Apps | Settings | Security , tap Set up SIM card lock. Enable Lock SIM card. Enter the PIN to enable SIM card lock. Once enabled, you are required to enter the PIN code in order to use the phone. -
Page 114: Use Wireless Local Area Network (Wi-Fi)
Wireless Radios 4.2. USE WIRELESS LOCAL AREA NETWORK (WI-FI) 4.2.1. CONNECT TO WI-FI NETWORK To power on Wi-Fi: Use two fingers to swipe down from the top of the screen to open Quick Settings. Tap Wi-Fi to scan for available networks. Select a network to connect. Tap All Apps | Settings | Wi-Fi... -
Page 115: Manually Add Wi-Fi Network
RS50 Mobile Computer 4.2.2. MANUALLY ADD WI-FI NETWORK If the network you would like to connect to does not broadcast its SSID, or if the network is out of range, you may add it manually. Tap All Apps | Settings... -
Page 116: Advanced Wi-Fi Settings
Wireless Radios 4.2.3. ADVANCED WI-FI SETTINGS To configure advanced Wi-Fi settings: On the Wi-Fi screen, tap More Select Advanced in the pop-up menu. Available settings are as below: Item Description Network notification Notifies when an open network is available. Keep Wi-Fi on during sleep Sets when to turn Wi-Fi on during sleep. -
Page 117: Configure Proxy Server
RS50 Mobile Computer 4.2.4. CONFIGURE PROXY SERVER A proxy server acts as an intermediary between an endpoint device and another server from which the device is requesting a service. To change the proxy settings for a connection: Tap a network in the available Wi-Fi hotspot list. -
Page 118: Modify Wi-Fi Network
Wireless Radios 4.2.7. MODIFY WI-FI NETWORK To change the settings for a connected network: Tap and hold a connected network in the Wi-Fi hotspot list. Tap Modify network in the pop-up menu. In the dialog box that opens, modify the network settings, and tap Save. 4.2.8. -
Page 119: Use Bluetooth
RS50 Mobile Computer 4.3. USE BLUETOOTH You can configure Bluetooth settings and manage Bluetooth services provided on remote devices. 4.3.1. BLUETOOTH PROFILES Bluetooth Profiles Supported Generic Access Profile (GAP) For device discovery and authentication. Service Discovery Access Profile (SDAP) Discovers services on remote devices. -
Page 120: Turn On Bluetooth
Wireless Radios 4.3.2. TURN ON BLUETOOTH By default, Bluetooth is turned off, to turn it on: Use two fingers to swipe down from the top of the screen to open Quick Settings. Tap Bluetooth to turn on this function while enabling the Bluetooth visibility of this device. -
Page 121: Change Bluetooth Name
RS50 Mobile Computer 4.3.3. CHANGE BLUETOOTH NAME To change the Bluetooth name of this mobile computer: On the available Bluetooth devices screen, tap More and select Rename this device in the pop-up menu. Type a new name in the field and tap RENAME. -
Page 122: Pair Bluetooth Devices
Wireless Radios 4.3.4. PAIR BLUETOOTH DEVICES Tap All Apps | Settings | Bluetooth . Tap the switch to On to scan for available Bluetooth devices nearby. Scroll through the list and tap the device you would like to pair. The Bluetooth pairing request dialog opens. Depending on the pairing settings of the Bluetooth device, you may need to enter a passkey, or confirm the assigned passkey on the device to pair if a smart pairing method is applied. -
Page 123: Use Near Field Communications
RS50 Mobile Computer 4.4. USE NEAR FIELD COMMUNICATIONS Near field communications (NFC) uses close proximity (4 cm or less) to establish radio communication through electromagnetic fields. With NFC enabled, the mobile computer can collect information from NFC tags, exchange information with other NFC supported devices, and even change information on the NFC tag if authorized. - Page 124 Wireless Radios PAIR WITH NFC ENABLED BLUETOOTH DEVICES On the device you would like to pair with, make sure NFC is enabled and Bluetooth discovery is enabled. Hold the mobile computer without covering the antenna area at the lower end of the battery.
-
Page 125: Using The Phone
RS50 Mobile Computer Chapter 5 USING THE PHONE The RS50 mobile computer allows making phone calls and connecting to the network over Wideband Code Division Multiple Access (WCDMA). Insert the SIM card before turning on the power. Refer to Installing SIM Card, SAM Card and Memory Card. -
Page 126: Sim Card Management
Using the PHONE 5.1. SIM CARD MANAGEMENT The mobile computer accommodates two SIM cards and supports dual standby of two different networks. Both networks will be monitored at the same time, and the phone will dynamically switch between the two networks during usage. Calls will be placed with either one of the networks;... -
Page 127: Phone Application
RS50 Mobile Computer 5.2. PHONE APPLICATION 5.2.1. PHONE INTERFACE When a SIM card is installed on the mobile computer, a signal icon appears on the status bar. The number of bars indicates the strength of the connection. Tap All Apps | Phone . -
Page 128: Place Call
Using the PHONE 5.2.2. PLACE CALL Enter the phone number in the dial pad and tap to initiate the call. If you need to frequently make calls to an interactive voice system, you may tap next to the number and select Add 2-sec pause for soft pause (a pause of 2 seconds to the buttons) or a hard pause (a pause that will wait for your confirmation to send the following digits). -
Page 129: During A Call
RS50 Mobile Computer 5.2.3. DURING A CALL When a call is connected, the phone keypad features the following buttons: Button Description Opens the dial pad. Turns on the speaker. Mutes the call. Places the call on hold. Add call: Adds another person to the call. - Page 130 Using the PHONE PLACE CALL USING CONTACTS To make a call using contacts: In the phone application page, tap Tap a contact to initiate a call.
-
Page 131: Receive Incoming Call
RS50 Mobile Computer 5.2.4. RECEIVE INCOMING CALL When a call is incoming on the mobile computer, tap to pick it up. Incoming calls will be logged in the Phone application; in the case of a missed call, a notification will be displayed. See Check Missed Calls. -
Page 132: Check Missed Calls
Using the PHONE 5.2.5. CHECK MISSED CALLS If you have a missed call, a notification icon will appear on the status bar. The number of missed calls will also be displayed next to Phone icon. Unlock the screen and use the Notifications Drawer to manage the missed call. -
Page 133: Call History
RS50 Mobile Computer 5.2.6. CALL HISTORY On the Phone application page, tap the History button to open a list of history calls. Or you can tap the settings button and then Call History. Button Description Connected calls. Missed calls. Tap the phone icon... -
Page 134: Make Multi-Party Calls
Using the PHONE 5.2.7. MAKE MULTI-PARTY CALLS To make multi-party conference calls: On the Phone application page, enter the first number to call and tap to initiate the call. and then Add call to add another member. The first call After the call has begun, tap will be put on hold. -
Page 135: Audio Modes
RS50 Mobile Computer 5.3. AUDIO MODES The mobile computer offers three different audio modes for phone calls: HANDSET MODE This is the default audio mode which uses the receiver above the touchscreen for audio output during calls. SPEAKER MODE This mode uses the built-in speaker for audio output during calls. -
Page 136: Using Reader Configuration Utility
Using Reader Configuration Utility Chapter 6 USING READER CONFIGURATION UTILITY The Reader Configuration utility allows you to manage the barcode reader integrated on the mobile computer. IN THIS CHAPTER 6.1 Configuring Reader ........... 138 6.2 Read Printed Barcodes ..........157... -
Page 137: Configuring Reader
RS50 Mobile Computer 6.1. CONFIGURING READER The mobile computer, equipped with either a (laser) 1D reader or a 2D imager scan engine, is capable of reading printed barcodes. The installed ReaderConfig utility on the mobile computer is to configure the scan engine; use the utility to create a profile of settings that best suits your needs. -
Page 138: General Settings
Using Reader Configuration Utility 6.1.1. GENERAL SETTINGS General Settings is where all reader settings are accessed from. Tap each item to enter its sub-menu. The functions under General Settings include: Scanner Preferences Data Output Enable Reader (enabled by default) ... - Page 139 RS50 Mobile Computer SCANNER PREFERENCES Options on the Scanner Preferences page differ according to the type of scan engine built within the mobile computer. To open Scanner Preferences page: Open ReaderConfig as described in Launch ReaderConfig. Tap Scanner Preferences.
- Page 140 Using Reader Configuration Utility 2D IMAGER SETTINGS Setting Description Default Decode Timeout Sets the maximum time for the decoding process during a scan. 3 sec. Configurable between 1 sec to 9 sec. Redundancy Level Sets how many successful readings should be done before Level 1 linear barcodes such as Codabar, MSI, and Interleaved 2 of 5 can be decoded.
- Page 141 RS50 Mobile Computer Inverse Type Decide whether to disable or enable decoding inverse barcodes, Regular or set as auto. only Addon Redundancy Functions when “auto-discriminate” is applied for UPC/EAN addons. Decides the number of times of supplemental decoding of the same barcode in order to count as a valid read.
- Page 142 Using Reader Configuration Utility WHERE TO OUTPUT Keyboard Emulation setting controls where the decoded data is to be output. Setting Descriptions Default Tap the switch to enable. When enabled, the reader Keyboard Emulation InputMethod module treats decoded data as typed text and outputs it to the active application on the mobile computer.
- Page 143 RS50 Mobile Computer HOW TO OUTPUT After the output destination is set, configure how to output decoded data, i.e. the “format” to present decoded data. Setting Description Default Auto Enter Adds an ENTER character before or after each string Decoded data + Enter of decoded data.
- Page 144 Using Reader Configuration Utility ENABLE READER Features a switch to enable or disable reader scanning ability. When enabled, a light beam will be sent out from the scanning window each time the trigger (scan key) is pressed. NOTIFICATION SETTINGS Notification Settings enables audible, visible and tactile feedback for scanning good read, which helps notify the user of a successful decoding.
-
Page 145: Symbology
RS50 Mobile Computer 6.1.2. SYMBOLOGY The Symbology page sets the symbologies to read, and also enables/disables some feature(s) for a symbology to read, such as: Customize and transmit start/stop characters Verify/transmit check digits Enable/disable addon digits Convert to another symbology ... - Page 146 Using Reader Configuration Utility 1D Symbologies 2D Symbologies ENABLE/DISABLE SYMBOLOGY Tap the label of each symbology to enable or disable it.
- Page 147 RS50 Mobile Computer SYMBOLOGY SETTINGS Tap the Detail label below each symbology to access detailed settings for the specific symbology. For details about the featured settings: See 2D Imager . ...
-
Page 148: Miscellaneous
Using Reader Configuration Utility 6.1.3. MISCELLANEOUS This section allows enabling code ID transmission for easy identification of the scanned barcode. Setting Description Default Transmit AIM Code ID Sets whether to include AIM code ID character in the Deselected decoded data. For AIM code ID, see the following: (Disabled) 2D Imager Symbology Settings... -
Page 149: Reader Config Option Menu
RS50 Mobile Computer 6.1.4. READER CONFIG OPTION MENU Reader Config provides an option menu which is accessible on the menu bar of the main settings page. This menu allows you to test scan barcodes, import/export all settings in a re-usable format, reset all settings back to factory default, and view copyright and version... - Page 150 Using Reader Configuration Utility SCAN TEST To test scan a barcode: Open Reader Config as described in Launch ReaderConfig. Tap the settings button on the menu bar to open the option menu. Tap Scan Test in the option menu. A page opens for test scanning.
- Page 151 RS50 Mobile Computer IMPORT AND EXPORT Reader Config supports saving the settings and exporting them as an .xml file. Previously exported symbology and scanner settings can be imported again on the mobile computer. This can also be used to implement identical Reader Config settings on multiple devices.
- Page 152 Using Reader Configuration Utility To export settings: Open Reader Config as described in Launch ReaderConfig. Tap the settings button on the menu bar to open the option menu. Tap Export. An export page opens allowing you to enter the name and location of the profile to save. Tap OK to export.
- Page 153 RS50 Mobile Computer RESET TO FACTORY DEFAULTS This function restores all settings in the Reader Config application to default. To enable Factory Reset: Open Reader Config as described in Launch ReaderConfig. Tap the settings button on the menu bar to open the option menu.
- Page 154 Using Reader Configuration Utility SECURITY You can set a password to restrict other users of this mobile computer from changing certain configurations or accessing certain functions in Reader Config. Open Reader Config as described in Launch ReaderConfig. Tap the settings button on the menu bar to open the option menu.
- Page 155 RS50 Mobile Computer ABOUT Tap About in the Reader Config option menu to display software version and copyright information.
-
Page 156: Read Printed Barcodes
Using Reader Configuration Utility 6.2. READ PRINTED BARCODES Aside from output to destinations as per Keyboard Emulation settings, Reader Config provides a Scan Test feature for quick viewing of decoded data. To perform test scanning of barcodes: Open Reader Config as described in Launch ReaderConfig. - Page 157 RS50 Mobile Computer The decoded data will appear on the page. When finished viewing, tap to leave the test scan page; or tap the settings button and then “Save” to save the decoded data as a .txt file or “Clear All” to clear all data on the screen.
-
Page 158: Specifications
SPECIFICATIONS PLATFORM, PROCESSOR & MEMORY Operating System & CPU OS Version Android™ 6.0 Marshmallow with GMS Certified Cortex A53 Octa-core 2.0GHz Memory 16GB Expansion Slot One microSD card slot (up to 32GB for SDHC; up to 2TB for SDXC) -
Page 159: Communication & Data Capture
RS50 Mobile Computer COMMUNICATION & DATA CAPTURE Communication USB Client USB 2.0 OTG WPAN Bluetooth Class II, v4.1 and v2.1+EDR (2402~2480 MHz: 3.3dBm) WLAN IEEE 802.11 a/b/g/n/ac networking (2412~2472 MHz: 18.41dBm 5180~5240MHz: 21.06dBm, 5260~5320MHz: 21.46dBm, 5500~5700MHz: 21.90dBm) WWAN Built-in WWAN modem for Quadband GSM, UMTS, LTE functions:... -
Page 160: Electrical Characteristics
Specifications ELECTRICAL CHARACTERISTICS Batteries Main Battery Pack Replaceable and rechargeable 3.8V 4000 mAh or 3.8V 5300 mAh Li-ion battery Backup Battery Rechargeable Li-ion battery: 3.7V, 60 mAh Capable of Data retention for 30 minutes Charging time: 4 hours Power Adaptor Power Supply Cord with Input AC 100~240 V, 50/60 Hz... -
Page 161: Environmental Characteristics
RS50 Mobile Computer ENVIRONMENTAL CHARACTERISTICS Temperature Operating -20°C to 50°C (-4°F to 122°F) Storage -30°C 70°C (-22°F to 158°F) Charging 0°C to 35°C Humidity Operating 10% to 90% (non-condensing) Storage 5% to 95% (non-condensing) Resistance Impact Resistance Multiple drops onto concrete at 1.8 m (6 ft.) on all six sides... -
Page 162: Programming Support
Environment Android studio Software Development Kit: JAR Environment: Visual Studio 2015 or later Software Development Kit: DLL (Xamarin Library) Software & Utilities Software Package Reader Configuration Software Trigger Key Xamarin Binding CipherLab TE App-Lock HTML5 (Browser and API) SOTI MobiControl Kalipso... -
Page 163: Scan Engine Settings
RS50 Mobile Computer APPENDIX I SCAN ENGINE SETTINGS Reader Configuration sets the following reader types: 2D Imager SYMBOLOGIES SUPPORTED Depending on the scan engine integrated on the mobile computer, supported symbologies will differ as listed below. For details on configuring associated settings, refer to... - Page 164 Appendix I Netherlands KIX Code US Postnet US Planet USPS Postal UPU FICS Postal UK Postal EAN/UPC EAN-8 EAN-8 Extend EAN-13 Bookland EAN (ISBN) ISSN EAN UPC-A UPC-E ...
-
Page 165: Imager
APPENDIX II 2D IMAGER The tables below list the symbology settings for 2D imager. SYMBOLOGY SETTINGS 1D SYMBOLOGIES Symbology Description Default CODABAR CodaBar Enable Codabar Switch to enable Codabar decoding. Enable Length option Sets the length of the Codabar symbols to decode. Length ... - Page 166 Appendix II Transmit Check Digit Decide whether to include the check digit in the data to Enable transmit. “Verify Check Digit” must be enabled. CODE 11 Code 11 Enable Code 11 Switch to enable Code 11 decoding. Enable Check Digit Option Sets whether to verify check digits according to the selected Disable option.
- Page 167 RS50 Mobile Computer Transmit Check Digit Decide whether to include the check digit in the data to Disable transmit. “Verify Check Digit” must be enabled. Support Full ASCII Selects whether to enable Code 39 Full ASCII decoding. Disable Characters are paired to encode the full ASCII character set.
- Page 168 Appendix II Enable App ID Check to enable the separator configuration for Application Separator Identifier. You can respectively set the Left Separator and Right Separator. Choose your input method from drop-down list: Keyboard input, Keyboard input (Hexadecimal) or Symbol table input to set a separator character to replace with.
- Page 169 RS50 Mobile Computer Chinese 25 Enable Chinese 25 Switch to enable Chinese 2 of 5 decoding. Enable Discrete 25 Enable Discrete 25 Switch to enable Discrete 2 of 5 decoding. Enable Length option Sets the length of the Discrete 2 of 5 symbols to decode.
- Page 170 Appendix II COMPOSITE Composite CC-A/B Disable Composite CC-A/B Switch to enable Composite CC-A/B decoding. Disable Composite CC-C Enable Composite CC-C Switch to enable Composite CC-C decoding. Enable Composite TLC 39 Disable Composite TLC 39 Switch to enable Composite TLC 39 decoding. Disable Composite General Preference UPC Composite Mode...
- Page 171 RS50 Mobile Computer Security Level There are setting options from Level 0 to 3 Level 1 KOREAN 3 OF 5 Korean 3 of 5 Disable Enable Switch to enable MSI decoding. Enable Length option Sets the length of the MSI symbols to decode.
- Page 172 Appendix II Addon 2 Decide whether to decode EAN-8 with addon 2. Ignore addon Ignore Addon Auto-discriminate Addon 5 Decide whether to decode EAN-8 with addon 5. Ignore addon Ignore Addon Auto-discriminate Transmit Check Digit Decide whether to include the check digit in the data being Enable transmitted.
- Page 173 RS50 Mobile Computer UPC-E Switch to enable UPC-E decoding. Enable Addon 2 Decide whether to decode UPC-E with addon 2. Ignore addon Ignore Addon Auto-discriminate Addon 5 Decide whether to decode UPC-E with addon 5. Ignore addon ...
- Page 174 Appendix II 2D SYMBOLOGIES Symbology Description Default Aztec Enable Aztec Switch to enable Aztec decoding. Enable Data Matrix Enable Data Matrix Switch to enable Data Matrix decoding. Enable Decode Mirror Image Switch to enable decode mirror images. Never Never Does not decode Data Matrix barcodes that are mirror images.
- Page 175 RS50 Mobile Computer The first codeword of MicroPDF417 is 910 or 911: The original Code ID "]L5" will be changed to "]C0". MicroQR Enable PDF417 Enable QR Code Enable QR Code Switch to enable QR Code decoding. Enable MISCELLANEOUS 2D Engine...
-
Page 176: Open Source License
Appendix III APPENDIX III OPEN SOURCE LICENSE The Reader Config involves the android-serialport-api project of Apache License Version 2.0, January 2004. http://www.apache.org/licenses/ TERMS AND CONDITIONS FOR USE, REPRODUCTION, AND DISTRIBUTION 1. Definitions. "License" shall mean the terms and conditions for use, reproduction, and distribution as defined by Sections 1 through 9 of this document. - Page 177 RS50 Mobile Computer "Derivative Works" shall mean any work, whether in Source or Object form, that is based on (or derived from) the Work and for which the editorial revisions, annotations, elaborations, or other modifications represent, as a whole, an original work of authorship. For the...
- Page 178 Appendix III c. You must retain, in the Source form of any Derivative Works that You distribute, all copyright, patent, trademark, and attribution notices from the Source form of the Work, excluding those notices that do not pertain to any part of the Derivative Works; and d.
- Page 179 RS50 Mobile Computer 9. Accepting Warranty or Additional Liability. While redistributing the Work or Derivative Works thereof, You may choose to offer, and charge a fee for, acceptance of support, warranty, indemnity, or other liability obligations and/or rights consistent with this License.
Need help?
Do you have a question about the RS50 and is the answer not in the manual?
Questions and answers