Table of Contents
Advertisement
Quick Links
U s e r M a n u a l
L R - 5 2 0 0 - 0 7 2 A d v a n c e d i D S P R e c e i v e r ( 7 2 M H z )
L R - 5 2 0 0 - 2 1 6 A d v a n c e d i D S P R e c e i v e r ( 2 1 6 M H z )
© 2018 Listen Technologies Corporation
For further details regarding use, adjustment, or programming of your Listen Technologies products visit
our website at www.listentech.com/support-manuals or contact us at +1.801.233.8992 or 1.800.330.0891.
All Rights Reserved
®
Advertisement
Table of Contents

Related Manuals for Listen Technologies LR-5200-072


Summary of Contents for Listen Technologies LR-5200-072
- Page 1 L R - 5 2 0 0 - 2 1 6 A d v a n c e d i D S P R e c e i v e r ( 2 1 6 M H z ) © 2018 Listen Technologies Corporation All Rights Reserved ® For further details regarding use, adjustment, or programming of your Listen Technologies products visit our website at www.listentech.com/support-manuals or contact us at +1.801.233.8992 or 1.800.330.0891.
- Page 2 Dear Valued Customer, Thank you for choosing Listen! We are dedicated to providing you with the highest quality products available, and take pride in delivering outstanding performance to ensure you are completely satisfied. We independently certify each of our products to the highest quality standards and back them with a limited lifetime guarantee.
-
Page 3: Table Of Contents
TABLE OF CONTENTS iDSP™ Receivers ……………………………………………………………………………………………………………………………………… LR-5200 Quick Reference ………………………………………………………………………………………………………………………… LR-5200 Specifications …………………………………………………………………………………………………………………………… Safety Cautions ……………………………………………………………………………………………………………………………………… Hearing Safety ………………………………………………………………………………………………………………………………… Medical Device Safety ……………………………………………………………………………………………………………………… Recycling ………………………………………………………………………………………………………………………………………………… Quick Setup and Operation Instructions ………………………………………………………………………………………………… Unpack Unit ……………………………………………………………………………………………………………………………… Activate Battery ………………………………………………………………………………………………………………………… Charge Battery …………………………………………………………………………………………………………………………… Connect Ear Phone ……………………………………………………………………………………………………………………... -
Page 4: Idsp™ Receivers
iDSP Receivers ™ The LR-5200 is a powerful Assistive Listening Receiver designed to be compact and simple to use. The unique design of the iDSP™ receiver family allows them to be worn as a necklace, using the belt clip or con- cealed in a pocket, making this the most inconspicuous ALS receiver on the market. -
Page 5: Lr-5200 Quick Reference
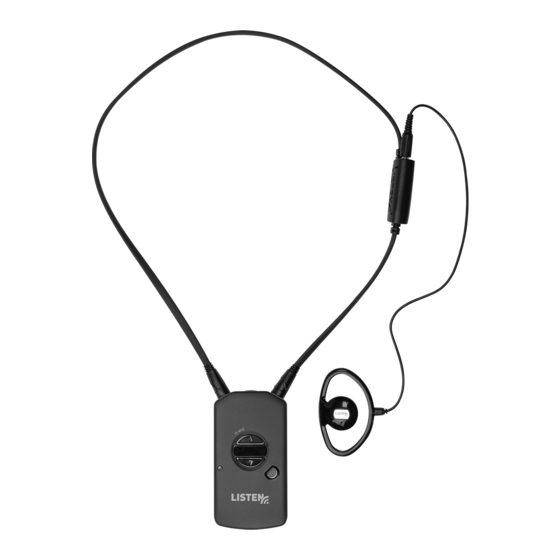
LR-5200 Quick Reference 3. Up/Down Volume Control 1. OLED Display Area 4. Programmable 2. Micro USB Channel Select 1. OLED Display Area: Displays battery status, unit ID, channel status, volume status and charge activation 2. Micro USB: USB charging, programming, firmware updates and inventory dispensing 3. -
Page 6: Lr-5200 Specifications
LR-5200 Specifications Product Specification: LR-5200-072 / LR-5200-216 Audio System Frequency Response 50 Hz - 15 kHz (±3 dB) System Signal to Noise Ratio SQ enabled 80 dB, SQ disabled 60 dB SQ enabled 70 dB, SQ disabled 50 dB System Distortion <2% total harmonic distortion (THD) at 80% deviation... -
Page 7: Safety Cautions
Always make sure you are using this product in accordance with the safety guidelines established by your physician or the implantable device manufactur- Recycling : Help Listen Technologies protect the environment! Please take the time to dispose of your equipment properly. Product Recycling Instructions: Please do NOT dispose of your Listen Technologies equipment in the household trash. -
Page 8: Quick Setup And Operation Instructions
3. Charge Battery Fully charge the rechargeable Lithium Ion battery by connecting the unit to one of Listen Technologies charging options. a. LA-380 Intelligent 12-Unit Charging/Carrying Case b. LA-381 Intelligent 12-Unit Charging Tray c. -
Page 9: Connect Earphone
Speaker 4. Connect Earphone Using The Earphone/Neck Loop Lan- yard Connect the Listen Intelligent ear phone/ neck loop lanyard to the two 3.5 mm output jacks on the Ear Phone/ unit. Then connect the short cable Neck Loop ear speaker or headphones to Lanyard the 3.5mm output jack on the Headset... -
Page 10: Turn The Unit On
5. Turn the Unit On Press and hold the Power Button for 1 second to turn the receiver on, the unit display will show the unit ID, battery status and the current channel. Each item will be displayed and then the display will turn off. Power Button: OLED Display: Press and hold for... -
Page 11: Channel Select Mode
Same Space: If you are using transmitters in the same space, the most number of channels that will work simultaneously is six wide band channels or 8 narrow band channels at 72 MHz, three wide band channels or 5 narrow band channels at 216 MHz. With all of the transmitters off, listen for interference on all the wide band channels via the headphone jack. -
Page 12: Automatic Channel Selection
1. Automatic Channel Selection In the Automatic Channel Selection mode the user decides how many channels of audio are to be received by the unit. In this mode the unit automatically selects the channels that can be used together simultaneously in a given space. The unit is defaulted to Auto 2. The max number of channels is 8 for 72 MHz and 5 for 216 MHz. -
Page 13: Channel Select Mode
4. Save/Exit: Press power button to save and exit. 1. Manual Select Mode: 2. Scroll Up/Down: Press and hold Use the up or down button to CH E the Power and scroll through available channels Down button simultaneously for 3 seconds 3. -
Page 14: Disabled
Disabled When in the disabled mode the Listen Button has no function. Listen Button Lock Once an active channel is found it is sometimes desirable to lock the unit onto the currently tuned channel and not allow the user to make any channel changes. This can be accomplished by pressing and holding the listen button for 5 seconds. -
Page 15: Adjust Volume
Adjust Volume Adjust the listening volume to a comfortable listening level via the volume up/down buttons. OLED: Volume Up/Down Indicates the Use the volume up level in a % of or down to raise/ maximum level lower volume If the volume is adjusted while there is no audio present the unit will output a momentary tone each time the button is pressed allowing the user to gauge and adjust the audio level to a comfortable listening level. -
Page 16: Battery & Belt Clip
Battery & Belt Clip Low Battery Indication When the unit detects a low battery condition it will cause the status LED to flash slowly indicating that the unit needs to be charged. When the light begins to flash the unit has approximately 30 minutes of receiver use before the unit will turn off. -
Page 17: Accessing Battery Compartment
Accessing Battery Compartment To access the battery compartment simply remove the belt clip and battery door by pulling down and out on the battery door locking tab. Note: The product labeling information can be found behind the battery and includes the product model number, description, serial number, contact information and compliance statement. Door locking Battery door... -
Page 18: Advanced Program Features And Listen's Ui Configuration Software
To manage the advanced program features on any of the iDSP™ receivers a windows based User Interface (UI) software is required. This software is available free of charge from Listen Technologies. To download the software log onto http://www.listen- tech.com/support/software/idsp-soft- ware-suite/ and follow the instructions. -
Page 19: Squelch
Squelch The purpose of squelch is to mute the audio output of the receiver when the signal from the transmitter is turned off or the level is too weak to be received. Without squelch radio noise will be heard in the earphone. The squelch on the receiver can be adjusted to mute the audio at different RF signal strengths. -
Page 20: Unit Id
Unit ID The unit ID number provides a unique identification for each receiver that is displayed on the OLED status screen. This can be any 3 digit number between 000 and 999. The unit ID allows venues to track individual units and for easy dispensing and inventory control. -
Page 21: Rf Reception Maximization Strategies
RF Reception Maximization Strategies: For proper and reliable operation, Listen receivers should receive a strong and consistent signal from the originating transmitter. Follow these strategies should be used to maximize this signal: When designing and installing a system, keep in mind that the location of both the transmitter and receivers is critical to maximizing signal strength Eliminate or minimize obstructions between the transmitter and receivers Minimize the distance between the transmitter and receivers... -
Page 22: 72 Mhz Compatibility Chart
72 MHz Compatibility Chart: Frequency Phonic Frequency Phonic Listen Comtek Phonak Williams* Gentner Telex Drake Listen Comtek Phonak Williams* Gentner Telex Drak e 72.0250 (11, 1) 74.6250 (36, 40) 72.0500 74.6500 (41) 72.0750 (12, 3) 74.6750 (37, 42) 72.1000 A, (13, 4) 72.1 74.7000 I, (38, 43) -
Page 23: 216 Mhz Compatibility Chart
216 MHz Compatibility Chart: Frequency Phonic Light Listen Phonak Comtek Williams Gentner Speed 216.0125 216.0250 216.0375 216.0625 216.0750 216.0875 216.1125 216.1250 216.1375 216.1625 216.1750 216.1875 216.2125 216.2250 216.2375 216.2625 216.2750 216.2875 216.3125 216.3250 216.3375 216.3625 216.3750 216.3875 216.4125 216.4250 216.4375 216.5125 216.5250 216.5375... -
Page 24: Troubleshooting Lr-5200 Receivers
Troubleshooting LR-5200 Receivers: The receiver has no power Make sure the unit has either a fully charged battery or a Listen approved wall charging transformer is connected. Make sure the Power button on the top of the unit has been pressed to turn the unit ON. If this does not work, make sure the battery is installed properly and / or install a replacement battery. -
Page 25: Compliance Notice And Fcc Statement
Compliance Notice and FCC Statement and Industry Canada Statements Compliance Notice This device complies with part 15 of the FCC Rules. Operation is subject to the following two conditions: (1) These devices may not cause harmful interference, and (2) these devices must accept any interference received, including interference that may cause undesirable operation. -
Page 26: Warranty
Product Warranty Listen Technologies Corporation (Listen) product warranty is only available to the original end purchaser of the product and cannot be transferred. Warranty is only valid if online form is completed or warranty card has been returned within 90 days of purchase. This warranty is void if damage occurred because of misuse or if the product has been repaired or modified by anyone other than a factory authorized service technician. ... - Page 27 Other Products and Accessories All other products and accessories carry a one year limited warranty to be free from defects in workmanship and material under normal use and conditions from date of purchase. The following cases are not covered by the above warranty: •...
-
Page 28: Contacting Listen
Contacting Listen If technical service is needed, please contact Listen. Pre-authorization is required before returning Listen products. If products were damaged in shipment, please contact the carrier, then contact Listen for replacement or repair requirements payable by the carrier. Listen’s corporate headquarters are located in Bluffdale, Utah U.S.A. and are open Monday through Friday, 8am to 5pm Mountain Time.
Need help?
Do you have a question about the LR-5200-072 and is the answer not in the manual?
Questions and answers