
Related Manuals for Redback E142C


Summary of Contents for Redback E142C
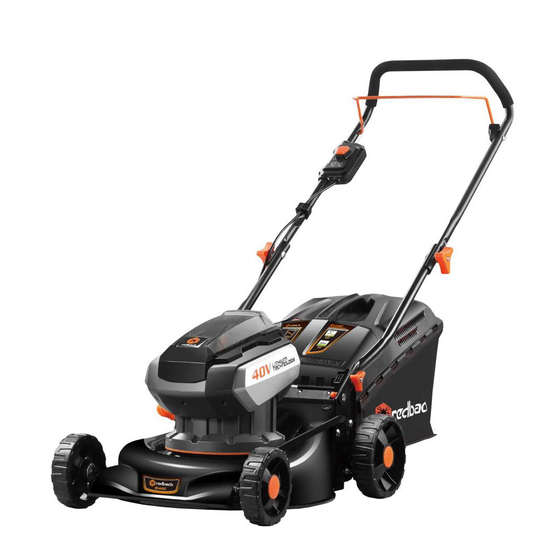
- Page 1 40V LITHIUM-ION CORDLESS LAWN MOWER Model: E142C Operations Manual www.redbacktool.com support@redbacktool.com...
-
Page 2: Table Of Contents
TABLE OF CONTENTS • Symbols……………………..1 • Before switching the power on, Safety Instructions read the operating manual. Read and Warnings………………….. 2 • Product Specifications…………7 all safety warnings and all • Assembly and Operation………7 instructions including the the • Charging The Battery….……..10 currently valid site rules and the •... -
Page 3: Safety Instructions
Any other use is not as intended. Improper use is not covered by the warranty and the manufacturer will reject Do not expose to rain or wet any liability. The user is liable for all conditions. injuries to third parties and damage to their property. - Page 4 trousers. Do not operate the unit when 12. Do not switch on the motor until your barefoot or wearing sandals. feet are at a safe distance from the cutter 6. Check the terrain on which the unit will bar. be used and remove any stones, sticks, 13.
- Page 5 For The Battery Charger explosive atmospheres, such as in the 1. Do not place any objects on the presence of flammable liquids, gases, or battery charger and do not place the dust. Power tools create sparks which battery charger on soft surfaces. may ignite the dust or fumes.
- Page 6 for outdoor use. Use of a cord suitable rotating part of the power tool may for outdoor use reduces the risk of increase the risk of injury. electric shock. 5. Do not overreach. Keep proper 6. If operating a power tool in a damp footing and balance at all times.
- Page 7 before storing the power tool. Such pack may create a risk of fire when used preventive safety measure reduces the with another battery pack. risk of starting the power tool 2. Use power tools only with specifically accidentally. designated battery packs. Use of any 4.
-
Page 8: Product Specifications
PRODUCT damaged. SPECIFICATIONS NOTE: batteries (optional; depending on delivery scope) are not Type E142C fully charged on delivery. Prior to initial Nominal voltage operation, charge the batteries fully. See user manual of the battery charger. EP20 Battery EP40 Safety Key... - Page 9 Assembly Attaching The Handle Bar Tools are not required to attach the handle bar. 1. Fold the lower handle upwards. Insert the two screws into the two holes and fasten the bar with the Attaching The Grass screws. Catcher 1. Lift the back cover of the mower. 2.
- Page 10 Removing The Battery 1. Press the release button. 2. Pull out the battery. Inserting/Replacing The Battery Ensure that the battery is fully charged before inserting it into the tool. 1. Open the battery cover. 2. Press the charged battery into the GENERAL SAFETY WARNING power tool until it clicks into place.
-
Page 11: Charging The Battery
Switching The Power Tool place 3. The LED will flash green while the 1. Release the On /Off switch (see #2 battery is charging. in the illustration above). - Once the battery is fully charged, the LED indicator will show a steady green light. -
Page 12: Exploded View And Part List
EXPLODED VIEW AND PARTS LIST 1. Upper Handle 2. Fasten Screw 7. Switch Interlock 3. Lower Handle 8. Foam Pipe 4. Grass Catcher 9. On/Off Switch 5. Battery 10. Plastic Stopper 6. Wheels 11. Safety Key 12. Cutting Height Adjustment Ball... -
Page 13: Maintenance And Care
MAINTENANCE AND 3. Remove the battery. 4. Remove the grass catcher. CARE 5. After mowing, always clean the lawnmower with a hand brush. 6. Remove grass residues carefully out of the cutting area. Remove 1. Switch the unit off, remove the safety stuck clipping deposits using a stick. -
Page 14: Disposal
DISPOSAL Folding the Lawn Mower INFORMATION The handle bar can be folded down to facilitate storage and transport. Loosen the screws of triangle knob on the upper handle and move the handle Recycle materials instead backwards . disposing wastes. Device, accessories and packaging should be recycled in an environmentally friendly Replacing/Regrinding The... -
Page 15: Declaration Of Conformity
1. Description: Battery operated lawn receipt with purchase date. Repairs mower under the guarantee may be carried out 2. Type: E142C only by workshops or service centres 3. Serial number: authorised by the manufacturer. 4. Applicable EC Directives: 2006/42/EC 5.
Need help?
Do you have a question about the E142C and is the answer not in the manual?
Questions and answers