Table of Contents
Advertisement
Available languages
Available languages
Quick Links
Updated information (the la0test Instruction Manual, system updates, new functions, etc.) is
available from <http://www.kenwood.com/cs/ce/>.
Des informations actualisées (le dernier mode d'emploi, les mises à jour du système, les nou-
velles fonctions, etc.) sont disponibles sur le site <http://www.kenwood.com/cs/ce/>.
La información actualizada (el Manual de instrucciones más actualizado, actualizaciones del
sistema, nuevas funciones, etc.) está disponible desde <http://www.kenwood.com/cs/ce/>.
Take the time to read through this instruction manual.
Familiarity with installation and operation procedures will help you obtain the best performance from your new
receiver.
For your records
Record the serial number, found on the back of the unit, in the spaces designated on the warranty card, and in the space
provided below. Refer to the model and serial numbers whenever you call upon your KENWOOD dealer for information or
service on the product.
Model DDX6906S/ DDX6706S/ DDX5706S/ DMX706S/ DMX7706S Serial number
US Residence Only
Register your KENWOOD product at www.kenwood.com/usa/
© 2019 JVC KENWOOD Corporation
MONITOR WITH DVD RECEIVER
MONITEUR AVEC RÉCEPTEUR DVD
MONITOR CON RECEPTOR DVD
DDX6906S
DDX6706S
DDX5706S
MONITOR WITH RECEIVER
MONITEUR AVEC RÉCEPTEUR
MONITOR CON RECEPTOR
DMX706S
DMX7706S
Quick Start Guide
Guide de démarrage rapide
Guía de inicio rápido
Register Online
B5K-0606-10 (K)
Advertisement
Chapters
Table of Contents

Related Manuals for JVC KENWOOD DDX6906S


Summary of Contents for JVC KENWOOD DDX6906S
- Page 1 Record the serial number, found on the back of the unit, in the spaces designated on the warranty card, and in the space provided below. Refer to the model and serial numbers whenever you call upon your KENWOOD dealer for information or service on the product. Model DDX6906S/ DDX6706S/ DDX5706S/ DMX706S/ DMX7706S Serial number US Residence Only Register Online Register your KENWOOD product at www.kenwood.com/usa/...
-
Page 2: Table Of Contents
Contents About the Quick start guide About the Quick start guide ........2 This Quick Start Guide describes basic functions of this unit. How to read this manual ......... 2 For functions not described in this Guide, refer Precautions ..............3 to the Instruction Manual on the following Initial Settings .............. -
Page 3: Precautions
Ñ Precautions Lens fogging When you turn on the car heater in cold weather, dew may form on the lens in the # WARNINGS disc player of the unit due to condensation. This condensation on the lens (also called lens Ñ... -
Page 4: Initial Settings
Initial Settings ■ [Camera] Set the parameters for the camera. 1 Touch [Camera]. Initial setup 2 Set each item and touch [ For details of, see Camera Setup (P.62) in Perform this setup when you use this unit first the Instruction Manual. time. -
Page 5: Adjusting The Volume
DMX7706S Press [R] to increase, and press [S] to decrease. Holding [R] increases the volume continuously to level 15. DDX6906S/ DDX6706S DMX706S/ DMX7706S h User Interface screen appears. Touch [Time Zone] in the User Interface screen. Select the time zone. -
Page 6: Functions Of The Buttons On The Front Panel
Basic Operations Functions of the Buttons on the Front Panel DDX6906S/ DDX6706S DDX5706S DMX706S/ DMX7706S... -
Page 7: Turning On The Unit
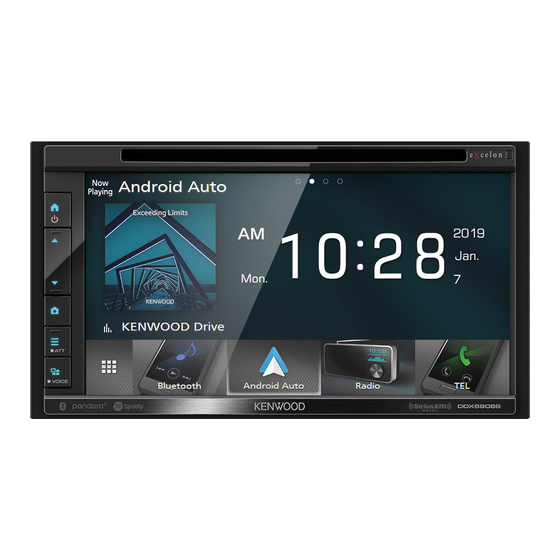
• When the power is off, turns the power on. S, R • Adjusts the volume. The volume will go up to 15 when you keep pressing. (DDX6906S/ DDX6706S/ (Volume) DMX706S/ DMX7706S only) • Switches view camera display on/off (P.62) in the Instruction Manual. - Page 8 • Switches to the SiriusXM® satellite radio broadcast. • Plays a Bluetooth audio player • Plays a disc. (DDX6906S/ DDX6706S/ DDX5706S) • Plays an iPod/iPhone. Display source selection buttons by touching [ ] or flicking left or right on the source •...
-
Page 9: Source Control Screen Descriptions
Customize Short-cut buttons on Source control screen HOME screen descriptions You can arrange the positions of the source There are some functions which can be icons as you like. performed from most screens. Press the [ ]/[HOME] button. Indicators h HOME screen appears. Touch [ Touch and hold the icon which you want to move in the customizing mode. -
Page 10: Playing A Disc
Playing a disc Connecting a USB device (DDX6906S/ DDX6706S/ DDX5706S) Connect the USB device with the USB Ñ cable. (P.26) Insert a disc Insert the disc into the slot. Press the [ ]/[HOME] button. Touch [ Touch [USB]. Ñ Disconnect the USB device h The unit loads the disc and playback starts. -
Page 11: Dvd/ Vcd Basic Operation
DVD/ VCD Basic Operation Function panel (DDX6906S/ DDX6706S/ DDX5706S) Touch the left side of the screen to display the function panel. Touch again to close the panel. Operation keys NOTE • [E] [F] : Searches for the previous/next • The screen shot below is for DVD. It may be different from the one for VCD. -
Page 12: Radio Basic Operation
Radio Basic Operation Information display Displays the information on the current station. To listen to the Radio source, touch [Radio] Seek mode icon on the source selection screen. (P.8) Touch to switch seek mode in the following Control screen sequence: [AUTO1], [AUTO2], [MANUAL]. •... -
Page 13: Music Cd/ Disc Media/Usb Basic Operation
Music CD/ Disc media/USB Play mode indicator/ Playing time Basic Operation • D, B, etc.: Current play mode indicator Meanings of the icons are as follows: D (play), B (fast forward), A (fast backward), NOTE H (pause). • In this manual, “Music CD” means a general CD •... -
Page 14: Ipod/Iphone Basic Operation
iPod/iPhone Basic Operation Artwork • Displays/hides artwork area. Ñ Connectable iPod/iPhone Play mode indicator/ Playing time • D, B, etc.: Current play mode indicator The following models can be connected to Meanings of individual icons are as follows: this unit. D (play), B (fast forward), A (fast Made for backward), H (pause). -
Page 15: Bluetooth Setup
Ñ Bluetooth Setup Connect the Bluetooth device Touch [Select Device] on the Bluetooth Press the [ ]/[MENU] button. Setup screen. h Popup menu appears. Touch [SETUP]. h SETUP screen appears. Touch [Bluetooth]. Touch the name of the device you want to connect. -
Page 16: Using The Hands-Free Unit
Using the Hands-Free Unit Select a dialing method. You can use the telephone function by connecting the Bluetooth telephone to this unit. NOTE • If you use the hands-free function frequently, move the TEL short-cut button (icon) to the HOME screen. (P.9) •... - Page 17 Call using call records Call using the phonebook Touch [ Touch [ Select the phone number from the list. Touch [ Select the initial. Call using the preset number • Characters with no corresponding name will not appear. Touch [ •...
-
Page 18: Before Installation
Connection/Installation • If your car’s ignition does not have an ACC Before Installation position, connect the ignition wires to a power source that can be turned on and off with the Before installation of this unit, please note the ignition key. If you connect the ignition wire to following precautions. - Page 19 Blocking these openings will inhibit the cooling of the internal temperature and result in malfunction. (DDX6906S/ DDX6706S/ DDX5706S) (3 m) Cooling fan (DMX706S/ DMX7706S) Cooling fan (M5 x 8 mm) (M5 x 8 mm) •...
-
Page 20: Installing The Unit
Ñ Installing the unit Trim plate 1) Attach accessory 6 to the unit. Ñ Non-Japanese cars DDX6906S/ DDX6706S/ DDX5706S A : Wide B : Narrow Bend the tabs of the mounting sleeve with a screwdriver DMX706S/ DMX7706S or similar utensil and attach it in place. - Page 21 Lower the trim plate (accessory 6) and pull it deeply into the slots on each side, as shown. forward as shown in the figure. DDX6906S/ DDX6706S/ DDX5706S 3) Lower the extraction key toward the bottom, and pull out the unit halfway while pressing Catch towards the inside.
- Page 22 Ñ Connecting wires to terminals ● DDX6906S/ DDX6706S/ DDX5706S Speaker impedance: 4-8 Ω Fuse (15A) White To front left speaker White/Black Gray To front right speaker Gray/Black Green To rear left speaker Green/Black Connect to the vehicle’s Accessory 1 parking brake detection switch harness.
- Page 23 ● DMX706S/ DMX7706S Fuse (10A) Speaker impedance: 4-8 Ω White To front left speaker White/Black Gray To front right speaker Gray/Black Green To rear left speaker Green/Black Accessory 1 Connect to the vehicle’s parking brake detection switch harness. Purple To rear right speaker Purple/Black Light Green Accessory 7 (2 m)
- Page 24 Ñ 3-way speaker system setup ● DDX6906S ● DMX706S Subwoofer Preout Subwoofer Preout Mid Range Preout Mid Range Preout Tweeter Preout Tweeter Preout White To mid range left speaker When connecting to an external amplifier, White/Black connect its ground wire to the car’s chassis to Gray avoid damaging the unit.
- Page 25 For more information on how to install the SiriusXM Connect Vehicle tuner, consult the installation guide included with the tuner. ● DDX6906S/ DDX6706S/ DDX5706S iDatalink connector AV-IN (CA-C3AV; Optional Accessory) input (DDX6906S/ DDX6706S/ DDX5706S only) Accessory 2: Bluetooth Microphone...
- Page 26 Ñ Connecting a USB device ● DDX6906S/ DDX6706S/ DDX5706S USB cable (1 m) USB terminal USB device ● DMX706S/ DMX7706S USB cable (1 m) USB maximum power supply current : DC 5 V = 1.5 A Sold separately Ñ Connecting an iPod/iPhone ●...
- Page 27 Ñ Connecting an Android smartphone ● DDX6906S/ DDX6706S/ DDX5706S Android smartphone USB cable (1 m) USB terminal ● DMX706S/ DMX7706S Micro USB to USB cable USB cable (1 m) USB maximum power supply current : DC 5 V = 1.5 A...
-
Page 28: About This Unit
Ubiquitous Corp. Copyright© 2017 Ubiquitous Corp. trademarks owned by the Bluetooth SIG, Inc. and any All rights reserved. use of such marks by JVC KENWOOD Corporation is under license. Other trademarks and trade names are those of their respective owners. - Page 29 – Redistributions in binary form must reproduce the • libogg above copyright notice, this list of conditions and Copyright (c) 2002, Xiph.org Foundation the following disclaimer in the documentation Redistribution and use in source and binary forms, and/or other materials provided with the with or without modification, are permitted provided distribution.
-
Page 30: À Propos Du Guide De Démarrage Rapide
Table des matières À propos du guide de démarrage rapide À propos du guide de démarrage rapide ..30 Comment lire ce manuel ........30 Ce Guide de démarrage rapide décrit les fonctions de base de cet appareil. Précautions ..............31 Pour les fonctions qui ne sont pas décrites Paramètres initiaux ..........32 dans ce guide, reportez-vous au mode Réglage du volume ..........33... -
Page 31: Précautions
Ñ Précautions Condensation sur la lentille Par temps froid, lorsque vous allumez le chauffage de la voiture, de la buée peut se # AVERTISSEMENTS former sur la lentille du lecteur de disque de l'appareil à cause de la condensation. Cette Ñ... -
Page 32: Paramètres Initiaux
Paramètres initiaux Pour les explications détaillées, voir Configuration de l'affichage (P.68) dans le mode d'emploi. Configuration initiale ■ [Camera] Configurez les paramètres de caméra. Effectuez cette configuration lors de la 1 Touchez [Camera]. première utilisation de cet appareil. 2 Réglez chaque option et touchez [ Réglez chaque option comme suit. -
Page 33: Réglage Du Volume
[S] pour réduire. Maintenez [R] enfoncé pour augmenter le volume de façon continue jusqu'au niveau 15. h L'écran d'interface utilisateur s'affiche. DDX6906S/ DDX6706S DMX706S/ DMX7706S Touchez [Time Zone] sur l'écran d'interface utilisateur. Sélectionnez le fuseau horaire. Réglez chaque option comme suit. -
Page 34: Fonctions Des Boutons En Façade
Utilisation de base Fonctions des boutons en façade DDX6906S/ DDX6706S DDX5706S DMX706S/ DMX7706S... -
Page 35: Mise En Marche De L'appareil
• Affiche l'écran APP (CarPlay/Android Auto). • Appuyez pendant 1 seconde pour afficher l'écran de reconnaissance vocale (P.58) dans le mode d'emploi. Logement • Logement où insérer les disques à contenu multimédia. (DDX6906S/ DDX6706S/ d'insertion des DDX5706S uniquement) disques Capteur de •... - Page 36 • Commute sur la réception radio satellite SiriusXM®. • Active un lecteur audio Bluetooth • Lit un disque. (DDX6906S/DDX6706S/DDX5706S) • Reproduit sur un iPod/iPhone. Affichez les boutons de sélection de la source en touchant [ ]/[ ] ou en faisant défiler sur la •...
-
Page 37: Descriptions De L'écran De Commande De Source
Descriptions de l'écran de Touchez [STANDBY]. commande de source Certaines fonctions peuvent être exécutées depuis la plupart des écrans. Indicateurs Personnalisez les boutons de raccourcis sur l'écran ACCUEIL Vous pouvez disposer les pictogrammes des sources comme bon vous semble. Appuyez sur la touche [ ]/[HOME]. h L'écran d'ACCUEIL apparaît. -
Page 38: Lecture D'un Disque
Lecture d'un disque Connecter un périphérique (DDX6906S/DDX6706S/DDX5706S) Ñ Insérer un disque Branchez le périphérique USB avec le câble USB. (P.54) Insérez le disque dans son logement. Appuyez sur la touche [ ]/[HOME]. Touchez [ Appuyez sur [USB]. h L'appareil charge le disque et la lecture Ñ... -
Page 39: Utilisation De Base Avec Les Dvd/Vcd
Utilisation de base avec les Panneau de fonction DVD/VCD Appuyez sur le côté gauche de l'écran pour afficher le panneau de fonction. Appuyez de (DDX6906S/DDX6706S/DDX5706S) nouveau pour fermer le panneau. Touches de commande REMARQUE • [E] [F] : Recherche le contenu précédent/ •... -
Page 40: Utilisation De Base De La Radio
Utilisation de base de la radio Affichage des informations Affiche les informations concernant la station Pour écouter la source radio, appuyez sur en cours. l'icône [Radio] sur l'écran de sélection de la Mode de recherche source. (P.36) Touchez pour changer de mode de recherche Écran de contrôle dans l'ordre suivant : [AUTO1], [AUTO2], [MANUAL]. -
Page 41: Fonctionnement De Base De Cd Musical/Disque À Contenu Multimédia/Usb
Fonctionnement de base de de lecture. (Fichier vidéo uniquement) CD musical/Disque à contenu Touches de commande multimédia/USB • [1] (Disque à contenu multimédia uniquement) : Recherche les fichiers. Pour plus REMARQUE de détails sur les recherches, voir Recherche • Dans ce manuel, « Music CD » fait référence à un de fichier (P. -
Page 42: Fonctionnement De Base De L'ipod/Iphone
Fonctionnement de base de Illustrations l'iPod/iPhone • Affiche/dissimule la zone d'illustration. Indicateur du mode de lecture/du temps Ñ de lecture iPod/iPhone connectables • D, B, etc. : Indicateur du mode de lecture Les modèles suivants peuvent être reliés à cet en cours appareil. -
Page 43: Configuration Bluetooth
Configuration Bluetooth Appuyez sur le nom du périphérique que vous souhaitez connecter. Appuyez sur la touche [ ]/[MENU]. h Le menu contextuel s'affiche. Touchez [SETUP]. h L'écran de CONFIGURATION s'affiche. h L'écran de sélection des profils apparaît. Touchez [Bluetooth]. REMARQUE •... -
Page 44: Utilisation Du Module Mains-Libres
Utilisation du module mains- Sélectionnez une méthode de numérotation. libres Vous pouvez utiliser la fonction téléphone en connectant le téléphone Bluetooth à cet appareil. REMARQUE • Si vous utilisez la fonction mains libres fréquemment, déplacez la touche de raccourci TEL (icône) sur l'écran d'accueil. (P.37) •... - Page 45 Appel depuis l'historique des appels Appel depuis le répertoire téléphonique Touchez [ Touchez [ Sélectionnez dans la liste le numéro de Touchez [ téléphone. Sélectionner l'initiale. Appel depuis un numéro présélectionné • Les caractères n'ayant aucun nom correspondant ne sont pas affichés. Touchez [ •...
-
Page 46: Avant L'installation
Connexion/Installation • Si l'appareil n'est pas sous tension (« There is Avant l'installation an error in the speaker wiring. Please check the connections. » (Il y a un problème avec Avant d'installer cet appareil, veuillez prendre le câblage du haut-parleur. Veuillez vérifier les mesures de précaution suivantes. - Page 47 L'obstruction de ces orifices empêcherait le refroidissement de la température interne du ventilateur, provoquant alors un dysfonctionnement. (3 m) (DDX6906S/ DDX6706S/ DDX5706S) Ventilateur (M5 x 8 mm) (DMX706S/ DMX7706S) Ventilateur (M5 x 8 mm) •...
-
Page 48: Installation De L'appareil
Ñ Installation de l'appareil Plaque de garniture 1) Fixez l'accessoire 6 à l'appareil. Ñ Voitures non japonaises DDX6906S/ DDX6706S/ DDX5706S A : Large B : Étroit Courbez les languettes de la douille de montage DMX706S/ DMX7706S à l'aide d'un tournevis ou d'un outil similaire, puis fixez-la en place. - Page 49 Abaissez la plaque de finition (accessoire 6) chaque côté, comme illustré. et poussez-la en avant, comme indiqué sur la figure. DDX6906S/ DDX6706S/ DDX5706S 3) Rabattez la clé d'extraction vers le bas, et tirez l'appareil à mi-distance tout en appuyant vers Fermeture l'intérieur.
- Page 50 Ñ Connexion des câbles sur les contacts électriques ● DDX6906S/ DDX6706S/ DDX5706S Impédance de haut-parleur : 4-8 Ω Fusible (15 A) Blanc Vers haut-parleur avant gauche Blanc/Noir Gris Vers haut-parleur avant droit Gris/Noir Vert Vers haut-parleur arrière gauche Vert/Noir Connexion au commutateur de Accessoire 1 détection du frein à...
- Page 51 ● DMX706S/ DMX7706S Impédance de haut-parleur : Fusible (10 A) 4-8 Ω Blanc Vers haut-parleur avant gauche Blanc/Noir Gris Vers haut-parleur avant droit Gris/Noir Vert Vers haut-parleur arrière gauche Vert/Noir Accessoire 1 Connexion au commutateur de détection du frein à main. Violet Vers haut-parleur arrière Vert clair...
- Page 52 Ñ Configuration du système d'enceinte à 3 voies ● DDX6906S ● DMX706S Préamplification du Préamplification du caisson de basses caisson de basses Préamplification de Préamplification de l'enceinte des médiums l'enceinte des médiums Préamplification du haut- Préamplification du haut-parleur des aigus...
- Page 53 Connecteur du syntoniseur de véhicule composants externes SiriusXMTuner Pour plus d'informations sur la manière d'installer le tuner pour véhicule SiriusXM, ● DDX6906S/ DDX6706S/ DDX5706S consultez le Guide d'installation inclus avec le tuner. Connecteur iDatalink Entrée AV-IN (CA-C3AV ; accessoire en option)
- Page 54 Ñ Connecter un périphérique USB ● DDX6906S/ DDX6706S/ DDX5706S Câble USB (1 m) Borne USB Périphérique USB ● DMX706S/ DMX7706S Câble USB (1 m) Tension d'alimentation maximum pour USB : DC 5 V = 1,5 A Vendue séparément Ñ Branchement d'un iPod/iPhone ●...
- Page 55 Ñ Connecter un smartphone Android ● DDX6906S/ DDX6706S/ DDX5706S Smartphone Android Câble USB (1 m) Borne USB ● DMX706S/ DMX7706S Micro USB vers câble USB Câble USB (1 m) Tension d'alimentation maximum pour USB : DC 5 V = 1,5 A Vendu séparément...
-
Page 56: À Propos De Cet Appareil
Ubiquitous Corp. Copyright© 2017 Ubiquitous Corp. des marques déposées de Bluetooth SIG, Inc. et All rights reserved. toute utilisation de ces marques par JVC KENWOOD Corporation est faite sous licence. Les autres marques déposées et appellations commerciales appartiennent à leurs propriétaires respectifs. - Page 57 above copyright notice, this list of conditions and • libogg the following disclaimer in the documentation Copyright (c) 2002, Xiph.org Foundation and/or other materials provided with the Redistribution and use in source and binary forms, distribution. with or without modification, are permitted provided –...
-
Page 58: Acerca De La Guía De Inicio Rápido
Contenido Acerca de la Guía de inicio rápido Acerca de la Guía de inicio rápido ......58 Cómo leer este manual ..........58 Esta Guía de inicio rápido describe las funciones básicas de esta unidad. Precauciones ..............59 En el caso de funciones no descritas en la Ajustes iniciales ............60 Guía, consulte el Manual de instrucciones en el Ajuste del volumen ..........61... -
Page 59: Precauciones
Ñ Precauciones Empañamiento de la lente Al activar la calefacción del coche cuando hace frío, puede aparecer vaho en la lente del # ADVERTENCIAS reproductor de disco de la unidad a causa de la condensación. Esta condensación en la Ñ Para evitar lesiones o incendios, lente (también denominada empañamiento de la lente) puede hacer que los discos no se... -
Page 60: Ajustes Iniciales
Ajustes iniciales 7 Toque [ Para obtener más información, consulte Configuración del visualizador (P.68) en el Configuración inicial Manual de instrucciones. ■ [Camera] Realice esta configuración si es la primera vez Ajusta los parámetros de la cámara. que utiliza esta unidad. 1 Toque [Camera]. -
Page 61: Ajuste Del Volumen
Pulse [R] para subirlo y pulse [S] para bajarlo. Si mantiene pulsado [R] el volumen aumenta de forma continua hasta el nivel 15. DDX6906S/ DDX6706S DMX706S/ DMX7706S h Aparecerá la pantalla User Interface. Toque [Time Zone] en la pantalla Interfaz del usuario. -
Page 62: Funciones De Los Botones Del Panel Frontal
Funciones básicas Funciones de los botones del panel frontal DDX6906S/ DDX6706S DDX5706S DMX706S/ DMX7706S... -
Page 63: Poner En Marcha La Unidad
• Si la unidad está apagada, la enciende. S, R • Ajusta el volumen. Si continúa presionando, el volumen aumentará hasta 15. (DDX6906S/DDX6706S/ (Volumen) DMX706S/DMX7706S solamente) • Activa/desactiva la visualización de la cámara de visión (P.62) en el Manual de ]/CAM instrucciones. - Page 64 • Cambia a la transmisión de radio satelital SiriusXM®. • Reproduce un reproductor de audio Bluetooth • Reproduce un disco. (DDX6906S/DDX6706S/DDX5706S) • Reproduce un iPod/iPhone. Visualice los botones de selección de fuente tocando [ ] [ ] o moviendo el dedo hacia la •...
-
Page 65: Descripciones De La Pantalla De Control De Fuente
Descripciones de la pantalla de Toque [STANDBY]. control de fuente Existen funciones que pueden ejecutarse desde la mayoría de las pantallas. Indicadores Personalizar los botones de acceso directo de la pantalla INICIO Puede colocar los iconos de las fuentes en las posiciones que desee. -
Page 66: Reproducción De Un Disco
Reproducción de un disco Conexión de un dispositivo (DDX6906S/DDX6706S/DDX5706S) Ñ Introduzca un disco Conecte el dispositivo USB con el cable USB. (P.82) Introduzca el disco en la ranura. Pulse el botón [ ]/[HOME]. Toque [ Toque [USB]. h La unidad carga el disco y se inicia la Ñ... -
Page 67: Manejo Básico De Dvd/Vcd
Manejo básico de DVD/VCD Panel de funciones (DDX6906S/DDX6706S/DDX5706S) Toque el lado izquierdo de la pantalla para mostrar el panel de funciones. Toque de nuevo para cerrar el panel. NOTA Teclas de operación • La captura siguiente corresponde al modo de DVD. -
Page 68: Funcionamiento Básico De La Radio
Funcionamiento básico de la Pantalla de información radio Muestra información sobre la emisora actual. Modo de búsqueda Para escuchar la fuente de radio, toque el Toque para cambiar al modo de búsqueda icono [Radio] en la pantalla de selección de en la siguiente secuencia: [AUTO1], [AUTO2], fuente. -
Page 69: Funcionamiento Básico De Cd De Música/Disco De Datos/Usb
Funcionamiento básico de CD Teclas de operación de música/disco de datos/USB • [1] (solamente disco de datos) : Busca archivos. Para obtener más detalles sobre la función de búsqueda, consulte Operación de NOTA búsqueda de archivo (P.20) en el Manual de •... -
Page 70: Funcionamiento Básico De Ipod/Iphone
Funcionamiento básico de Ilustraciones iPod/iPhone • Muestra/oculta la zona de ilustraciones. Indicador del modo de reproducción/ Ñ Tiempo de reproducción iPod/iPhone que pueden • D, B, etc.: Indicador del modo de conectarse reproducción actual Los siguientes modelos pueden conectarse a El significado de los iconos individuales es el esta unidad. -
Page 71: Configuración De Bluetooth
Configuración de Bluetooth Toque el nombre del dispositivo que desee conectar. Pulse el botón [ ]/[MENU]. h Aparece el menú emergente. Toque [SETUP]. h Aparece la pantalla CONFIGURACIÓN. h Aparece la pantalla de selección de Toque [Bluetooth]. perfil. NOTA • Si el icono está iluminado, significa que la unidad utilizará... -
Page 72: Usar La Unidad De Manos Libres
Usar la unidad de manos libres Seleccione un método de marcación. Puede usar la función de teléfono conectando un teléfono Bluetooth a esta unidad. NOTA • Si utiliza frecuentemente la función manos libres, mueva el botón de acceso directo (icono) TEL a la pantalla HOME. - Page 73 Llamar usando datos de llamada Llamar usando la agenda telefónica almacenados Toque [ Toque [ Toque [ Seleccione el número de teléfono de la Seleccione la inicial. lista. • Los caracteres que no correspondan a Llamar usando el número ningún nombre no aparecen. preseleccionado •...
-
Page 74: Antes De La Instalación
Conexión/Instalación altavoz haya sufrido un cortocircuito o que Antes de la instalación haya tocado el chasis del vehículo y se haya activado la función de protección. Por lo tanto, Antes de la instalación de esta unidad, tenga el cable del altavoz debe ser revisado. en cuenta las precauciones siguientes. - Page 75 Si estas aberturas quedan bloqueadas, la refrigeración no se producirá, aumentando la temperatura interna y provocando averías. (DDX6906S/ DDX6706S/ DDX5706S) (3 m) Ventilador de refrigeración (DMX706S/ DMX7706S) (M5 x 8 mm) Ventilador de refrigeración...
-
Page 76: Instalación De La Unidad
Ñ Instalación de la unidad Placa de montaje 1) Conecte el accesorio 6 a la unidad. Ñ Coches no japoneses DDX6906S/ DDX6706S/ DDX5706S A : Ancho B : Estrecho Doble las lengüetas del manguito de montaje con un DMX706S/ DMX7706S destornillador o similar y fíjelo. - Page 77 Baje la moldura embellecedora (accesorio 6) y tire de ella hacia delante tal y como se muestra en la figura. DDX6906S/ DDX6706S/ DDX5706S 3) Mueva la llave de extracción hacia abajo y extraiga la unidad hasta la mitad mientras presiona hacia dentro.
- Page 78 Ñ Conectar los cables a los terminales ● DDX6906S/ DDX6706S/ DDX5706S Fusible (15A) Blanco Impedancia del altavoz: 4-8 Ω Al altavoz delantero izquierdo Blanco/Negro Gris Al altavoz delantero derecho Gris/Negro Verde Al altavoz trasero izquierdo Realice la conexión en el arnés Verde/negro del interruptor de detección...
- Page 79 ● DMX706S/ DMX7706S Impedancia del altavoz: Fusible (10A) 4-8 Ω Blanco Al altavoz delantero izquierdo Blanco/Negro Gris Al altavoz delantero derecho Gris/Negro Verde Al altavoz trasero izquierdo Realice la conexión en el arnés Verde/negro Accesorio 1 del interruptor de detección del freno de estacionamiento del vehículo.
- Page 80 Ñ Configuración de sistema de altavoces de 3 vías ● DDX6906S ● DMX706S Salida previa del Salida previa del subwoofer subwoofer Salida preamplificada Salida preamplificada de de rango medio rango medio Salida preamplificada Salida preamplificada del del tweeter tweeter Blanco...
- Page 81 Conector del sintonizador para vehículos componentes externos SiriusXM Connect Para obtener más información acerca de cómo instalar el sintonizador SiriusXM Connect ● DDX6906S/ DDX6706S/ DDX5706S Vehicle, consulte la guía de instalación suministrada con el sintonizador. Conector iDatalink Entrada AV-IN (CA-C3AV; accesorio opcional) (DDX6906S/DDX6706S/DDX5706S solo) Accesorio 2: Micrófono Bluetooth...
- Page 82 Ñ Conexión de un dispositivo USB ● DDX6906S/ DDX6706S/ DDX5706S Cable USB (1 m) Terminal USB Dispositivo USB ● DMX706S/ DMX7706S Cable USB (1 m) Corriente de alimentación máxima USB : CC 5 V = 1,5 A Vendida por separado Ñ...
- Page 83 Ñ Conexión de un teléfono inteligente Android ● DDX6906S/ DDX6706S/ DDX5706S Smartphone Android Cable USB (1 m) Terminal USB ● DMX706S/ DMX7706S Micro USB a cable USB Cable USB (1 m) Corriente de alimentación máxima USB : CC 5 V = 1,5 A Se vende por separado Español...
-
Page 84: Acerca De Esta Unidad
Ubiquitous Corp. Copyright© 2017 Ubiquitous Corp. registradas propiedad de Bluetooth SIG, Inc., y All rights reserved. cualquier uso de los mismos por JVC KENWOOD Corporation se realiza bajo licencia. El resto de marcas comerciales y nombres comerciales corresponden a sus respectivos propietarios. - Page 85 above copyright notice, this list of conditions and • libogg the following disclaimer in the documentation Copyright (c) 2002, Xiph.org Foundation and/or other materials provided with the Redistribution and use in source and binary forms, distribution. with or without modification, are permitted provided –...
- Page 86 21 CFR SUBCHAPTER J IN EFFECT AT DATE OF This product contains a CR Coin Cell Lithium Battery MANUFACTURE. which contains Perchlorate Material – special handling may apply. Location See www.dtsc.ca.gov/hazardouswaste/perchlorate. DDX6906S/ DDX6706S/ DDX5706S: Top plate DMX706S/ DMX7706S: Bottom plate...
- Page 87 ■ Note de ‘IC (Industrie Canada) ■ Información acerca de la eliminación de equipos eléctricos y electrónicos Le présent appareil est conforme aux CNR d’Industrie Canada applicables aux appareils radio exempts de al final de la vida útil (aplicable a los licence.
Need help?
Do you have a question about the DDX6906S and is the answer not in the manual?
Questions and answers