
Related Manuals for Comelit HUB32LCD


Summary of Contents for Comelit HUB32LCD
- Page 1 USER MANUAL Quick-start user manual for wireless intruder alarm control panel HUB32LCD Passion.Technology.Design.
-
Page 2: Table Of Contents
Index Index ....................2 Available documentation ..............3 Introduction ..................3 The front panel ................. 4 Viewing the system status .............. 4 Accessing the menu ................ 5 Arming the alarm system ..............5 Disarming the alarm system ............5 Forced arming .................. 5 Custom area arming ................ -
Page 3: Available Documentation
Introduction Thank you for choosing a Comelit Secur Hub wireless intruder alarm system. It is designed to off er the utmost fl exibility and ease of use. Cutting-edge connectivity, advanced video surveillance functions and elegant design make it the perfect choice to keep your family and your property safe. -
Page 4: The Front Panel
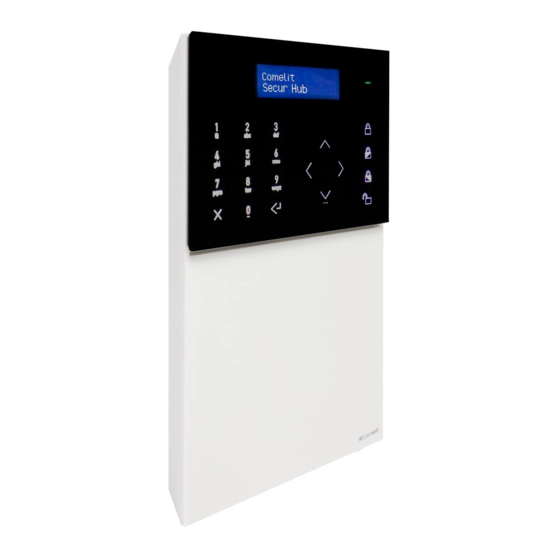
The front panel 16 x 2-character LCD. LED indicators: green, orange, red. Alphanumeric keypad. Arming/disarming buttons. Back/Cancel/Delete button. Enter/Confi rm button. Navigation keypad / menu button. • Green LED: indicates the system is armed (lit steadily) or in “not ready to arm” condition (fl ashing). The LED is off if the system is ready for arming. -
Page 5: Accessing The Menu
Accessing the menu The user menu is accessed by entering the user code followed by the down arrow. A guide to all user menu options is available online. See the chapter “Available documentation”. Enter user code (default: 111111) Arming the alarm system The system can be armed in various ways: total arm, part arm 1 and part arm 2. -
Page 6: Custom Area Arming
Custom area arming This procedure is used to confi gure a custom arming program in which the user can quickly select the arming status for each area. • Access custom arming set with [CODE] + [ENTER]. • Using buttons 1, 2, 3, 4 the user can set the desired arming status for each area (if present). An asterisk beside the arming status indicates that the setting has been changed (but the areas are not in that condition yet). -
Page 7: Silencing An Alarm / Alarm Memory
Silencing an alarm / Alarm Memory After an alarm is triggered, the control panel begins to send the intruder event alerts to the contacts in the phonebook programmed by the installer. The siren begins to sound, the red LED on the control panel is lit steadily and the alarm alert is displayed. If the zone is reset, the control panel will show the message “System in alarm”... -
Page 8: View / Edit Zone Status
View / edit zone status This menu can be used to select which zones will be excluded in the next arming procedure. Exclusion prevents the violation of these zones from triggering an alarm. The same menu can be used to isolate a zone (this prevents that zone from generating any messages, including the tampering message). Please bear in mind that excluded zones are automatically re-included when the system is disarmed. -
Page 9: Using The Radio Control
Using the radio control 1. Button 1 2. Button 2 3. Button 3 4. Button 4 5. 3-Colour LED The remote control has 4 buttons. All the buttons can be confi gured using the programming software on the control panel. By default button 1 is assigned to the “total arming”... -
Page 10: Consult Event Log
Consult event log Use this function to consult the event log. The control panel can log up to 1024 events. New events are stored in the log as event 0000. Event 1023 becomes 1024 and is then deleted from the log. To consult the log: Enter the installer code (default 001961) using the alphanumeric keypad and press the down arrow. - Page 12 CERTIFIED MANAGEMENT SYSTEMS w w w . c o m e l i t g r o u p . c o m Via Don Arrigoni, 5 - 24020 Rovetta (BG) - Italy...
Need help?
Do you have a question about the HUB32LCD and is the answer not in the manual?
Questions and answers