Table of Contents
Advertisement
Quick Links
Advertisement
Table of Contents

Subscribe to Our Youtube Channel
Summary of Contents for Elgee Power-Vac 632-E
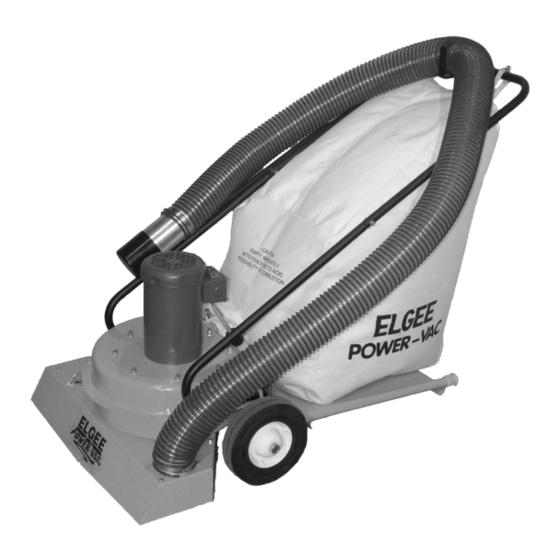
- Page 1 OWNER’S MANUAL...
-
Page 2: Table Of Contents
Additional Resources and Contact Information ....15 Elgee Power-Vac Limited Warranty ......16... -
Page 3: Assembling The Power-Vac
Assembling the Power-Vac Assembling your new Elgee Power-Vac is a snap. Just follow the instructions on the next few pages and you’ll be up and running in no time! Below is an exploded view showing the main components to be assembled. The hardware that is used is detailed on the next page. - Page 4 You’ll need just a few tools . . . • Ratchet wrench with 1/2” socket and extension • 1/2” Open end wrench • Rubber mallet All the hardware you’ll need is provided . . . 5/16” x 1-1/2” Hex Head Screw (4) 5/16”...
-
Page 5: Handle Assembly
Handle Assembly Attach the Left and Right Handle Legs to the machine body. NOTE: The Right Handle Leg has five holes and goes on the right side of the machine (when viewed from the operator’s position); the Left Handle Leg has only three holes and goes on the left side. For each leg, use two hex-head machine screws, flat washers, and locking hex nuts as shown in the illustrations below. - Page 6 Slide the Handle onto the Right and Left Handle Legs and attach with two hex-head machine screws, flat washers, and hex nuts as shown in the illustration. The two holes nearest the bend must be on the right side of the machine when viewed from the operator’s position.
-
Page 7: Dolly Installation
Dolly Installation Line up the half hole of the Dolly with the machine’s Axle. Strike the Dolly above the hole with a rubber mallet to snap it into place. DOLLY (WHEEL NOT SHOWN FOR CLARITY) HALF HOLE ON DOLLY FRAME SNAPS ONTO AXLE INBOARD OF WHEEL COLLAR. -
Page 8: Deflector Installation
Deflector Installation Position the Deflector towards the inside of the machine so that its top and bottom lips will engage the channels on the discharge chute. Use a rubber mallet to force the Deflector outward until it is centered on the discharge chute. ENGAGE THE DEFLECTOR’S TOP LIP WITH THE TOP CHANNEL TOP CHANNEL... -
Page 9: Filter Bag Installation
Filter Bag Installation Place the neck of the Filter Bag over the Deflector so that it covers the channels on the machine’s discharge outlet. Cinch the Filter Bag’s built-in strap to secure its neck. Loop each pair of the Filter Bag’s handle straps around the Handle and fasten the metal clasps to join them. -
Page 10: Hose Assembly And Installation
Hose Assembly and Installation (optional) The next few pages describe the assembly, installation, and use of the optional Power-Vac Hose. Skip ahead to page 14 if you have not purchased this accessory. Below is an exploded view showing the parts included with the kit. HEX HEAD MACHINE SCREW, 5/16”... - Page 11 HOSE CUP Attach the Hose Cup to the Right Handle Leg with two 1/4” lock washers and hex nuts. RIGHT HANDLE LEG 1/4” LOCK WASHER (2) 1/4” HEX NUT (2) Attach the Hose Bracket to the HEX HEAD MACHINE Handle with a 5/16” x 1-1/4” hex SCREW, 5/16”...
- Page 12 1/4” LOCK WASHER HOSE NOZZLE 1/4” HEX NUT HEX HEAD MACHINE SCREW, 1/4” x 1-1/4” HEX HEAD MACHINE SCREW, 1/4” x 1” From the inside of the Hose Nozzle, pass a 1/4” x 1-1/4” hex head machine screw through the hole nearest to one end of the Nozzle. Secure the screw with a 1/4”...
- Page 13 Insert the Hose Nozzle into the Hose Cup. Route the Hose over the machine as shown. Trim the Hose to length so that it doesn’t drag on the ground or interfere with the machine’s wheels. Slide a hose clamp over the free end of the Hose. Push the free end of the Hose onto the port on the machine’s Inlet Housing and tighten the hose clamp to secure it.
-
Page 14: Using The Optional Hose
When maximum suction is needed for heavy or difficult-to-pickup waste, however, Elgee’s Hose Baffles should be used. These divert all of the Power-Vac’s suction to the hose by blocking off the debris inlet within the Inlet Housing. A Manual Hose Baffle is included with all Hose kits unless the optional Onboard Hose Baffle is purchased. -
Page 15: Maintaining Your Power-Vac
Motor - Periodic lubrication is necessary. Refer to the motor manufactur- er’s literature for specific requirements. Filter Bag - Elgee Filter Bags hold the debris picked up by your Power-Vac and are designed to capture dust from the discharge air. To ensure that your machine continues to operate at peak efficiency: •... -
Page 16: Additional Resources And Contact Information
We respond promptly to all email inquiries. Phone: 908-647-4100 or 800-742-0400 Call during normal business hours (8:30 am - 4:30 pm EST Monday through Friday) to speak with a knowledgeable representative. Fax: 908-647-4242 Mail and Shipping: Elgee Manufacturing Co., Inc. 225 Stirling Road Warren, NJ 07059... -
Page 17: Elgee Power-Vac Limited Warranty
Elgee Power-Vac Limited Warranty For ONE YEAR from date of installation for the original purchases, Elgee will repair or replace (at Elgee’s option), FREE OF CHARGE, any parts or parts found upon examina- tion by the factory in Warren, New Jersey, or by any factory authorized center, to be defective in material and/or workmanship.
Need help?
Do you have a question about the Power-Vac 632-E and is the answer not in the manual?
Questions and answers