
Related Manuals for Nova Caddy X9RD


Summary of Contents for Nova Caddy X9RD
- Page 1 X9RD Remote Electric Golf Trolley Model: X9RD User Manual Nova Caddy Golf Products www.novacaddy.com Tel: +1 905-209-9937...
-
Page 2: Table Of Contents
CONTENTS Page Packing List and Parts Glossary Assembly Instructions Operating Instructions Important Safety Instructions Electronic System General Maintenance Technical Specifications Trouble Shooting Frequently Asked Questions One-Year Limited Warranty... -
Page 3: Packing List And Parts Glossary
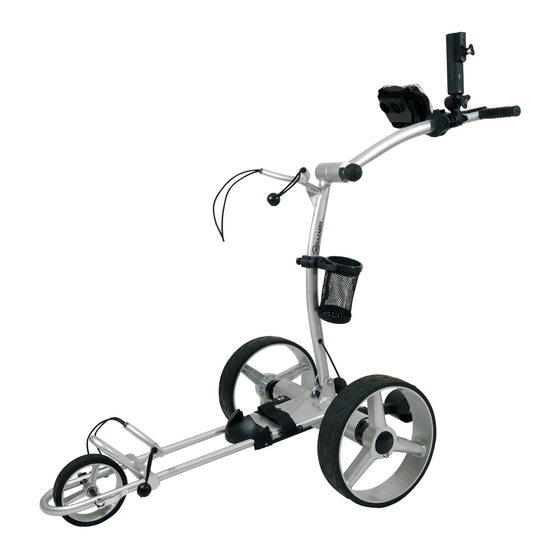
Congratulations on your purchase of the NovaCaddy X9RD Remote Electric Golf Trolley. The X9RD is without doubt one of the most high performance, light weight and competitive carts in the global market for motorized golf push carts and it represents what really counts in this market: A Great Balance between Functionality, Performance, Practicality and Value! To ensure operate the golf trolley properly, please read this instruction before using your X9RD. - Page 4 Pic1 Control Panel 10. Tracking Adjustment Ass. USB Port 11. Front Wheel Manual Rheostat Speed Ctrl. 12. Bag Support Lower Folding Locking Knob 13. Lower Bag Strap Anti-tip Wheel 14. Lower Bag Holder Rear Wheels 15. Upper Bag Holder Dual Motors/Gearbox Ass. 16.
-
Page 5: Assembly Instructions
2. Assembly Instructions Please read and follow these instructions carefully, and you will be ready to go in a few minutes. 1.Unpack all items carefully and check everything has been included. Some extras may be in small packages so do not throw anything away until all has been checked. 2. - Page 6 Pic 4 Pic 5 Pic 6 5. Place battery pack on battery tray and fasten Velcro strap around battery tightly. Insert battery plug into caddy outlet. Pic 7 Pic 8 6. Insert anti-tip wheel into frame and secure with pin (or built-in ball pin). Pic 9 Pic 10 7.
- Page 7 Pic 11 Pic 12 Pic 13 Pic 14 Pic 15 8. Unpack remote control and install batteries as indicated in the diagram in the receiver compartment of the unit. Now you are ready to learn and understand the function of the manual and remote controls.
- Page 8 9.2 Fit seat post into slot on the bracket bar. Hold base of post on the ground and lift the post connector to slide on to slot. Pic 17. 9.3 Attach seat to top of post. The seat is spring loaded and base is kept off the ground until weight is applied.
-
Page 9: Operating Instructions
3. Operating Instructions 3.1. Handle Function Pic 20 3.1.1. Power ON/OFF. Power/Stop-Go Combo button controls the caddy’s power supply. Press and hold for 2-5 seconds in order to turn the caddy ON or OFF. LED Battery/Power indicator will lite up when power is ON. - Page 10 3.1.2. Battery Status When main power turns ON, battery LED indicator illuminate. If the Green indicator illuminate, battery is full. If only Red indicator illuminate, battery is running out and need to be recharged. 3.1.4. Manual Speed Controller Scrolling of the Manual Speed Control Dial lets you choose your preferred speed to suit your space perfectly.
- Page 11 3.2. Remote Control Pic 21 A. Forward: Press the FWD button will set the caddy in forward motion. Briefly press the FWD button will increase the speed (press FWD button to decrease speed at backward motion). B. Left Turn: Initiates left turn. When the button is released, the caddy stops turning and continues straight with original speed prior to turning.
- Page 12 H. Cruise Ctrl (Timer Function): 10, 20, 30 Seconds moving control (roughly 10, 20, 30 yard/meter) Increase 10 seconds (10 yards) each press. 30 seconds (30 yards) max. Important Notes: • Change remote control batteries once the indicator LED gets weak or dim •...
- Page 13 3.3.2. USB Port USB port is located at end of handle bat. Use cart battery to charge Cell Phone, GPS, USB speaker or any other USB device. 3.4. Test Caddy Test caddy power supply by press POWER button on handle. All power indicator should come on and caddy should be operable by both the manual control on the handle and remote control.
- Page 14 Automatic stop feature. An additional safety feature of this caddy is that it will stop moving at remote control mode, if it does not receive a signal from the remote control at least every 25-30 seconds. This way, should you ever be distracted, your caddy does not get away. Timer Function.
- Page 15 3.5.2.3. Do not leave the battery on the charger for extended periods of time. Do not overcharge the battery. Overcharging the battery will void the warranty. 3.5.2.4. The lithium batteries should be stored at a middle charge state during longer periods of inactivity.
- Page 16 The battery has a normal lifespan of approximately 100-150 charges, depending on charging frequency, storage conditions, and time and discharge history, which could reduce this lifetime. 3.5.3.5. In order to prolong the service life of the battery, please AVOID full discharge, charge the battery after every use and KEEP THE BATTERY FULLY CHARGED.
-
Page 17: Important Safety Instructions
*Life of sealed lead acid and any other batteries is dependent on a variety of factors, other than purely the number of charges, including but not limited to, frequency between charges, duration of charge, level of drainage, idle time, operating temperature, storage conditions and duration and overall shelf time. -
Page 18: General Maintenance
• Microprocessor Controlled Electronics System: When you connect the battery, the electronics system will automatically run through a start-up routine. Then you can press the main power on the T-handle turn the power ON. The battery level indicator lights will show you the battery level. - Page 19 leave battery on charger. All of these recommendations will help keep your trolley in top condition and ensure that it remains your reliable partner, both on and off the course.
-
Page 20: Technical Specifications
7. Technical Specification Remote control up to 80-120 yard. Forward, Backward, Left Turn, Right Turn, Stop. 9 speed adjustment. Control Timed advance function: 10, 20 and 30 meter/yard Automatic forward cruise. Motor 2 x 200W (400W) 12V DC Deep Cycle motor Rear Wheel Drive, Dual Stainless Steel Gears &... -
Page 21: Trouble Shooting
8. Trouble Shooting SYMPTOM ACTION • Make Sure battery is plugged correctly onto cart plug Caddy does not have power • Check battery charge level • Check all wiring connections and plugs • Depress and hold down power button for at least 5 seconds •... - Page 22 position in security. Question 3: The caddy’s main power is on, and all battery indicator lights are on, but the caddy does not run or one motor does not run. Reply: Please check the motor connectors on the controller box and if connector pins are in the correct position.
-
Page 23: One-Year Limited Warranty
10. One-Year Limited Warranty Your NovaCaddy product is warranted to be defects in materials and workmanship for one year after the date of purchase. In the event of a defect under this warranty, we will repair the product. This warranty does not cover damages caused by misuse, improper handling, installation, or maintenance provided by someone other that a NovaCaddy authorized service department.
Need help?
Do you have a question about the X9RD and is the answer not in the manual?
Questions and answers
Have I damaged by card by pushing it back to the club house after the battery died. It will not respond to the remote control. Will not stop, turn, backup with the use of the remote.