
Related Manuals for Hanyoung RT9


Summary of Contents for Hanyoung RT9
-
Page 1: Table Of Contents
CONTENTS 1. SAFETY INFORMATION P . 4 2. INSTRUCTION P . 6 3. ORDERING INFORMATION P . 6 4. SPECIFICATION P . 7 5. DIMENSIONS & PANEL CUTOUT P . 1 1 6. TERMINAL ARRANGEMENT P . 1 1 7 NAME & FUNCTION P . -
Page 2: Safety Information
● Do not touch the terminals to avoid electrical shock or malfunction. Caution on maintenance Model : RT9 ● Turn OFF the power before mounting or removing the instrument. ● To ensure continuous and safe operation of the instrument, periodical maintenance is recommended. -
Page 3: Instruction
● If the input cable is disconnected, the display shows “ ” . When replacing the sensor, please turn OFF the power supply. SCR (4~20mADC) RT9 - 1 ⑦ Other Relay (P.I.Dcontro) Do not use organic solvents such as alcohol, benzine when cleaning. (Use neutral detergent) -
Page 4: Specification
3) F U N C T I O N SPECIFICATION Input correction (Bias): -100.0~100.0% for instrument range Scaling : According to SH, SL of measurement range 1) I N P U T Measurement input Filter : OFF, 1~120 sec. Thermocouple: K, J, E, T, R, S, B, L, N, U, WRe 5-26, PL-Ⅱ 3 settings (SV1, SV2 and SV3) and P.I.D setting each I n p u t R.T.D: Pt 100Ω, KPt 100Ω... - Page 5 6 ) S T R U O T U R E 10) INPUT SIGNAL and MEASUREMENT RANGE M O D E L External Dimension W e i g h t M a t e r i a l Input type (Input signal) Input code Range (℃) Range(℉) Accuracy...
-
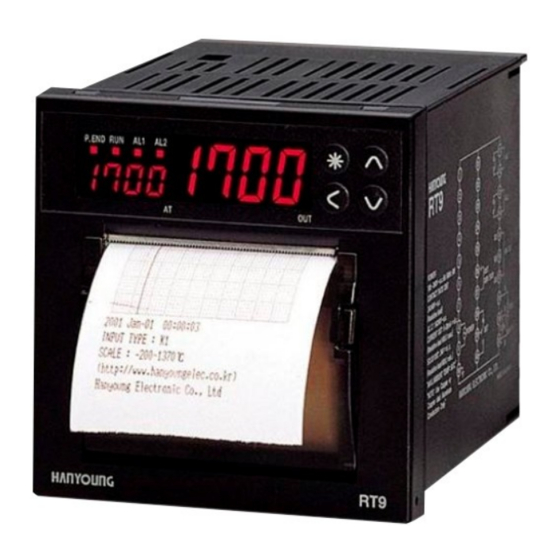
Page 6: Dimensions & Panel Cutout
NAME & FUNCTION DIMENSIONS & PANEL CUTOUT 1) Front ● RT9 ( 9 6×96 mm ) ●Panel cutout (Unit : mm ) TERMINAL ARRANGEMENT 2) Displays N a m e F u n c t i o n s ① P.END No paper. -
Page 7: Table Of Setting Items
C o m m u n i c a t i o n Time setting Output volume display ※Set a number Parameter structure ○ Recorder exclusive use(RT9-0): •Control group •Alarm group (Optional) •Communication group (Optional) •Input group •Time setting group will be displayed. -
Page 8: Setting Method
SETTING METHOD GROUP SETTING ※ Display level setting ●After completion of wiring, apply power ON. (1)Management version indicated as below and then present PV and SV will be indicated. Signal Display Name D i s c r i p t i o n C o n d i t i o n I n i t i a l (Record exclusiue use : Input type and PV will be indicated) - Page 9 Auto tuning group setting (Model: RT9-1) When checking P.I.D. values or setting SV in manual Signal Name D e s c r i p t i o n Condition I n i t i a l mode, this can be done in P.I.D. Group.
- Page 10 1~99 , maximum 31 devices Low deviation value (inverted) Response time 0~10. response time = (handling time + response time) X 10ms High・Low deviation value Output group setting ( M o d e l : RT9-1) High・Low band Signal Name Description Conditi Initial value...
- Page 11 ③ Decimal point Input group setting Parameter is not indicated in T.C and R.T.D input, but when selecting voltage input “Decimal point”mode is indicated. (set 1 : 0.0, set 2 : 0.00, set 3 : 0.000) Signal Name Description Condition Initial value ④...
-
Page 12: Function
When changing a set point value frequently (low limit alarm) control and determine proper P.I and D. (Limit cycle type) max. value of RT9-1 series controller have two types of Auto-tuning as measuriag b e l o w . range (SV)
Need help?
Do you have a question about the RT9 and is the answer not in the manual?
Questions and answers