Table of Contents
Advertisement
Quick Links
Welcome to bitbox. Bitbox is a very useful tool for capturing and playing back
samples. This manual will walk you through all of the features of bitbox. If you
want to start playing right away, please consult the Quick Start Guide found
in the box. The Quick Start Guide and this manual are also available on the
1010music.com Support page.
P. 1
v. 1.0
Bitbox User's Manual
Bitbox User Manual
©1010music 2016
Advertisement
Table of Contents

Related Manuals for 1010 Music Bitbox


Summary of Contents for 1010 Music Bitbox
- Page 1 Welcome to bitbox. Bitbox is a very useful tool for capturing and playing back samples. This manual will walk you through all of the features of bitbox. If you want to start playing right away, please consult the Quick Start Guide found in the box.
-
Page 2: Table Of Contents
Working with Presets and Saving Your Work Working with Tracks Export a Set to Ableton Live Switch to a New MicroSD Card While Operating Bitbox Demonstration Videos and Latest Docs Contact Us P. 1 Bitbox User Manual v. -
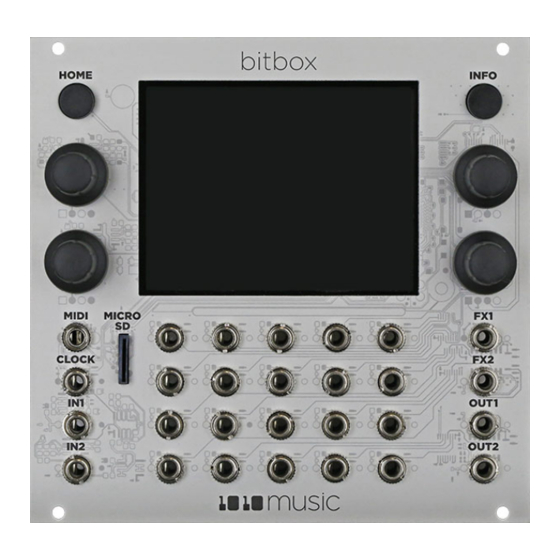
Page 3: Overview
The diagram below identifies the components of bitbox. This manual will refer to the controls and inputs of the module using the labels shown. Bitbox is equipped with a touchscreen. You can touch cells in the grid on the screen to select them, and touch on-screen buttons to take an action. -
Page 4: The Microsd Card
Bitbox uses a MicroSD card to store clips and clip parameter information. A MicroSD card must be inserted into the MicroSD slot on the front panel of the bitbox during operation of the module. A MicroSD card loaded with some sample clips is included with bitbox. Insert the MicroSD card with the notched edge down. -
Page 5: Clip Actions
Trigger Activate the clip by touching the cell, through a CV Trigger, or through Quant MIDI note on. Bitbox will start playback of the clip according to the Size (see More Clip Information below) and play through to completion. The release has no effect. - Page 6 You can see the current bar and beat in the upper left of most screens. Slice Size When this parameter is enabled, bitbox will subdivide the sample into pieces that will Quant play in sync with the clock. The available values are the same units as the Size .
-
Page 7: Load Clip Files From A Microsd Card
Load clip files from a microSD card You can use the microSD card to load clips into bitbox from other sources. 1. Use your laptop or other device to load clips in WAV format into the root folder of a microSD card. -
Page 8: Synchronize Clips With Clocks Or Midi Inputs
The Clock input must use 4 pulses per quarter (PPQs), or a pulse per 16 note. § If MIDI and CLOCK inputs are used together, Bitbox will select the highest priority clock based on § the following order of priority: 1.) CLOCK Input; 2.) MIDI Input; 3.) Internal Clock. -
Page 9: Working With Presets And Saving Your Work
Column format as shown to the right. Note that 1,1 is in the lower left corner, and 4,4 is in the upper right. Working with Presets and Saving Your Work Bitbox allows you to store multiple configurations of clips and parameter settings as Presets . You can save up to 12 different banks of Presets . -
Page 10: Export A Set To Ableton Live
The FX outputs are a convenient way to apply different effects to different Export a Set to Ableton Live Bitbox files are compatible with Ableton Live. Follow these steps to export them: 1. Press HOME until you see the Menu... -
Page 11: Switch To A New Microsd Card While Operating Bitbox
WAV files onto your machine and into the customary Ableton directory structure. Switch to a New MicroSD Card While Operating Bitbox You can switch to a different microSD card while operating bitbox. Simply remove the current card and new one, then follow the steps in...
Need help?
Do you have a question about the Bitbox and is the answer not in the manual?
Questions and answers