Table of Contents
Advertisement
Quick Links
Advertisement
Table of Contents

Related Manuals for BAQ alphaDUR mini


Summary of Contents for BAQ alphaDUR mini
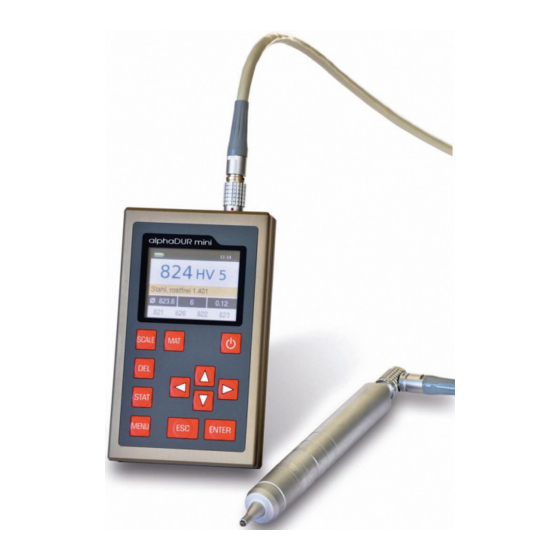
- Page 1 Manual Version 1.5...
-
Page 3: Table Of Contents
Contents 1 Introduction.......................5 2 Manual......................6 2.1 Lettering.....................6 2.2 Text boxes....................6 3 Information on the probes................7 3.1 Probe selection..................7 3.2 Probe handling...................7 4 General working instructions................9 4.1 Key functions....................9 4.2 Status bar....................10 4.3 The menus....................10 4.4 Text entry....................10 4.5 The number field..................12 5 Measurement....................13 5.1 Specimen requirements................13 5.2 Measuring parameter................14... - Page 4 9.1 Creating a new series................29 9.2 Continuing a series..................29 9.3 New serial measurements...............30 9.4 Continuing a serial measurement............30 9.5 Deleting a series..................30 9.6 Displaying a series...................30 9.7 Copying of series to an USB flash drive..........31 9.7.1 CSV file format...................31 9.7.1.1 Single series and subordinated series of a serial measurement..31 9.7.1.2 Summary serial measurements............32 10 System settings....................34 10.1 Language....................34...
-
Page 5: Introduction
Up to 100,000 readings including hardness, date, time and measuring parameter can be stored to the internal memory of the alphaDUR mini. The readings are arranged in series of measurements. A series of measurements is an aggregation of several readings. In addition to ordinary measurement series, serial measurement series which consists of multiple subordinate measurement series, can be recorded. -
Page 6: Manual
MANUAL 2 Manual 2.1 Lettering Operating elements Operating elements Keys Standard text Descriptions and explanations in text form Important notes Important notes and remarks 2.2 Text boxes Explanations of functions and operating Operating elements elements are framed in blue. Green fields describe user inputs and Entry fields parameters Information and notes are provided with yellow... -
Page 7: Information On The Probes
To carry out a measurement, the probe must Protective sleeve be held perpendicular to the specimen surface. (The alphaDUR mini has to be calibrated to the material and must be in Oscillating rod with Vickers diamond measuring mode.) The Vickers diamond may touch the surface slightly, but not for Fig. - Page 8 INFORMATION ON THE PROBES achieve an accurate measurement, the probe must be pressed steadily and vertically onto the specimen. To facilitate the pressing, probe supports (separately available) can be screwed instead of the protective sleeve onto the probe. These probe supports are available for flat and convex surfaces.
-
Page 9: General Working Instructions
GENERAL WORKING INSTRUCTIONS 4 General working instructions 4.1 Key functions Switches on/off the device. Changes the hardness scale. Changes the material. Deletes last measurement point Displays statistics Opens the main menu Cursor keys With these keys, menu items are selected and the re- quired values in input fields are set. -
Page 10: Status Bar
GENERAL WORKING INSTRUCTIONS 4.2 Status bar The rechargeable battery status, the time and the selected revaluation standard are displayed in the status bar at the top of the window. 4.3 The menus A menu consists of a list of available menu items and a bar which identifies the active menu item. - Page 11 GENERAL WORKING INSTRUCTIONS Switching between upper case and lower case Apply text and close text entry window Cancel Close text input window without applying the text The field marked in yellow is the active field. With the keys ▲ and▼ the line above or below the current line is selected.
-
Page 12: The Number Field
GENERAL WORKING INSTRUCTIONS 4.5 The number field A number field is used to enter numbers. It consists of mostly several digits, which can be changed separately, and a marker (cursor) which can be moved with the cursor keys ◄ and ► within the number field. The figure on which the cursor is positioned, can be modified through pressing the cursor keys ▲... -
Page 13: Measurement
5 Measurement The measurement can be started with the menu item Measurement. If a probe is connected to the alphaDUR mini, the measurement window will by shown directly after the start-up. The test load of the connected probe will be detected automatically. -
Page 14: Measuring Parameter
MEASUREMENT To avoid this effect, the specimen has to be thick enough to allow the os- cillations to attenuate before the diamond is reached. At thin blocks or round stock, the total mass of the specimen has an effect. If the mass of the specimen is high enough, a thickness of 8 mm for flat specimen or 10 mm for round stock is sufficient. -
Page 15: Measuring Procedure
MEASUREMENT After switching the alphaDUR mini on, the last used combination of measurement is always parameters active. 5.3 Measuring procedure To take a measurement, put the probe vertically onto the specimen and press it down steadily as far as it will go. The hardness value will be determined shortly before the protective sleeve touches the surface of the specimen. - Page 16 MEASUREMENT Charge status display:: Displays the residual charge of the batteries. Time: Current time Measured value: Current measured value Hardness scale: Current hardness scale Material: Current material Number of Number of measurements already carried out measurements: Average value: Average value of the measurements carried out Standard deviation: Standard deviation History:...
-
Page 17: Key Assignment Of The Measuring Window
MEASUREMENT 5.4.1 Key assignment of the measuring window SCALE Changes the hardness scale. If limits for the evaluation GOOD are specified, they are automatically set to 0. In the system settings it can be determined whether the scale should be changed automatically to the next valid scale or a dialogue should be opened (see 10.4.2). - Page 18 STAT or because a value has been deleted) the measurement series will be continued. The alphaDUR mini can be configured to display a query whether the data should be saved as a new series (see 10.4.4), when the predetermined number of data is reached.
-
Page 19: Instant Printout
MEASUREMENT 5.6 Instant printout If a mobile printer is connected, a consecutive printout can be made. The measured data is then instantly printed. The instant printout mode stays active when the measuring window is closed. It must be explicitly deactivated (see chapter 6.2.1). -
Page 20: Measuring Parameter
MEASURING PARAMETER 6 Measuring parameter 6.1 Description After switching the alphaDUR mini on, the last used combination of measurement parameter is always active. The measuring parameter in detail: M a t e r i a l : The currently selected material calibration. Materials that are not valid for the selected revaluation standard (see chapter 7.1) are displayed in gray. -
Page 21: Managing Sets Of Measuring Parameter
MEASURING PARAMETER 6.2 Managing sets of measuring parameter In the alphaDUR mini combinations of measuring parameter can be stored, under a user-defined name. In this way, the measuring parameter required for specific applications can be called up easily. The following parameter are stored: ... -
Page 22: Loading Measuring Parameter
MEASURING PARAMETER 6.2.3 Loading measuring parameter Choose menu item Measuring parameter / Load to read back a set of measuring parameter. Select the measuring parameter set from the list by means of the cursor keys. Then press ENTER to load the parameter. If a measurement parameter data set is loaded in which a material is selected that is not valid in the current revaluation standard (see chapter 7 and 8), the revaluation standard is automatically switched to the value corresponding to the... -
Page 23: Conversion Of Hardness Values
CONVERSION OF HARDNESS VALUES 7 Conversion of hardness values The alphaDUR mini can convert hardness values to another hardness scale. The tables DIN EN ISO 18265 - Feb.2014 and ASTM E140 - 12b (2019) are used for the conversion. These tables partly contain values, which are outside of the definition area of the standardized hardness testing method, but may be used as approximate values. -
Page 24: Selection Of The Conversion Standard To Be Used
CONVERSION OF HARDNESS VALUES 7.1 Selection of the conversion standard to be used In the menu item Material calibration/ Conversion standard can be selected if the DIN EN ISO 18265 or the ASTM E140 should be applied. -
Page 25: Material Calibration
MATERIAL CALIBRATION 8 Material calibration The alphaDUR mini has to be calibrated for every material that should be measured. These calibrations can be stored permanently on the device. For measurements on samples made of the calibrated material, the corresponding material calibration must be selected. (Measuring parameter: Material see chapter 6.1). - Page 26 If the calibration should be continued, the cursor key right ► must be pressed. Now, the measurements for calibration have to be taken. The alphaDUR mini makes a beep at the end of each measurement. The probe should be lowered evenly and steadily.
- Page 27 MATERIAL CALIBRATION mean value). This allows conclusions regarding the quality of the calibration. If the standard deviation is too high, press ESC to repeat the calibration. Same as for regular hardness measurements, the standard deviation of the calibration depends on surface quality, homogeneity and correct probe handling (perpendicular, without shaking).
-
Page 28: Memory Functions
MEMORY FUNCTIONS 9 Memory functions The alphaDUR mini can store about 100,000 readings. These readings are organized in series of measurements. A measurement series is defined as an aggregation of several readings. In addition to single measurement series, serial measurement series which consists of multiple subordinate measurement series, can be recorded. -
Page 29: Creating A New Series
MEMORY FUNCTIONS • Probe type • Test load • Material • Hardness scale • Upper and lower limit for rating GOOD While values are saved to a series, the SCALE and MAT keys are disabled in the measuring window! When a series is displayed or printed, standard deviation and mean value will be included. -
Page 30: New Serial Measurements
MEMORY FUNCTIONS 9.3 New serial measurements Under the menu item Memory functions / New serial measurement, a new serial measurement can be started. After defining the name of the new serial measurement with the text input function (see 4.4), the number of measuring points per subordinate series must be entered. -
Page 31: Copying Of Series To An Usb Flash Drive
MEMORY FUNCTIONS 9.7 Copying of series to an USB flash drive The measurement series can be copied to a USB flash drive under the menu item Memory functions / Copy to USB flash drive. Thus it is possible, to transfer the series. The files will be stored on the USB flash drive in CSV format (character set Unicode UTF8). -
Page 32: Summary Serial Measurements
MEMORY FUNCTIONS Number of Data;<e.g. 5> Mean value;<e.g. 321.6> Minimum;<e.g. 312> Maximum;<e.g. 334> Standard deviation;<e.g. 10.1> rel. Standard dev.;<e.g. 3.15> Value /<Hardness scale>;Day;Month;Year;Hour;Minute 312;23;4;2020;10;51 <reading 1> …. <more readings> 320;23;4;2020;10;51 <reading n> 9.7.1.2 Summary serial measurements Probe type;< type description> Name;<file name>... - Page 33 MEMORY FUNCTIONS …. <more readings> 320;23;4;2020;10;51 <reading n> Single series;<name of subordinate single series: 2> Number of Data;<e.g. 5> Mean value;<e.g. 321.6> Minimum;<e.g. 312> Maximum;<e.g. 334> Standard deviation;<e.g. 10.1> rel. Standard dev.;<e.g. 3.15> Value /<Hardness scale>;Day;Month;Year;Hour;Minute 312;23;4;2020;10;51 <reading 1> …. <more readings>...
-
Page 34: System Settings
SYSTEM SETTINGS 10 System settings 10.1 Language Select the menu item System / Language to set the language. Select the required language by means of the cursor keys. The chosen language will become active when you close the dialog 47777777 by pressing ENTER. 10.2 Time Select the menu item System / Time to set the current time. -
Page 35: Key Mat
SYSTEM SETTINGS Select: Open dialog If the new hardness scale should be selected in a dialog. Next scale If the hardness scale should be set automatically to the next valid scale. 10.4.3 Key MAT In the menu item System / Configuration / Key MAT, the function of the key MAT in the measurement window is set. -
Page 36: Factory Defaults
SYSTEM SETTINGS 10.5 Factory defaults With the aid of the menu item System / Factory defaults, the current measuring parameters and the date format can be reset to the default values. 10.6 System information Select System / Info from the menu to display the system information. The version numbers of the software, kernel and system will be shown. -
Page 37: Maintenance And Inspection
MAINTENANCE AND INSPECTION 11 Maintenance and inspection Periodically checks of the device should be executed with standard hardness test blocks. The thickness of the test block is very important due to the measuring method. It should be no less than 15 mm. Test blocks of lesser thickness (e.g. -
Page 38: The Uci Method
THE UCI METHOD 12 The UCI method The UCI method (Ultrasonic Contact Impedance) is successfully used in hardness testing since many years. A rod is excited into a longitudinal oscillation. The tip of the rod is equipped with Vickers diamond. This diamond is pressed to the specimen with a discrete test load. - Page 39 THE UCI METHOD The advantages of the UCI method are the ease of automation and the very good repeatability of the hardness readings. The repeatability of the measurements is better than with optical methods of hardness testing because the total area of contact (proportional to d ) enters into the measurement and not only the diagonal d or a diameter.
-
Page 40: Proper Disposal
PROPER DISPOSAL 13 Proper disposal Consumers are legally required to dispose of batteries at suitable collection points, vending points or dispatch bays. The crossed-out wheeled bin means that batteries must not be disposed of in the household waste. Pb, Cd and Hg designate substances that exceed the legal limits. -
Page 41: Español
PROPER DISPOSAL 13.4 Español Los usuarios están obligados por ley a depositar las pilas viejas en un punto de recogida adecuado /punto de venta/centro de envío. El contenedor de basura tachado significa: la pilas no deben desecharse en la basura doméstica. Pb, Cd y Hg designan sustancias que se encuentran por encima de los valores establecidos por ley. -
Page 42: Technical Data
2616, Part 1). Measurement is done with test load applied. Indenter Diamond, Vickers pyramid angle 136° Preferably metals, to which the alphaDUR mini Test materials can be calibrated with standard hardness test blocks. Tests on ceramics, glass and plastics are also possible using comparison measurements for calibration purposes. - Page 43 TECHNICAL DATA Depth Probe Diameter 19,5 mm Length Weights Device 320 g Probe 190 g...
-
Page 44: Appendix 1: Hardness Conversion Validity Ranges
15 Appendix 1: Hardness conversion validity ranges 15.1 DIN EN ISO 18265 - Feb.2014 The tables of DIN EN ISO 18265 – Feb.2014, used for conversion in the alphaDUR mini, apply to the following materials and hardness scales: Material from... - Page 45 APPENDIX 1: HARDNESS CONVERSION VALIDITY RANGES Material from 580 HV 59.5 HR45N 720 HV 66.4 HR45N Cold work tool steel (C2) 210 HV 205 HB 620 HV 600 HB 220 HV 18.8 HRC 840 HV 65.8 HRC 210 HV 95.6 HRB 340 HV 109.5 HRB 210 HV 110.7 HRF 340 HV 118.6 HRF...
-
Page 46: Astm E140 - 12B (2019)
APPENDIX 1: HARDNESS CONVERSION VALIDITY RANGES Material from 305 HV 950 MPa 474 HV 1550 MPa 305 HV 65.9 HRA 474 HV 74.9 HRA Tool steel 1.2741 (G1) 280 HV 279 HB 424 HV 419 HB 280 HV 27.7 HRC 424 HV 43.1 HRC 280 HV... - Page 47 APPENDIX 1: HARDNESS CONVERSION VALIDITY RANGES Material from Copper (7) 40 HV 42.8 HK 0.5 130 HV 133.8 HK 0.5 (strips excluded) 40 HV 40.2 HK 1 130 HV 138.7 HK 1 Alloyed White Irons (8) 380 HV 357 HB 1000 HV 903 HB 380 HV...
-
Page 48: Appendix 2: License Information
License (GPL) or under the GNU Lesser General Public License (LGPL). The free software source code can at least for a period of 3 years be requested from BAQ GmbH. However, please be noted that we cannot provide guarantee with the source code, and there is also no technical support for the source code from us. - Page 49 16 APPENDIX 2: LICENSE INFORMATION DIRECT, INDIRECT, INCIDENTAL, SPECIAL, EXEMPLARY, OR CONSEQUENTIAL DAMAGES (INCLUDING, BUT NOT LIMITED TO, PROCUREMENT OF SUBSTITUTE GOODS OR SERVICES; LOSS OF USE, DATA, OR PROFITS; OR BUSINESS INTERRUPTION) HOWEVER CAUSED AND ON ANY THEORY OF LIABILITY, WHETHER IN CONTRACT, STRICT LIABILITY, OR TORT (INCLUDING NEGLIGENCE OR OTHERWISE) ARISING IN ANY WAY OUT OF THE USE OF THIS SOFTWARE, EVEN IF ADVISED...
- Page 50 BAQ GmbH Hermann-Schlichting-Straße 14 38110 Braunschweig Germany Tel: +49 5307 95102 - 0 Fax: +49 5307 95102 - 20...
Need help?
Do you have a question about the alphaDUR mini and is the answer not in the manual?
Questions and answers