Table of Contents
Advertisement
Available languages
Available languages
OWNER'S MANUAL
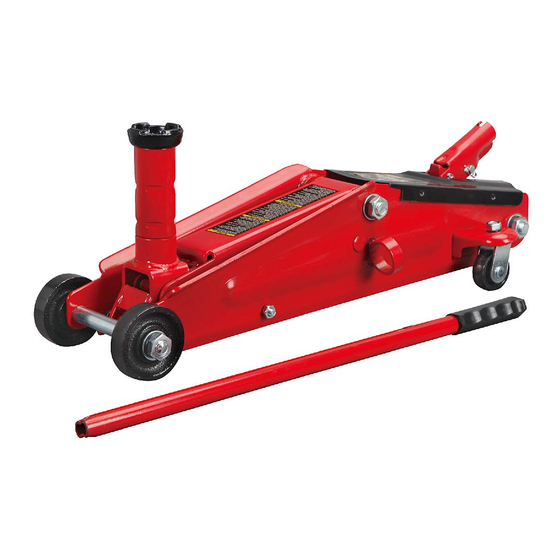
3 TON S.U.V. TROLLEY JACK
Item: T83006C
Questions, problems, missing parts? Before returning to your retailer, call our customer service department at
1-888-44-TORIN (1-888-448-6746), 8 a.m.- 5 p.m., PST, Monday-Friday.
Read carefully and understand all ASSEMBLY AND OPERATION INSTRUCTIONS before operating. Failure
to follow the safety rules and other basic safety precautions may result in serious personal injury.
Version 20161129
Advertisement
Table of Contents

Related Manuals for Torin BIG RED T83006C


Summary of Contents for Torin BIG RED T83006C
- Page 1 Item: T83006C Questions, problems, missing parts? Before returning to your retailer, call our customer service department at 1-888-44-TORIN (1-888-448-6746), 8 a.m.- 5 p.m., PST, Monday-Friday. Read carefully and understand all ASSEMBLY AND OPERATION INSTRUCTIONS before operating. Failure to follow the safety rules and other basic safety precautions may result in serious personal injury.
-
Page 2: Owner / User Responsibility
IMPORTANT Before You Begin Register This Product. For future reference, record the model name, model number, date of manufacture and purchase date of this product. You can find this information on the product. Model Name ________________________ Model Number ________________________ Date of Manufacture _______________________ Date of Purchase ________________________ OWNER / USER RESPONSIBILITY... -
Page 3: General Safety Rules
GENERAL SAFETY RULES WARNING: Read and understand all instructions. Failure to follow all instructions listed below may result in serious injury. CAUTION: Do not allow persons to operate or assemble this jack until they have read this manual and have developed a thorough understanding of how the jack works. WARNING: The warnings, cautions, and instructions discussed in this instruction manual cannot cover all possible conditions or situations that could occur. -
Page 4: Safety Markings
SAFETY Always follow safety precautions when installing and operating this jack. Keep all decals on the unit clean and visible. Before proceeding ensure that you fully understand and comprehend the full contents of this manual. Failure to operate this equipment as directed may cause injury or death. The distributor is not responsible for any damages or injury caused by improper use or neglect. -
Page 5: General Safety Instructions
GENERAL SAFETY INSTRUCTIONS Position the Jack Position the jack to only lift on the areas of the vehicle as specified by the vehicle manufacturer. Always Use Jack Stands After lifting the vehicle always support the load with appropriately rated vehicle Jacks stands before working on the vehicle. - Page 6 ASSEMBLY 1. Familiarize yourself with the jack. 3. Secure the handle in place inside the handle socket. Without any vehicle on the jack. Cycle Lifting Arm the lift up and down several times to insure the hydraulic system is operating properly. (Perform Saddle to the Air Purge Procedure before first use.) Front Wheel...
- Page 7 SYSTEM AIR PURGE PROCEDURE IMPORTANT: BEFORE FIRST USE Perform the following Air Purge Procedure to remove any air that may have been introduced into the hydraulic system as a result of product shipment and handling. This step is to be completed without any weight on the jack.
-
Page 8: Before Use
BEFORE USE 1. Before using this product, read the owner's manual completely and familiarize yourself thoroughly with the product and the hazards associated with its improper use. 2. Perform the air purge procedure. (See System Purge Procedure.) 3. Check and that the pump operates smoothly before putting into service. 4. - Page 9 LOWERING THE JACK 1. Raise load high enough to allow clearance for the jack stands to be removed, then carefully remove jack stands. 2. Remove support stands. 3. Grasp the handle firmly with both hands. Securely hold on to the jack handle so your hands do not slip and ensure the release valve does not rapidly lower.
-
Page 10: Maintenance Instructions
MAINTENANCE INSTRUCTIONS If you use and maintain your equipment properly, it will give you many years of service. Follow the maintenance instructions carefully to keep your equipment in good working condition. Never perform any maintenance on the equipment while it is under a load. Inspection You should inspect the product for damage, wear, broken or missing parts (e.g.: pins) and that all components function before each use. - Page 11 5. Replace oil plug. TO ADD JACK OIL 1. Position the jack on level ground and lower the saddle. 6. Replace coverplate and perform the Air Purge Procedure. 2. Remove cover plate. TO REPLACE JACK OIL 3. Remove the oil plug. 1.
- Page 12 3. Remove cover plate. 7. Replace oil plug. 4. Remove the oil plug. 8. Replace the cover plate and perform the Air Purge Procedure. 5. Turn the jack upside down to drain old oil from the oil fill hole. ADDITIONAL WARNINGS: •...
-
Page 13: Assembly Diagram
ASSEMBLY DIAGRAM No. Part Description No. Part Description T83003.1-1 Handle cover Pin for saddle base T83003.1(asm) Handle QLQ2A-13 Sleeve for front wheel Supporting shaft QLQ2A-12 Front wheel Pin for frame Shaft for front wheel Supporting shaft Pin for lifting arm T83003C-1 Cover plate Left frame assembly... -
Page 14: Troubleshooting
Part # are available for purchase. For assistance with the operation or the availability of replacement parts, contact our Parts and Warranty Department at 1-888-44-TORIN (1-888-448-6746). Please have available a copy of your receipt, the model number of the product, serial number, and specific details regarding your question. - Page 15 Manufacturer reserves the rights to make design changes and or improvements to this product lines and manual without notice. We at Torin have taken every effort to ensure complete and accurate instructions have been included in this manual. However, possible product updates, revisions and or changes may have occurred since this printing.
-
Page 16: Manual Del Propietario
ADVERTENCIA! ¿Alguna pregunta o problema? ¿Le faltan piezas? Antes de recurrir a su distribuidor, llame a nuestro departamento de atención al cliente al 1-888-44-TORIN (1-888-448-6746) de lunes a viernes de 8 a. m. a 5 p. m. Horas del Pacífico. -
Page 17: Uso Debido
IMPORTANTE Antes de empezar, registre este producto. Como referencia para el futuro, registre el nombre del modelo, el número del modelo, la fecha de fabricación y la fecha de compra de este producto. Puede encontrar esta información en el producto. Nombre del modelo _______________________ Número del modelo... -
Page 18: Reglas Generales De Seguridad
REGLAS GENERALES DE SEGURIDAD ADVERTENCIA: Asegúrese de leer y entender todas las instrucciones. Si no sigue todas las instrucciones incluidas a continuación, pueden ocurrir lesiones graves. PRECAUCIÓN: No permita que nadie utilice ni ensamble este gato hasta haber leído este manual y haber comprendido completamente cómo funciona este gato. - Page 19 SEGURIDAD Siempre siga las precauciones de seguridad al instalar y utilizar este gato. Mantenga todas las calcomanías de la unidad limpias y visibles. Antes de proceder, asegúrese de haber entendido y comprendido completamente la totalidad del contenido de este manual. Si no utiliza el producto según lo indicado, pueden producirse lesiones o la muerte.
-
Page 20: Instrucciones Generales De Seguridad
INSTRUCCIONES GENERALES DE SEGURIDAD Coloque el gato Coloque el gato para levantar solamente en áreas del vehículo especificadas por el fabricante del vehículo. Siempre utilice bases de gato Después de levantar el vehículo, siempre apoye la carga con bases de gato para vehículos de clasificación apropiada antes de trabajar con el vehículo. - Page 21 ENSAMBLAJE 1. Familiarícese con el gato. 3. Asegure la palanca en su lugar dentro del receptáculo. Sin ningún vehículo en el gato, Brazo elevador haga ciclar el elevador hacia arriba y abajo varias veces para asegurarse de que el sistema Silla hidráulico esté...
- Page 22 PROCEDIMIENTO DE PURGA DE AIRE DEL SISTEMA IMPORTANTE: ANTES DEL PRIMER USO Realice el siguiente Procedimiento de purga de aire para extraer cualquier residuo de aire que pueda haber entrado en el sistema hidráulico durante el envío y la manipulación del producto. Este paso debe realizarse sin ningún peso sobre el gato.
-
Page 23: Antes Del Uso
ANTES DEL USO 1. Antes de utilizar este producto, lea todo el manual del propietario y familiarícese bien con el producto y los peligros asociados a su uso incorrecto. 2. Realice el procedimiento de purga de aire. (Consulte la sección Procedimiento de purga del sistema). 3. - Page 24 DESCENSO DEL GATO 1. Levante la carga lo suficiente para dejar un espacio para que las bases del gato se puedan retirar y luego retire las bases cuidadosamente. 2. Retire las bases de soporte. 3. Agarre la palanca con firmeza utilizando ambas manos. Agarre la palanca del gato de manera segura de modo que sus manos no se resbalen y asegúrese de que la válvula de liberación no baje rápidamente.
-
Page 25: Instrucciones De Mantenimiento
INSTRUCCIONES DE MANTENIMIENTO Si utiliza y da mantenimiento a su equipo correctamente, este le ofrecerá muchos años de servicio. Siga cuidadosamente las instrucciones de mantenimiento para mantener su equipo en buenas condiciones de funcionamiento. No haga ningún mantenimiento al equipo mientras esté llevando una carga. Inspección Debe inspeccionar el producto en busca de daños, desgaste, averías o piezas faltantes (p. - Page 26 5. Reemplace el tapón de aceite. PARA AGREGAR ACEITE AL GATO 1. Coloque el gato sobre suelo nivelado y baje la montura. 6. Vuelva a colocar la placa cobertora y realice el Procedimiento de purgado de aire. 2. Remueva la placa cobertora. PARA REEMPLAZAR EL ACEITE DEL GATO 1.
- Page 27 3. Remueva la placa cobertora. 7. Reemplace el tapón de aceite. 4. Retire el tapón de llenado de aceite. 8. Vuelva a colocar la placa cobertora y realice el Procedimiento de purgado de aire. 5. Gire el gato sobre su lado para drenar el aceite ADVERTENCIAS ADICIONALES: antiguo desde el orificio de llenado de aceite.
- Page 28 DIAGRAMA DE ENSAMBLAJE No. Parte Descripción Cant. No. Parte Descripción Cant. T83003.1-1 Cubierta de la Palanca Pasador de la base del sillín T83003.1(asm) Palanca QLQ2A-13 Casquillo rueda frontal Eje de soporte QLQ2A-12 Rueda frontal Pasador del armazón Eje de la rueda frontal Eje de soporte Pasador del brazo elevador T83003C-1...
-
Page 29: Solución De Problemas
Para obtener ayuda con la operación o la disponibilidad de las piezas de repuesto, comuníquese con nuestro departamento de piezas y garantía al 1-888-44-TORIN (1-888-448-6746). Tenga a mano una copia de su recibo, el número de modelo del producto, el número de serie y detalles específicos relacionados con su pregunta. - Page 30 El fabricante se reserva el derecho de realizar cambios de diseño o mejoras en esta línea de productos y en este manual sin previo aviso. En Torin, hemos hecho nuestro mayor esfuerzo por garantizar que se incluyan instrucciones completas y exactas en este manual. Sin embargo, probablemente se hayan efectuado posibles actualizaciones, revisiones o cambios desde esta publicación.
- Page 31 1-888-44-TORIN (1-888-448-6746) De 8 heures à 17 heures, heure du Pacifique, du lundi au vendredi Comuníquese conel Servicio de Atención al Cliente de Torin® directamente por teléfono al: 1-888-44-TORIN (1-888-448-6746) De lunes a viernes de 8:00 a. m. a 5 p. m. hora del Pacífico Torin Inc.
Need help?
Do you have a question about the BIG RED T83006C and is the answer not in the manual?
Questions and answers
I need to buy part# QLQD2A.2-7B U-Bracket for Plunger. Can you send 1 to me
@Hugh Pittman or sell one ?
the handle position is to the left and i can't get it to move