Table of Contents
Advertisement
Quick Links
Advertisement
Table of Contents

Subscribe to Our Youtube Channel
Related Manuals for Logosol M7


Summary of Contents for Logosol M7
- Page 1 Manual Read the safety instructions.
- Page 3 The company will replace or fix any Everyone who bought directly faulty parts or constructions from Logosol in Madison is within two years of purchase. already fully registered here. Those of you who bought the Free technical support...
- Page 4 Metric Parts Sizing Chart Nut, Bolt and Washer Chart To assist you in the assembly of this mill, we have detailed the nuts, bolts and washers found on each page in the chart below. The part name and size is M6x30 Bolt Sawmill Bolt Sizes listed to the left and the total number found in the...
-
Page 5: Table Of Contents
For us, the most important consideration is that you are 100% satisfied with your M7 WoodWorkers Mill. If you have any questions or thoughts about the sawmill, please do not hesitate to contact us. -
Page 6: Logosol M7 Woodworkers
Read through this whole and a face shield. manual carefully before using Work only in when the light is the M7. Failure to observe these good – never in darkness, fog or Remember that hearing can safety instructions may result in the like. - Page 7 Other repairs must be The overall max. load capacity off any parts involved. If you get done by Logosol or by of the M7 is 500 kg (1100 lbs). fuel on your clothing, change authorized Logosol dealers. The 2.5 m extension increases immediately.
-
Page 8: Description
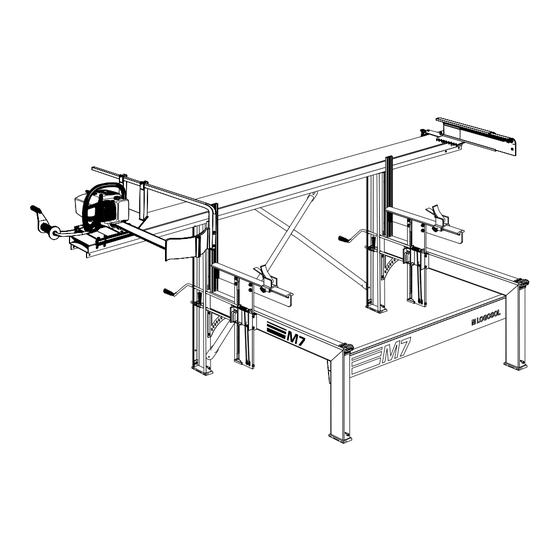
M7 WoodWorkers Mill as compensate for uneven sites. follow the instructions step by well. step. - The M7 has a double rachet mechanism enabling a simple Whenever this symbol shift by hand between 1/4” (6.25 appears, tighten bolt loosely mm) and 1/8”... - Page 9 M7 WoodWorkers Mill components What follows is a brief description of the M7 components to assist in identifying them during assembly. A more complete listing is found at the end of the manual. Guide rail Long leg Horizontal beam Short leg...
-
Page 10: Assembly: Frame
Assembly: frame The right and left leg units of the Tighten all four bolts Finally tighten the bolts between frame are assembled in the loosely to allow the beams the horizontal beam and the same way. The bolts listed to move somewhat in relation to long leg. -
Page 11: Assembly: Guide Rail
(4 x M6x20 collar bolts, 4 x bolts, 4 x M6 collar nuts) standard M7 unit (C), while the M6 collar nuts) others are used when the M7 is extended and an additional Check that the angle cross beam is fitted on either between the guide rail and side. -
Page 12: Assembly: Log Side-Rest
Assembly: log side-rest (7) Fit the log side-rest. make sure that the measuring scales are both facing in torwards the center of the mill so that operator can read both scales from the center position.(2 x M6x20 bolts, 2 x M6 collar nuts) (8) Place the plastic slide rail on the log bed. -
Page 13: Assembly: Saddle Plate
Assembly: saddle plate (13) Thread the lifting line through the hole in the lower part of the saddle plate and make the knot shown (A). Leave a 1 cm (3/8”) end after the knot. (14) Press the steel sleeves into the holes in the plastic glides. -
Page 14: Assembly: Edge Support
Assembly: crank and lifting cable (17) Thread the lifting line under the outside pulley on the lifting beam, straight up and around the pulley on the cross beam (A) and then down again to the inner pulley on the lifting beam. Fit the crank rod through the upper hole in the long leg and through the bushing on the... - Page 15 Assembly: saw carriage (19) Insert bolts through the (20) Insert the square nuts into (21) Thread the line spool over holes along the sides of both the the slide rail track, moving the the spool holder arm and tighten chain-saw bed (pylon) and the spool holder plate and the the nut.
-
Page 16: Assembly: Chain Guard
The guide bar nuts will be used to fasten the chain-saw to the carriage. Only CE-approved chain- saws with two guide bar nuts may be used with the M7 sawmill. -
Page 17: Assembly: Chain-Saw
Assembly: chain-saw (25) Fit the Logosol extender ensure that the saw cover will (26) Fit the chain guard support nuts through the chain-saw not extend too far. However, this on the two arms of the chain- plate using the front hole. (For is relatively unusual.) Screw the... -
Page 18: Assembly: Spiked Log Grip
Assembly: spiked log grip with guard (28) Screw the handle with a (30) Fit the sliding rails under (32) Thread the chain-saw feed washer on the threaded rod for the plate so that the square nuts line holder bolt through the the log grip carriage. -
Page 19: Siting
50x150 mm (2”x 6”) and at least is greater. 2 m (6.5 ft) long. The boards must extend at least 0.5 m While the goal is to have the M7 (1.5 ft) beyond the long legs. WoodWorkers Mill fully level, any tilt, however slight, must not... -
Page 20: Adjustments - Log Bed
Adjustments – log bed (A) Check that when the log bed - Loosen the plastic slide rail on (C) Use the bolt and inside nut is cranked down, it moves the log bed (D) and adjust it so on the rachet bar to move the easily through the saddle plate that it is straight in relation to the log bed up until the setting block... -
Page 21: Adjustments -Guide Bar
This can be compensated for by placing one or more adjustment pieces between the aluminium sliding rails and the chain-saw or electric saw plate. Adjustment pieces can be ordered from Logosol, part. no. 4507-001- 1305. -
Page 22: Step-By-Step Sawing
Step-by-step sawing instructions For larger logs the log beds might Roll the log onto the log be set at 7 1/4” or 8 1/4”, bed. depending on whether a 1” or 2” board is wanted. Fasten the log in place using the edge support. -
Page 23: Sawing Tips
Do not quarter saw arms. small logs. Begin by halving andquartering the log. When Many of us here at Logosol can sawing the boards out of the share long sawing experiences. quarters, you turn the log 90° log in this way it is best to saw As a new Logosoloist, if you between each cut. -
Page 24: Material Drying
Material drying Generally, once the wood is In most cases, however, the Place your first row of boards sawn it must be dried. wood must be dried. If this is not on the support logs, leaving It is possible to use undried done, there is a danger it will be about an inch between them. -
Page 25: Trouble-Shooting
One frequent reason for Check that all four legs up or down while the saw is problems when using the M7 is stand firmly and that the feet do mounted on the sawmill (see that the chain is dull (see page not sink into the ground when a page 21). - Page 26 Some tips for avoiding the wood The precision requirements also effects of wood tensions. The M7 sawmill can only saw vary. A result that is satisfactory straight. If the wood grain twists for someone sawing boards for Cut wood with tension in...
- Page 27 However, after between 50 and It is not good to drive a normal 100 cuts with the M7, the edge Regular chain sharpening 3/8” chain and a PMX chain with in the chromium layer will be the same sprocket.
-
Page 28: Accessories
Accessories Logosol offers a great range of extensions, special tools and other accessories for the M7 Wood Workers Mill. Simple extensions can be bought in 0.5 lengths (1.6 ft). It is also possible to extend the Wood Workers mill to the M7Logosol Sawmill. - Page 29 34. 4507-001-1205 Line pulley holder 53. 4510-720-2900 Pylon carriage plate * 35. 4507-001-7600 Log grip, compl. 54. 4510-723-3402 Logosol chainsaw nut 36. 4510-723-2905 Plastic slide rail, log grip * 55. 4507-001-1305 Adjusting plate 0.5 mm * 37. 4510-723-2511 Spacer *...
-
Page 30: Eu Declaration
Machine Directive 89/392/EEC, as amended, and in accord with the following harmonised standard: EN 292. The M7 portable sawmill may only be used in combination with Logosol’s sawing units E 5000, E 3000 and BS 320 or with a chain-saw that satisfies the specifications in Machine Directive 89/ 392/EEC, as amended, and is fitted with two guide bar nuts for fastening to the carriage.
Need help?
Do you have a question about the M7 and is the answer not in the manual?
Questions and answers