Table of Contents
Advertisement
Quick Links
Table of Contents
Leo 2 Multirotor Manual
Before Reading
Cautions
Introduction
Interface
Installation
Desktop Connection
PNP
ADV
PRO
Pre-flight Inspection
The First Flight
Pre-flight Inspection
1
2.1
3.1
3.2
3.3
3.4
3.5
3.5.1
3.5.2
3.5.3
3.6
3.7
4.1
4.2
4.2.1
4.2.2
4.2.3
4.3
4.4
5.1
6.1
Advertisement
Table of Contents

Related Manuals for Foxtech Leo 2


Summary of Contents for Foxtech Leo 2
-
Page 1: Table Of Contents
Table of Contents Leo 2 Multirotor Manual Before Reading Cautions Introduction Product Overview Function Description Device Dimensions Specification Interface 3.5.1 3.5.2 3.5.3 Indicators Redundancy Scheme Installation Preparation Desktop Connection 4.2.1 4.2.2 4.2.3 Start Installation Installation Parameters Pre-flight Inspection Flight Inspection Wizard... - Page 2 RC Flight Flight Parameters Tuning Route Flight Autonomous Flight Remote Assistance Flight Log Management Aerial Mapping Required Devices Photograph Configuration Devices Connection Scanning Route Planning Terrain Follow Flight Support After Sale Policy...
- Page 3 Reading Tips Copyright Notice Disclaimer Reading Tips Blue Text: Suggestions and possible contents. Orange Text: Content that needs close attention. Red Text: Must be strictly implemented. Copyright Notice The intellectual property rights of this product and the manual are solely owned by AheadX Technology.
- Page 4 3. Personal injury or property loss caused by operator’s errors or subjective judgment 4. Knowing that the relevant equipment is in an abnormal state (such as water damage, oil damage, soil & sand damage and entry of other unidentified substances and incomplete assembly, main components with obvious failures, spare parts with obvious defect or missing), but still use the equipment and cause damages.
-
Page 5: Product Overview
Product Overview Product Overview Copyright © 2014-2020 AheadX all right reservedRevision time of this article: 2020-10-14 11:17:20... -
Page 6: Function Description
L1 guidance law, and ADRC controller as the core algorithms of Guidance Navigation Control, It has high control precision. Leo 2 is equipped with advanced real-time motion planning algorithm - AxPlanner due to its powerful computing power, which can ensure that the UAV completes... - Page 7 the new avionics modules: navigation light module, airspeed module, and GNSS- compass module, Leo2 has great ease of use. Three versions are available to meet the needs of different users. Features and applications Three versions are available to adapt to different application scenarios. Centimeter-level satellite positioning system, supports RTK&PPK working at the same time, supports dual satellite antenna orientation.
- Page 8 Excellent internal damping structure can effectively reduce the impact of vibration on inertial measurement unit. Leo2 is able to be connected to two AM1 high-precision airspeed modules with temperature compensation to improve the reliability through redundancy technology. Dual redundancy satellite receiver and three redundancy yaw with standard configuration.
- Page 9 Copyright © 2014-2020 AheadX all right reservedRevision time of this article: 2020-10-10 17:06:28...
-
Page 10: Device Dimensions
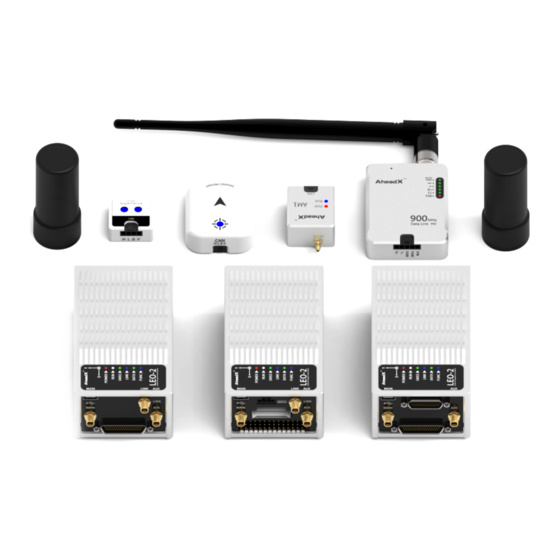
Device Dimensions Device Dimensions LEO-2 PNP LEO-2 ADV... - Page 11 LEO-2 PRO...
- Page 12 GNSS-compass Module SuperNova (Aviation Light Module) (Multirotor only)
- Page 13 Airspeed Module (Fixed-wing and VTOL) Copyright © 2014-2020 AheadX all right reservedRevision time of this article: 2020-10-12 17:47:35...
-
Page 14: Specification
Leo2 Specification Leo2 Specification... - Page 15 Index Typical Unit Remark GNSS- Compass, SuperNov Supply Voltage Airspeed Modules: 7 -28V Power Consumption Working ℃ Temprature (Enviroment) High accuracy Attitude positioned 0.05 ° Accuracy magnetic interferenc High accuracy positioned Yaw Accuracy ° magnetic interferenc Anglerate 1000 -1000 °/s Range Acceleration Range...
- Page 16 Voltage channel Measurement Voltage measurement range channel Measurement RMP Range 65535 Support al AheadX Communication channel Ports avionics Extended channel Serial Port Copyright © 2014-2020 AheadX all right reservedRevision time of this article: 2020-10-10 17:12:52...
- Page 17 Copyright © 2014-2020 AheadX all right reservedRevision time of this article: 2020-10-10 16:45:48...
-
Page 18: Pnp
Interface Definition - PNP POWER DATALINK ANTENNA GNSS ANTENNA SBUS Input USB Type-C Function Interface Interface Definition - PNP POWER The power supply interface, and the power supply voltage is 12-53v. P1+: Leo2 power supply positive pole, voltage monitoring channel 1 collects this pin. - Page 19 Built-in datalink antenna, MCX-KK interface. GNSS ANTENNA Built-in differential GNSS receiver module antenna interface, MCX-KK interface. MAIN: Main antenna interface, work independently for positioning. AUX: AUX: Auxiliary antenna interface, used in conjunction with the main antenna for orientation.
- Page 20 PWM pulse signal output interface. PWM1~14: PWM signal output. Vser: External power supply of servo, voltage monitoring #2 collect this pin, interconnected. Gnd: PWM digital ground, interconnected. PWM1-14 interface Gnd connected, Vser connected. SBUS Input SBUS input interface, access to airborne RC receiver. S-IN: SBUS input signal.
- Page 21 USB Type-C Connect computer through USB Type-C cable, it will be recognized as a USB disk, the onboard PPK data, log and POS data can be exported. Function Interface...
- Page 22 Index Definations Remarks Tx: Data Transmission. RS232 communication Rx: Data Reception. interface. When P2+ is not COM1 & Gnd: Serial Communication powered, COM1 can be COM5 Ground, which can be used to connect an shared with Event and Ph- external datalink. out interface signal ground.
- Page 23 Interface Definition DATALINK ANTENNA GNSS ANTENNA USB Type-C Main Interface (J30J-51PIN) Interface Definition DATALINK ANTENNA Built-in datalink antenna, MCX-KK interface. GNSS ANTENNA...
- Page 24 Built-in differential GNSS receiver module antenna interface, MCX-KK interface. MAIN: Main antenna interface, work independently for positioning. AUX: AUX: Auxiliary antenna interface, used in conjunction with the main antenna for orientation. USB Type-C Connect computer through USB Type-C cable, it will be recognized as a USB disk, the onboard PPK data, log and POS data can be exported.
- Page 25 Definitions:...
- Page 26 Definitions Remarks P1+:Leo2 power supply positive pole, voltage monitoring channel 1 collects this pin. Power Supply Range: 12V-58V P1+ and P2+ MUST input P-: Leo2 power supply same voltage level. negative pole. P2+:Built-in datalink power supply positive pole. COM1 is set as RS232 by 232/422: COM1 RS422 / default, connect this pin with RS232 switching pin...
- Page 27 PWM-3 PWM-4 GND: PWM Ground PWM-5 PWM-6 PWM-7 PWM-8 GND: PWM Ground PWM-9 PWM-10 PWM-11 PWM-12 GND: PWM Ground PWM-13 PWM-14 AD2: Voltage #2 Measurment. AD3: Voltage #3 Measurment. GND: A/D Ground CAN2-H: CAN2 Port H Reserved for customized CAN devices.
- Page 28 GND: Ground Copyright © 2014-2020 AheadX all right reservedRevision time of this article: 2020-10-10 16:45:48...
- Page 29 Interface Definition GNSS ANTENNA USB Type-C Main Interface (J30J-51PIN) Function Interface (J30J-25PIN) Interface Definition GNSS ANTENNA Built-in differential GNSS receiver module antenna interface, MCX-KK interface. MAIN: Main antenna interface, work independently for positioning. AUX: AUX: Auxiliary antenna interface, used in conjunction with the main antenna for orientation.
- Page 30 Connect computer through USB Type-C cable, it will be recognized as a USB disk, the onboard PPK data, log and POS data can be exported. Main Interface (J30J-51PIN) Definitions:...
- Page 31 Definitions Remarks P1+:Leo2 power supply positive pole, voltage monitoring channel 1 collects this pin. Power Supply Range: 12V-58V P-: Leo2 power supply P1+ and P2+ MUST input negative pole. same voltage level. P2+:Can be connected to P1+ to improve power supply stability.
- Page 32 PWM-3 PWM-4 GND: PWM Ground PWM-5 PWM-6 PWM-7 PWM-8 GND: PWM Ground PWM-9 PWM-10 PWM-11 PWM-12 GND: PWM Ground PWM-13 PWM-14 AD2: Voltage #2 Measurment. AD3: Voltage #3 Measurment. GND: A/D Ground CAN2-H: CAN2 Port H Reserved for customized CAN devices.
- Page 33 GND: Ground Function Interface (J30J-25PIN)
- Page 34 Definitions Remarks Fu_Rx3+: RS232 Data Reception / RS422 Data Reception+ Fu_Rx3-: RS422 Data Reception- Serial port-3 from function processor. Support Fu_Tx3+: RS422 Data RS232/RS422 switching by Transmission+ software configuration. Fu_Tx3-: RS232 Data Transmission / RS422 Data Transmission- GND: Digital Ground Fu_Rx4+: RS232 Data Reception / RS422 Data Reception+...
- Page 35 FU_PWM_5: GND: Digital Ground FU_AD1: Range: 0-58V FU_AD2: Copyright © 2014-2020 AheadX all right reservedRevision time of this article: 2020-10-10 16:45:48...
-
Page 36: Adv
Indicators Indicators Leo2 Indicator Description Status POW keep on Power supply OK RUN fast flash (5HZ) Working Satellite Fixed, low accuracy GNSS slow flash (1HZ) position Satellite Fixed, high accuracy GNSS keep on position LINK fast flash Receiving data Flashing once means to DATA slow flash (5HZ) record PPK data once. - Page 37 SuperNova- Aviation Lights definition Indicator Description Status Yellow slow flash Satellite not fixed Satellite fixed and flight mode is Green slow flash standby or attitude RC Satellite fixed and flight mode is Blue slow flash position RC Red and yellow lights Magnetic compass disturbed flash alternately Yellow fast flash...
-
Page 38: Redundancy Scheme
Redundancy Scheme Redundancy Scheme Default Hardware Redundancy: 1. 4-redundancy IMU 2. Dual redundant GNSS receivers 3. Triple redundancy yaw measurement Copyright © 2014-2020 AheadX all right reservedRevision time of this article: 2020-10-10 17:17:36... -
Page 39: Preparation
Preparation 1. Multirotor Drone 2. Datalink and RC 3. Power Supply 4. Related Software Preparation You need to prepare the following equipment to work with GNC: 1. Multirotor Drone Prepare a multi-rotor drone that meets the following layout. - Page 40 2. Datalink and RC Datalink RS232 interface, baud rate 115200 and transparent transmission, AheadX DL900 datalink is recommended. LEO2-PNP and LEO-ADV have integrated data link internally. Radio Transmitter and Receiver RC Requirements 1. Support SBUS or SBUS2, 11 channels at least (For example: FUTABA T8FG/T14SG).
- Page 41 Other RC Communication Standard: If other brands of RC is used, the range requirements of SBUS are as follows: CH1 (Roll); CH4 (Yaw): Left 364 - Mid 1024 - Right 1684; CH2(Pitch); CH3 (Lifting): Down 364 - Mid 1024 - Up 1684; CH5: Not in use;...
- Page 42 GNSS-compass module and aviation light module are able to be powered by CAN ports from GNC (8.4V), if they need independent power supply, the input voltage range is 7~28V. 4. Related Software Download the latest version of AheadX Space (GCS), AheadX Master (Parameters configuration), and Firmware updating tool.
- Page 43 Next Next...
- Page 44 Start installation Wait for process complete...
- Page 45 Read release note carefully after installation GCS Software Installation Video...
- Page 46 AheadX Master Installation Video...
- Page 47 Copyright © 2014-2020 AheadX all right reservedRevision time of this article: 2020-10-10 16:45:48...
- Page 48 Redandency Scheme Redandency Scheme Default hardware redundancy: 1. 4-redandency IMU 2. Dual redundant magnetic compass Redundancy expansion: Access AheadX DG3 differential positioning and orientation system 1. Dual redundant GNSS receivers 2. Triple redundancy yaw measurement Copyright © 2014-2020 AheadX all right reservedRevision time of this article: 2020-10-10 16:45:48...
- Page 49 Desktop Connection - PNP Power Connection GNSS-compass Connection Aviation Light Connection System Connection GCS Communication Desktop Connection - PNP Power Connection Please make essential test on desktop before installation. Find power cable from the box, as shown in the picture below: Weld the power plug as required:...
- Page 50 During welding, please pay attention to the positive and negative poles of the power supply. It must be consistent with the battery. If the welding is reversed, the device will be damaged directly. After welding, connect the power cable to the "POWER" interface of device. When inserting, it is necessary to hear the "click"...
- Page 51 GNSS-compass Connection Find function interface cable from the box One end with buckle is connected to GNSS-compass module, the other end is connected to Leo2, as shown below...
- Page 52 Aviation Light Connection Same way as GNSS-compass module, connect to the Leo2 main body. System Connection When the desktop connection is completed, as shown in the following figure:...
- Page 53 机载端 GCS Communication Connect the ground terminal of datalink to the computer through micro USB cable, and open the software of AheadX Space GCS. Select the serial port corresponding to the datalink, and click the 'ON' button, After successful connection, click , after the progress bar is completed, click to start up GCS software.
- Page 54 Copyright © 2014-2020 AheadX all right reservedRevision time of this article: 2020-10-12 17:53:54...
- Page 55 Copyright © 2014-2020 AheadX all right reservedRevision time of this article: 2020-10-10 16:45:48...
- Page 56 Copyright © 2014-2020 AheadX all right reservedRevision time of this article: 2020-10-10 16:45:48...
-
Page 57: Start Installation
Start Installation LEO-2 Main Body GNSS-Compass Aviation Light Module Multirotor's ESC Connection System Connection Start Installation LEO-2 Main Body Wiring Requirement Due to the need to connect with other avionics equipment, cable welding or plug connection will be involved. In order to ensure reliability, the following points should be paid attention to: 1. - Page 58 1. High power radio transmitting equipment with poor shielding effect, power supply wire, magnetic equipment, etc; 2. If the PWM control signal is interfered by electromagnetic field for the high- power radio transmitting equipment and transmitting antenna with poor shielding effect, abnormal conditions such as rudder shaking may occur, which may cause control hidden trouble;...
- Page 59 4. The installation angle parameters are set in strict order: First rotate the yaw axis (that is, rotate around the Z axis, where the parameter can only be non negative number 0 ~ 360); Then rotate the pitch axis (i.e. rotate around the y- axis, where the parameter range can be - 90 ~ + 90.
- Page 60 Installation Diagram of GNSS-Compass Module After installation, how to configure the installation parameters will be described in the following parameter setting section. Aviation Light Module The aviation light module can be used as status light and navigation light. The multirotor UAV is used as the status light by default. It is generally installed in the tail of UAV, and it is easy to observe.
- Page 61 Please connect the PWM signal according to your airframe, as shown in the following figure:...
- Page 62 System Connection Airborne When the RC receiver is directly connected to the GNC S-IN interface, the control distance of RC is affected by itself, which is generally suitable for the application of short distance remote control within the visual range. The RC receiver can access the software of AheadX Space through SBUS to USB converter.
- Page 63 Ground The ground terminal of DL900 datalink can be connected in the following ways: 1. A stable and reliable micro USB cable is used to connect PC and datalink; 2. USB to RS232 cable is used to connect the 5pin interface of datalink, and external power supply is used to improve the stability of power supply.
-
Page 64: Installation Parameters
Installation Parameters ESC Calibration Compass Calibration Installation Parameters Master Easy Connection After installation, power on all equipment except power system. Open the software of AheadX Space GCS, select the serial port corresponding to the datalink, and click the 'ON' button, After successful connection, click , after the progress bar is completed, click to start up GCS... - Page 65 GNSS Position Adjustment Taurus2: Write XYZ calibration data to channel 1 GNSS antenna position as shown in the figure below (The GNSS-compass module is the GNSS main antenna of channel 1), click to send. Leo2: Write XYZ calibration data and direction value to channel 1 (MAIN and AUX antenna) as shown in the figure below;...
- Page 66 Layout Set: According to the diagram, select the layout settings consistent with the actual UAV. It is forbidden to modify the layout set when the drone is powered on and the propeller is installed! Power Setting: Power Mode: The default is common, which is suitable for most power systems. If 'common' can not achieve better flight effect, Users can try to specify the power model as shown in the figure below, input the power model, click to query the power coefficient, the software will pull the corresponding model power...
- Page 67 ESC Calibration Power up the GNC separately, open Master Easy software, operate as graphic shown. Please note that the ESC calibration process is applicable to HobbyWing series. If other brands of ESC are not applicable, please refer to the relevant third-party user manual.
- Page 68 When GNC performs advanced calibration of magnetic compass, it will calibrate the internal magnetic compass and GNSS-Compass module at the same time.After completing the advanced calibration, it is necessary to carry out pre takeoff inspection - magnetic compass status check. Magnetic Compass Calibration...
- Page 69 Copyright © 2014-2020 AheadX all right reservedRevision time of this article: 2020-10-10 16:45:48...
-
Page 70: Flight Inspection Wizard
Reading Tips Flight Inspection Wizard Task Register* Manual Check Sensor Status Compass Status RC Status Actuator Inspection Flight Preference Protections Reading Tips This wizard will use the combination of automatic detection and manual detection to help you check the aircraft before flight and improve the operational reliability of the aircraft. - Page 71 This page is used to register people and task information. Click "information management" to register the team member information, which will take effect after saving. After the task division is selected, it can be set as the default value, and the team information will be automatically loaded next time.
- Page 72 The page will automatically detect the current GNC status, if there is a red alarm sign, troubleshoot in time. Manual detection is still needed: Attitude Inspection: Lift the aircraft to make pitch / roll change. Observe the corresponding value change. The head up / right roll is positive. If the actual change is inconsistent with the value, please check whether the GNC installation angle is configured correctly;...
- Page 73 there is no interference, please carry out advanced calibration of magnetic compass. Taurus 2 is the dual redundant magnetic compass by default, and the magnetic compass of channel 1 and channel 2 should be checked at the same time. 1. Compass Selection Heading angle shows the magnetic compass data currently in use.
- Page 74 1. Channel Range Checking After selecting the display mode corresponding to the RC, observe whether the actual position of the channel is consistent with the display. 2. Mode Switch Checking Toggle the mode switcher and observe whether the remote control mode status pops up in the figure below is consistent with the expectation.
- Page 75 Click the obtain motor layout button to display the current flight layout diagram. After confirming the safety of personnel and equipment, drag the sliding bar button to the right to start the inspection of the actuator of motor and parachute (if included).
- Page 76 Flight Preference After entering the check page, the parameters will be automatically downloaded once. If the parameters are not saved after uploading, the change will be invalid after the GNCler is restarted. Protections Opening this interface will automatically refresh the current GNC protection parameters.
- Page 77 Copyright © 2014-2020 AheadX all right reservedRevision time of this article: 2020-10-10 16:45:48...
- Page 78 The First Flight Inspection Before Flight The First Flight Inspection Before Flight Be sure to perform the pre flight inspection wizard before taking off Please refer to the pre flight inspection teaching video bilibili Copyright © 2014-2020 AheadX all right reservedRevision time of this article: 2020-10-10 16:45:48...
-
Page 79: Rc Flight
Multirotor RC Flight Operation Steps Normal RC Flight Procedures Multirotor RC Flight Before RC flight, confirm following contents: 1,RC transmitter and receiver synchronized. 2,The RC status in the lower right corner of the GCS is green 3,Right click in the map area of the GCS, open the Joystick panel, and check whether the response in the panel is consistent with the action of the RC channel, so as to verify the correctness of the RC configuration. - Page 80 For details, please refer to the multirotor tuning chapter: Normal RC Flight Procedures There are two ways to give control right to RC 1, Under 'Standby' mode, use RC to unlock: 2, Under 'Standby' mode, double click in the Joystick panel of AheadX Space. Please refer to RC flight operation video Multirotor RC Flight Video Copyright ©...
-
Page 81: Flight Parameters Tuning
Flight Parameters Tuning Flight Parameters Tuning The default flight parameters are suitable for most of the multirotor aircraft. If the flight is unstable and can not meet the flight requirements, please adjust the following flight parameters in the Anglur Velocity page of Master Easy software. Response Sensitivity Adjustment: The RC stick to the center after quick action, If the aircraft attitude response is slow, the parameter value can be increased by 1-5 units. - Page 82 Copyright © 2014-2020 AheadX all right reservedRevision time of this article: 2020-10-10 16:45:48...
-
Page 83: Route Flight
Route Flight Fast Route Planning Detailed Manual Route Planning Route Drawing and Modifying Route Flight Fast Route Planning In the ground station, click on the left side of the main interface to pop up the route editing panel, click on and a cross will appear cursor, move the cursor to the map and click to start planning the route. - Page 84 Height Difference Protection: This parameter is not effective. Waypoint Action: After you choose to take a photo once, the drone will take a photo once it reaches the waypoint. Flight Segment Mission: You can choose isochronous/equal distance photo or turn off, the drone will perform corresponding actions after reaching the waypoint until the next flight segment task is triggered.
- Page 85 Route Position Adjustment: Select and double-click any waypoint on the map, and the overall adjustment box will appear. Move the mouse to the box and hold down the left button to pan the route as a whole. Move the mouse to the round point on the corner of the adjustment box, and the mouse will change to Rotate sign, hold down the left mouse button to rotate the route, the rotation center is the geometric center of all waypoints (the rotation center of the landing route is the converted...
-
Page 86: Autonomous Flight
Autonomous Flight Takeoff Execute Route Home Mode Auto Landing Autonomous Flight Before taking off, please confirm whether the route to be executed is within a reasonable range, and do not exceed the maximum range of the aircraft. Takeoff Double-click 'Takeoff' button , After taking off, the aircraft will climb to the set altitude for hovering and wait for further command. - Page 87 Home Mode Double click to execute home mode command, Click the blue button below to call out the sub menu: The detailed information of home point can be set here. Auto Landing Double click 'Land' button , The aircraft will perform a regular home landing.
-
Page 88: Remote Assistance
Remote Assistance Remote Assistance The remote assistance function requires users to register and log in to the AheadX Galaxy cloud management system account. It can realize remote monitoring, tuning and control. The user registration interface will pop up when the ground station is started for the first time. Enter the account and password to log in. - Page 89 :Click this button to refresh the secret key Monitoring: the default state is monitoring state, at this time, the remote people can only view UAV data, and cannot modify parameters or GNC. Tuning: at this time, the remote people can view the UAV data and tune the parameters, but can not control the flight.
- Page 90 Remote control terminal status display, UAV under control The flight site status shows that the UAV is under control Remote Assistance Copyright © 2014-2020 AheadX all right reservedRevision time of this article: 2020-10-10 16:45:48...
-
Page 91: Flight Log Management
Flight Log Management Log Storage Log Replay Flight Log Management Log Storage The log files are stored in the root directory of AheadX Space under the AheadX space\log path Opr: Operation log; RC: GCS command log; RM: Telemetry log. The log naming standard is: AheadX / GNC type / log type / year, month, day, hour, minute, second / .log Log Replay Users can use the log player tool for replay to analyzing flight data... - Page 92 In the AheadX Space root directory, open ZDLogPlayer.exe , select to open the log file or drag the log file into the player interface. The log file supports the .Log file automatically recorded by AheadX Space, and also supports exporting airborne data (PDR files).
- Page 93 Log Management Copyright © 2014-2020 AheadX all right reservedRevision time of this article: 2020-10-10 16:45:48...
-
Page 94: Required Devices
Required Devices Required Devices In order to improve the accuracy of GNC and mapping, you may need the following equipment: AheadX DG3 Differential Positioning and Orientation System AheadX DG3 is a high-performance industrial GNSS airborne differential positioning product launched by AheadX. The product has the advantages of low power consumption, small size, light weight and easy to use. - Page 95 Ubase is high-precision positioning equipment for UAV surveying and mapping applications. It adopts integrated magnesium aluminum alloy bottom shell, Linux operating system and high-performance multi frequency receiving antenna. It supports BDS, GPS, GLONASS multi constellation system; Built in WiFi, Bluetooth, 3G/4G connection function, can expand rich application scenarios;...
- Page 96 Parameter Configuration Parameter Configuration Camera Connection Connect the camera shutter signal to the PH-OUT pin. The default is rising edge trigger. Trigger Mode Adjustment H-L Level Trigger: connect Master Easy parameter software and open the interface of basic configuration control distribution, as shown in the figure below: Special PWM Trigger:...
- Page 97 Exposure Delay: Compensate for the time from the GNC sending out the photographing signal to the time when the camera takes the image. The POS point data will delay this time and record the information. Hold Time: The time to hold the shutter action. Set the appropriate holding time to prevent the camera from taking more or missing shots, which is generally set to 100-300 ms.
-
Page 98: Devices Connection
Devices Connection Devices Connection Camera Inspection: Connect AheadX Space software and open the Pre-takeoff inspection wizard panel, as shown in the following figure: Carry out manual photographing to check whether the actual number of photos taken by the camera is consistent with the GNC record value. It is recommended to clear the last POS record data before each operation. - Page 99 UBase Base Station Copyright © 2014-2020 AheadX all right reservedRevision time of this article: 2020-10-10 16:45:48...
-
Page 100: Scanning Route Planning
Scanning Route Planning Scanning Route Planning KML&KMZ Files Import Click the left side of the main interface . The route editing panel pops up, and click the lower left corner of the panel! icon to call out area management interface. Click button to import KML&KMZ zone file. - Page 101 After simplification, click the confirm button to close the interface. Generate Scanning Route After selecting area on the map, click icon under the route edit panel. The aerial mapping parameter panel will pop up, as shown in the following figure:...
- Page 102 UAV Information: Click read to get the related GNC parameters. If the aircraft is not connected, it can be set manually (if it is not filled in according to the actual aircraft performance, there may be flight risks). Task Requirement: Support block mapping and strip mapping.
- Page 103 Expansion: Increase the area of scanning. Turning extension time: The product of this time and the flight speed increases the extra distance for the turn. Scanning angle: modify the angle of the UAV scanning route, after modification, it can be previewed in real time. Enter location: Confirm the entry location according to the ABCD point displayed in the map area.
- Page 104 Air strip distribution: Left/Right: The coverage is one side of the path file; Middle: Covers both sides with the path as the center. Motion planning: Enable the drone to automatically turn at the position where the auxiliary turning point was originally needed to ensure the attitude level of the drone when taking pictures and improve the image quality (The function is supported by the GNC firmware 2.14.0 and later ).
-
Page 105: Terrain Follow Flight
Terrain Follow Flight Terrain Follow Flight Route Planning Open the route editing panel, draw the route manually or generate the scan route through the aerial mapping parameter panel. Terrain Follow Flight Configuration Flight height: When the height of waypoint 1 is a relative altitude, the default ground height is the height of waypoint 1, otherwise the default value is 300m. - Page 106 2. The sampling interval will be automatically adjusted according to the degree of terrain undulations. The sampling points in areas with large terrain undulations will be automatically increased to ensure the best terrain following effect; sampling points in areas with small terrain undulations will effectively reduce the frequency of drone attitude adjustment , Improve endurance, flight stability and imaging effect.
-
Page 107: After Sale Policy
After-sales Policy After-sales Policy User can request a return& refund service within seven (7) calendar days of receiving a product if the product has a manufacturing defect. AheadX provides one-year warranty. You can request a return& refund service where: Provide a legal proof of purchase, receipt, bill, invoice or order number; Serial number, product label and other marks shows no sign of alteration or tempering ;... - Page 108 Warranty Service Standard project Professional technical services Technical 400 Hotline provided by technical engineers, Support (Mandarin Only) responsible for troubleshooting. Help customers to Remote tune or solve the 5 days*8 hours Assistance problem by remote assistance. Customer Service 7 days*8 hours Email Wechat、...
Need help?
Do you have a question about the Leo 2 and is the answer not in the manual?
Questions and answers