Table of Contents
Advertisement
Available languages
Available languages
Quick Links
READ AND SAVE THESE INSTRUCTIONS
Installer: leave this guide with homeowner.
Register your product online at www.nutone.com/register.
Easy installation
© 2013 Broan-NuTone LLC
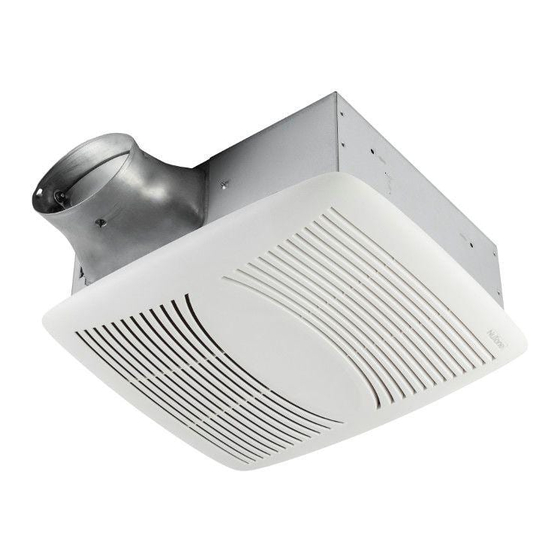
EZ80N
EZ Fit
Ventilation Fan
INSTALLATION GUIDE
Table of Contents
2
2
2
2
2
3-7
7
8
8
Advertisement
Table of Contents

Related Manuals for Broan NuTone EZ80N


Summary of Contents for Broan NuTone EZ80N
-
Page 1: Table Of Contents
Register your product online at www.nutone.com/register. INSTALLATION GUIDE Table of Contents Warnings and Cautions Operation Cleaning and Maintenance Troubleshooting Easy installation Typical Installation Installation - Replace an Existing Fan Installation in New Construction Service Parts Warranty © 2013 Broan-NuTone LLC... -
Page 2: Warnings And Cautions
Page 2 EZ80N Installation Guide Operation WARNING To Operate Fan Use an ON/OFF switch or speed control to operate this TO REDUCE THE RISK OF FIRE, ELECTRIC SHOCK, OR ventilator. INJURY TO PERSONS, OBSERVE THE FOLLOWING: 1. Use this unit only in the manner intended by the manufacturer. WARNING If you have questions, contact the manufacturer at the Before servicing or cleaning unit,... -
Page 3: Installation - Replace An Existing Fan
Page 3 EZ80N Installation Guide Installation - Replace an Existing Fan Tools needed Materials needed • Phillips screwdriver (recommended) • 4" round metal ducting recommended for best performance. Use of • Hammer other ducting is acceptable but may impact performance. •... - Page 4 Page 4 EZ80N Installation Guide Installation - Replace an Existing Fan Mark Ceiling Using Template I S T I S T Make sure existing fan is no larger than 8” x 8¼” . Mark center line of existing fan on ceiling. Trace around outside of template with a pencil.
- Page 5 Page 5 EZ80N Installation Guide Installation - Replace an Existing Fan Install New Housing Lift new fan housing up into When turned clockwise (with a Phillips screwdriver), clamps enlarged rectangle will spin outward from housing and move downward on top of in ceiling material.
- Page 6 Page 6 EZ80N Installation Guide Installation - Replace an Existing Fan Connect Electrical Wiring Install Grille WARNING TO REDUCE THE RISK OF FIRE, ELECTRIC SHOCK, OR INJURY TO PERSONS, OBSERVE THE FOLLOWING: If unfamiliar with electrical wiring, secure the services of a qualified person to connect wiring according to all applicable codes and standards.
-
Page 7: Installation In New Construction
Page 7 EZ80N Installation Guide Installation in New Construction Remove from Packaging (See Page 3) Prepare the Housing (See Page 3) Install Fan Housing & Connect Ductwork Position fan against ceiling framing with bottom edge of housing flush with finished ceiling. Push 4”... -
Page 8: Service Parts
Warranty Limited Warranty Warranty Period and Exclusions: Broan-NuTone LLC (the “Company”) warrants to the original consumer purchaser of its product (“you”) that the product (the “Product”) will be free from material defects in the Product or its workmanship for a period of one (1) year from the date of original purchase. - Page 9 Aviso al instalador: Deje esta guía con el dueño de la casa. Ventilador de bajo perfil Registre su producto en línea en www.nutone.com/register. GUÍA DE INSTALACIÓN Índice Advertencias y precauciones Funcionamiento Limpieza y mantenimiento Resolución de problemas Instalación sencilla Instalación típica Instalación 11-15 Piezas de servicio Garantía © 2013 Broan-NuTone LLC...
- Page 10 Página 10 EZ80N Guía de instalación Funcionamiento ADVERTENCIA Para hacer funcionar el ventilador Accione este ventilador mediante un interruptor de encendido/ PARA REDUCIR EL RIESGO DE INCENDIOS, DESCARGAS apagado o control de velocidad. ELÉCTRICAS LESIONES PERSONALES, SIGA SIGUIENTES PRECAUCIONES: ADVERTENCIA 1.
- Page 11 Página 11 EZ80N Guía de instalación Instalación - Vuelva a colocar el ventilador existente Herramientas necesarias Materiales necesarios • Destornillador Phillips (recomendado) • Se recomienda utilizar conductos metálicos redondos de 4 pulg. • Martillo (10.2 cm) para obtener un desempeño óptimo. Aunque el uso •...
- Page 12 Página 12 EZ80N Guía de instalación Instalación - Vuelva a colocar el ventilador existente Marque el cielo raso usando la plantilla V I G V I G Asegúrese de que el ventilador existente no sea mayor de 8 x 8 ¼ pulg.
- Page 13 Página 13 EZ80N Guía de instalación Instalación - Vuelva a colocar el ventilador existente Instale la cubierta nueva Levante la cubierta del nuevo ventilador hacia el rectángulo Cuando se les da vuelta a la derecha (con un destornillador alargado en el material Phillips), las abrazaderas girarán hacia afuera de la cubierta y se del cielo raso.
- Page 14 Página 14 EZ80N Guía de instalación Instalación - Vuelva a colocar el ventilador existente Conecte los cables eléctricos Instale la rejilla ADVERTENCIA PARA REDUCIR EL RIESGO DE INCENDIOS, DESCARGAS ELÉCTRICAS O LESIONES PERSONALES OBSERVE LAS SIGUIENTES PRECAUCIONES: Si no está familiarizado con el cableado eléctrico, contrate los servicios de una persona calificada para realizar las conexiones eléctricas de acuerdo con todos los códigos y normas aplicables.
- Page 15 Página 15 EZ80N Guía de instalación Instalación en la nueva construcción Saque todo del empaque (Vea página 11) Prepare la cubierta (Vea página 11) Instale la cubierta del ventilador y conecte los conductos Empuje el conector Coloque el ventilador contra el armazón, con el borde inferior de la cubierta a nivel con el cielo raso terminado.
- Page 16 Garantía Garantía limitada Periodo y exclusiones de la garantía: Broan-NuTone LLC (la “Compañía”) garantiza al consumidor comprador original de su producto (“usted”) que el producto (el “Producto”) estará libre de defectos en materiales o en mano de obra, por un periodo de un (1) año a partir de la fecha de compra original.
Need help?
Do you have a question about the NuTone EZ80N and is the answer not in the manual?
Questions and answers