Advertisement
Quick Links
Advertisement

Related Manuals for Euromaid EWC171IB


Summary of Contents for Euromaid EWC171IB
- Page 1 User Manual Wine Cooler EWC171IB Thank you for purchasing and using this Euromaid wine chiller. Our wine chillers and beverage centres are will create the perfect environment to store and display your collection of wine and beverages. www.euromaid.co.nz euromaid.com.au...
-
Page 3: Table Of Contents
Contents Safety instructions & warnings Page 4 - 6 Installation Page 7 Description of the appliance Page 8 - 10 Operation Page 10 - 12 Troubleshooting Page 13 Maintenance and cleaning Page 14 Technical parameters Page 15 Manufacturer Guarantee Page 16 - 17... -
Page 4: Safety Instructions & Warnings
Safety instructions & warnings Your safety is of the utmost importance to our company. Please make sure that you read this instruction booklet before attempting to install or use the appliance. If you are unsure of any of the information contained in this booklet, please contact the Technical Department. - Page 5 • Make sure that the appliance is connected to power supply in accordance with the rating label. • Use an independent grounded socket with 10A or higher, do not connect to transformer or socket with multiple outlets. • Make sure socket is grounded properly and do not modify power cord & plug.
- Page 6 Modification on the appliance not allowed • Do not attempt to modify the appliance by yourself as this may cause damages to the appliance. Unplug the appliance under certain conditions • Unplug the appliance before cleaning & maintenance. • Unplug the appliance when a power cut has occurred. Disposal of the appliance •...
-
Page 7: Installation
Installation Position Do not lean the appliance over 45°, especially when moving it. The appliance must be put on flat, firm & dry floor or similar noncombustible pad; do not use the package foam pad. Do not put the appliance in a wet place. Do not use the appliance in a frozen place. Do not use the appliance outdoor in case of sunlight or rain. -
Page 8: Description Of The Appliance
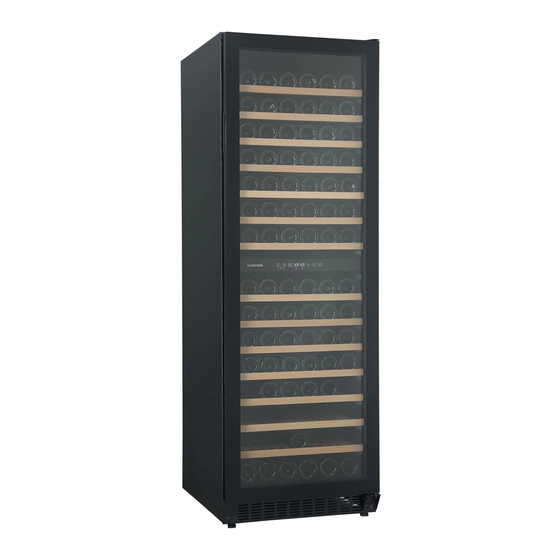
Description of the appliance Overall image 1. Housing 7. Lower hinge 2. Shelf 8. Door 3. Control panel 9. Door seal 4. Cover board 10. Handle 5. Grill 11. Upper Hinge 6. Adjustable foot Note: Shelves, door frame, handle and other accessories may be different according to different models and configuration. - Page 9 Reversing the door Note: Two people are required to complete the door change. 1. Hold the door , unscrew the four screws from the lower hinge , and remove the lower hinge . Slowly take out the door from the top right hinge from top to bottom. [Figure 1]. 2.
-
Page 10: Operation
Operation Start operation 1. Cleaning the compartment Before powering on, clean inside of the appliance and check the drainage pipe is connected. (For details, please refer to the “Maintenance and cleaning”). 2. Stabilising the appliance Before powering on, level the appliance on a firm & dry floor for at least 30 minutes. 3. Power on Once the appliance has started operation, it will cool down internally after 1 hour, otherwise you should check the power connection. - Page 11 Press the key once, the LED Display will flash showing current set temperature. Continue pressing to adjust set temperature, one press increases temperature by 1°C. Flashing will stop after 5 seconds without any input and new set temperature will be saved. LED display will return to show actual temperature inside. Down Press this key once, LED Display will flash showing current set temperature.
- Page 12 Wine storage • The appliance is equipped with sufficient shelves to allow your collection of wine to mature quietly and peacefully. • Full wood shelves loading capacity: 171 bottles. (Standard Bordeaux with 750ml). • Loading capacity will vary depending on bottle arrangement or different bottle sizes. • Each shelf is designed to support 1 or 2 layers of wine bottles. More than 2 layers of bottles on one shelf is not recommended.
-
Page 13: Troubleshooting
Troubleshooting The appliance makes lots of • Adjust the front foot, keep the appliance level. noise? • Keep the appliance spaced away from walls. There is a liquid flowing • It is normal because of the refrigerant working inside. sound inside the cabinet? The appliance does not start? •... -
Page 14: Maintenance And Cleaning
Maintenance and cleaning Cleaning • Disconnect the appliance before cleaning. • Clean the appliance with a soft cloth or sponge with water. • Do not use organic solvents, alkaline detergent, boiling water, washing powder or acidic liquid etc. • Do not flush the compartment of the appliance. • Clean regularly surfaces that can come in contact with accessible drainage systems. -
Page 15: Technical Parameters
Technical parameters Product model EWC171IB Voltage/frequency 220-240V~/50Hz Refrigerant/amount R600a/42g Effective volume 415L Loading capacity 171 bottles Net weight 90kg Unit dimension (WxDxH) 595×680×1770 mm 660×745×1960 mm Packing dimension (WxDxH) With wood pallet Remarks: 1. The net weight includes shelves, and the unit dimension is without handle on the door. -
Page 16: Manufacturer Guarantee
2 years from the date the product is purchased as a brand- new product from a retailer located in Australia / New Zealand. b) In the case of Euromaid products used for purposes other than personal, domestic or household purposes (including business or commercial use), a period of 90 days from the date the product is purchased as a brand-new product from a retailer located in Australia / New Zealand. - Page 17 e) the breakdown occurs after the expiry of the express warranty period set out in section 1 or f) the product was not purchased in Australia / New Zealand as a brand-new product. 3. Consumer guarantees Our goods come with guarantees that cannot be excluded under the Australian / New Zealand Consumer Law.
- Page 18 Notes...
- Page 20 READ THE INSTRUCTION BOOKLET BEFORE INSTALLING AND USING THE APPLIANCE. The manufacturer will not be responsible for any damage to property or to persons caused by incorrect installation or improper use of the appliance. The manufacturer is not responsible for any inaccuracies, due to printing or transcription errors, contained in this manual. In addition, the appearance of the figures reported is also purely indicative.
Need help?
Do you have a question about the EWC171IB and is the answer not in the manual?
Questions and answers