Advertisement
Quick Links
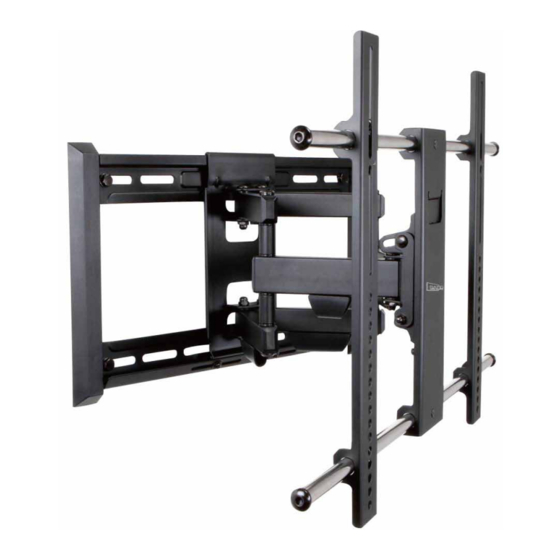
RVM-64FM125
Low Profile Full Motion TV Mount
IN STRUCTION MANUAL
MANUAL DE INSTRUCCIONES
MANUEL D'INSTRUCTIONS
!
CAUTION:
THE MAXIMUM LOADING WEIGHT
IS 125 LBS. USE WITH PRODUCTS HEAVIER THAN
THE MAXIMUM WEIGHT INDICATED MAY RESULT IN
INSTABILITY AND POSSIBLE PERSONAL INJURY.
Max Screen Size: 70"
V2
Advertisement

Related Manuals for Rapid video mounts RVM-64FM125


Summary of Contents for Rapid video mounts RVM-64FM125
- Page 1 RVM-64FM125 Low Profile Full Motion TV Mount IN STRUCTION MANUAL MANUAL DE INSTRUCCIONES MANUEL D’INSTRUCTIONS CAUTION: THE MAXIMUM LOADING WEIGHT IS 125 LBS. USE WITH PRODUCTS HEAVIER THAN THE MAXIMUM WEIGHT INDICATED MAY RESULT IN INSTABILITY AND POSSIBLE PERSONAL INJURY.
-
Page 2: Tools Needed
Tampoco prevé todas las posibles contingencias relacionadas con la instalación o el uso de este producto. La información que contiene este documento queda sujeta a cambio sin aviso previo o compromiso alguno. RAPID VIDEO MOUNTS no ofrece ninguna garantía, ni expresa ni implícita, respecto de la información aquí incluida. RAPID VIDEO MOUNTS no se responsabiliza de la precisión de la información provista en este documento, ni tampoco de que sea completa o suficiente. - Page 3 HARDWARE PRODUCT NUMBERS SQUARE M5 x 30 M6 x 30 M8 x 30 M4 x 30 M8 x 15 M6 x 15 M4 x 12 M5 x 12 WASHER LAG BOLT LAG BOLT WALL STEEL ALLEN ANCHOR WASHER 8mm x 65mm STEEL WASHER ACORN 10mm...
- Page 4 CORNER MOUNTING INFORMATION The Large Full Motion Mount can be installed in a corner location when needed. Prior to installing the Mount it is important to determine the appropriate corner wall to install the mount. Please see diagrams below to assist in determining the appropriate wall placement to use.
- Page 5 STEP 1- FLAT BACK FLAT PANEL (UNIVERSAL MONITOR PLATE) Connect Universal Monitor Plate to flat panel Conecte el adaptador al monitor Connectez l'adaptateur au moniteur STEP 1- CURVED BACK FLAT PANEL (UNIVERSAL MONITOR PLATE) Connect Universal Monitor Plate to flat panel Conecte el adaptador al monitor Connectez l'adaptateur au moniteur Spacers can also be used to...
- Page 6 STEP 1- USE M8 STEEL WASHER IF THE PHILLIPS SCREWS FROM THE MONITOR KIT ARE TOO LONG Diagrams show three options for using additional washers if hardware screws are too long to properly tighten into back of flat panel television. STEP 2- CENTER UNIVERSAL MONITOR PLATE Monitor Plate must be centered (horizontal plane) on back of flat panel STEP 2- SECURE UNIVERSAL MONITOR PLATE VERTICAL RAILS...
- Page 7 STEP 3 - PRIOR TO EXTENDING ARMS REMOVE ARM ASSEMBLY FROM WALL PLATE Prior to extending arms; Remove 2 Philips screws at top of Arm Assembly . Remove additional 2 Philips screws at bottom of Arm Assembly. Note- 4 Philips screws will be used in Step 5 to reattach arm assembly to wall mount.
- Page 8 STEP 4A- WOOD STUD INSTALLATION (CONCRETE INSTALLATION SKIP TO 4B) Find stud and mark edge and center locations Ubique el panel y marque las ubicaciones de los bordes y el centro. Repérez l'emplacement d'une poutre, puis marquez l'emplacement des bords et du centre de cette poutre. LEVEL WALL PLATE DRILL BIT WITH INCLUDED...
- Page 9 STEP 4B – SOLID CONCRETE INSTALLATION Solid Concrete Drill Bit Level Drill pilot hole Concreto sólido S. broca Nivelado Realice el agujero piloto Béton massif Foret Level Percez le trou de guidage DRILL BIT LEVEL WALL PLATE NOT INCLUDED WITH INCLUDED BUBBLE LEVEL AND MARK HOLES FOR DRILL BIT PILOT HOLE...
- Page 10 STEP 5 - ATTACH MOUNT ASSEMBLY TO WALL PLATE Position Arm Assembly to desired lateral position on wall plate for optimum placement of Flat Panel. Secure Arm Assembly to Wall plate using screws removed from Step 2. STEP 6 - ATTACH UNIVERSAL MOUNT PLATE TO ARM ASSEMBLY & WALL PLATE PLATE Heavy, Assistance Required...
- Page 11 SECURE MONITOR PLATE TO ARM ASSEMBY Secure Acorn Nut and Washer on Monitor Plate to Arm Assembly (snug tension only) M6 Wrench M6 Washer M6 Acorn Nut ADJUST TILT TENSION/ POST INSTALLATION LEVEL Built-in level feature for post installation Adjust tilt mechanism tension with ratchet handle lever correction ±3°...
-
Page 12: Warranty Information
Esta garantía se aplica a los residentes de los Estados Unidos que realizaron la compra en un distribuidor autorizado de RAPID VIDEO MOUNTS. Esta garantía cubre los productos RAPID VIDEO MOUNTS de los defectos de materiales y de mano de obra por un periodo de 5 años. RAPID VIDEO MOUNTS, a su exclusivo criterio, reparará o reemplazará...
Need help?
Do you have a question about the RVM-64FM125 and is the answer not in the manual?
Questions and answers