
Related Manuals for VIPColor VP485


Summary of Contents for VIPColor VP485
- Page 1 V P 4 8 5 Printer U s e r u i d e Mantenimiento Periféricos Informáticos C/Canteras, 15 28860 Paracuellos de Jarama (Madrid) Tel: 00 34 917481604 Web: https://mpi.com.es/...
- Page 2 fitness for a particular purpose. VIPColor Technologies, Pte Ltd. shall not be liable for errors contained herein or for incidental or consequential damages in connection with furnishing, performance, or use of this material.
-
Page 3: Regulatory Information
Regulatory information VIPColor Env ironmental Policy Product VP485 / VP485e is in compliance with the requirements of VIPColor Environmental policy and has been assessed to ensure rate of recovery, re-use and recycling of constituent parts are acceptable. Ink use This product’s fast mode uses less ink, which might ex tend the life of the cartridges. -
Page 4: Safety Precautions
, through controlled treatment of possible hazardous substances that may ex ist. F or more information about where you can drop off your waste equipment for recycling, please refer to VIP Color website at UR L: http://www.vipcolor.com/ . Safety Precautions Please read the safety warnings and cautions provided in this manual to ensure that you use your printer safely. - Page 5 Power supply Never attempt to plug in or unplug the printer from the power supply when your hands are wet. Always push the plug all the way into the power outlet. Never damage, modify, stretch or ex cessively bend or twist the power cord. Do not place heavy objects on the power cord.
- Page 6 Power supply Ensure that the area around the power outlet is kept clear at all times so you can easily unplug the power cord when if necessary. Never remove the plug by pulling on the cord. Do not use an ex tension lead/cord. Never use a power supply source other than the one rated for the printer in the country of where you purchased the printer.
-
Page 7: Choosing A Location For The Printer
Choosing a location for the printer F ollow these guidelines to select a suitable location for the printer: The area must be well ventilated and free from dust emissions. Avoid places where the printer will be ex posed to direct sunlight, liquids or chemicals. Avoid places that are subject to abrupt changes in temperature and humidity. -
Page 8: Table Of Contents
Contents Copyright ....................i Regulatory Information ..............ii Safety Precautions ................iii Choosing a location for the printer ..........v i U npacking the Printer ...............v i Printer Parts and Their F unctions ..........1 F ront View ..................1 Control Panel ..................2 Status lights reference..............3 R ear View ..................4 Setting U p the Printer ..............5 Install the ink cartridges ..............5... - Page 9 Install and U ninstall the D riv er Software .........23 To install the software before connecting the printer (recommended) ............23 To connect the printer before installing the software ....24 Uninstall and reinstall the Printer Drivers ........25 Method 1: To uninstall from a Windows computer ....25 Method 2: To uninstall from a Windows computer ....26 M aintainance ................27 R eplace the ink cartridges ............27...
-
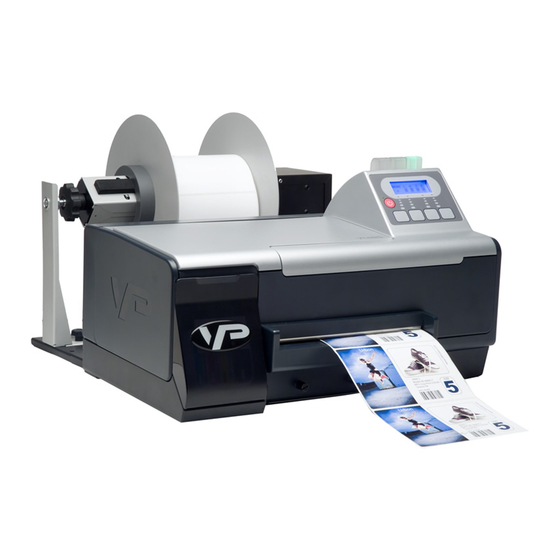
Page 10: Printer Parts And Their F Unctions
C h a p t e r 1 P rin ter P arts an d T heir F u n c tio n s F ro n t V iew S ta tu s lig h ts C on trol pa n el Top cover In k ca rtrid g e com pa rtm en t... -
Page 11: Control Panel
Co n tro l P an el S ta tu s lig h ts P ow er in d ica tor L C D d is pla y M en u b u tton s P ow er b u tton CA U T IO N : D o n ot tu rn off th e prin ter u s in g th e P ow er s w itch on th e rea r of th e prin ter. -
Page 12: Status Lights Reference
S tatu s lig hts referen c e Th e in d ica tor lig h ts in d ica te s ta tu s of th e prin ter a n d a re u s efu l for d ia g n os in g prin tin g prob lem s . -
Page 13: R Ear View
R ear V iew R ea r m od u le M ed ia feed er M ed ia w id th g u id e P ow er con n ector P ow er s w itch G P IO port S tock s en s or N etw ork con n ector pos ition a d ju s tm en t... -
Page 14: Setting U P The Printer
C h a p t e r 2 S ettin g U p the P rin ter To set up the printer, you need to do the following: Install the ink cartridges Install the printheads Connect the power cable Run the printhead alignment Unwinder setup Load Label Media Install the printer driver... -
Page 15: Install The Printheads
3 . P ush the ink cartridge firmly into the corresponding slot as indicated by the colored labels at ink cartridge compartment. N O T E : The ink cartridge will not sit properly if it is in the wrong slot. 4 . - Page 16 The printhead carriage is on the left of the printer. 2. Remove the packing tape from each of the latches on the carriage. 3 . Lift up the printhead latch. 4 . S hake the printhead 6 times as shown. 5 .
-
Page 17: Connect The Power Cable
Repeat steps 4 to 8 to install the other printhead. 1 0 . Lower the printhead latch to secure the printheads. 1 1 . Close the top cover. Co n n ec t the po w er c ab le N O T E : Make sure the packing material inside the printer has been removed and the printer cover is closed. -
Page 18: R Un The Printhead Alignment
R u n the prin thead alig n m en t P rinthead alignment procedure should be performed when new printheads are installed in the printer. This is to ensure all the printheads are lined up properly to provide optimum print q uality. N O T E : If the printhead alignment procedure is not carried out, your printouts will have misaligned ruled lines and will look fuz z y or blurred. -
Page 19: Unwinder Setup
U n w in d er S etu p Left edge S E T T I N G U P T H E P R I N T E R Mantenimiento Periféricos Informáticos C/Canteras, 15 28860 Paracuellos de Jarama (Madrid) Tel: 00 34 917481604 Web: https://mpi.com.es/... -
Page 20: Load Label Media
L o ad L ab el Med ia 1 . Insert the media print-side up along the left edge of the media feeder. The printer will automatically feed the stock and position it correctly for printing. Left edge 2. S lide and adjust the media width guide to suit the media stock siz e that you are using. -
Page 21: Install The Printer Driver
In s tall the prin ter d riv er The printer driver works with the following W indows Operating S ystems: W indows 2 0 0 0 2 0 0 3 S erver V ista Install the printer driver from the CD -ROM labeled BarT en d er L ab el P rin tin g S o ftw are, V IP Co lo r S pec ial E d itio n . -
Page 22: Printer Control Panel
C h a p t e r 3 P rin ter Co n tro l P an el The printer’s control panel displays information about the status of jobs that are being processed, the operating status of the printer, and the status of ink cartridges and printheads. - Page 23 B u tto n / L ig ht D es c riptio n Power button Power on/off. Power light L ights up when the power is turned on. C ancels the current function. W hen a function can be canceled, ‘esc’ appears over the button. F E E D F eeds a single label.
-
Page 24: Selecting Printer Options
M E N U / (D o w n ) (b u tto n 3) The M E N U button allows the user to enter the menu. (D own) button allows the user to move down through the menu structure. -
Page 25: Main Menu
M ain m en u The printer options are organiz ed in a hierarchy of menus. The options on the main menu are as follows: Printer Setup menu Test menu M aintenance menu E ject M edia menu A dvanced menu S u b m en u s an d o ptio n s P rin ter S etu p m en u Option... -
Page 26: Maintenance Menu
M ain ten an c e m en u Option Description Cl ean Printheads Runs a c l eaning c y c l e on the printheads. Change Printhead The printheads c arriage wil l mov e to the l ef t of the printer to al l ow the c hanging of the printheads when the printer is stil l on. -
Page 27: U Sing The Printer
The printer is designed to work well with most types of labels. It is best to test a variety of print labels before buying large quantities. Please contact your reseller or VIPColor for recommendations. Visit the VIPColor Website (www.vipcolor.com) for more information. -
Page 28: Load Media
L o ad m ed ia 1 . Insert the media print-side up along the left edge of the media feeder. The printer will automatically feed the stock and position it correctly for printing. Left edge 2 . S lide and adjust the media width guide to suit the media stock siz e that you are using. -
Page 29: Change Print Settings
Chan g e prin t s ettin g s Y ou can change print settings (such as paper siz e or type) from an application or the printer driver. Changes made from an application take precedence over changes made from the printer driver. H owever, after the application is closed, the settings return to the defaults configured in the driver. -
Page 30: To Change Default Settings For All Future Jobs
T o c han g e d efau lt s ettin g s fo r all fu tu re jo b s 1 . Click S tart, point to S ettin g s , and then click P rin ters or P rin ters an d F ax es . -
Page 31: Canceling A Print Job
5 . To select the media type: a. Click S to c k tab. b. Click the desired media type, and then click O K . 6 . S elect the Q u ality : a. Click O ptio n s tab. b. -
Page 32: Install And U Ninstall The D Riv Er Software
“BarTender Label Printing Software, VIPColor Special Edition” CD. 3 . On the “BarTender Label Printing Software, VIPColor Special Edition” CD menu, click In s tall P rin ter D riv ers and follow the onscreen instructions. -
Page 33: To Connect The Printer Before Installing The Software
CD into the CD drive. If the CD menu appears, close it. 4 . Browse to locate the root directory on the “BarTender Label Printing Software, VIPColor Special Edition” CD (for ex ample, D), and then click O K . -
Page 34: Uninstall And Reinstall The Printer Drivers
U n in s tall an d rein s tall the P rin ter D riv ers If your installation is incomplete, or if you connected the USB cable to the computer before prompted by the printer drivers installation screen, you might need to uninstall and then reinstall the printer drivers. -
Page 35: Method 2: To Uninstall From A Windows Computer
N O T E : Use this method if Uninstall is not available in the Windows Start menu. 1 . Insert the printer “BarTender Label Printing Software, VIPColor Special Edition” CD into your computer’s CD-R OM drive, and then start the R em o v e prin ter d riv ers program. -
Page 36: Aintainance
C h a p t e r 6 M ain ten an c e R eplac e the in k c artrid g es You can check the estimated ink levels on the control panel display. N O T E : The ink levels shown are an estimate only. Actual ink volumes may vary. -
Page 37: Clean The Printheads
Clean the prin thead s If printed characters are incomplete, or dots or lines are missing from printouts, ink noz z les might be clogged and you might need to clean the printheads. W hen the quality of printouts deteriorates, complete the relevant steps based on the following sequence: 1 . -
Page 38: To Clean The Printheads
1 . O n the control panel, P rinter S etu p – Press the M E N U button to enter the main Test menu. Maintenance – S elect P rin ter S etu p. E ject Med ia –... -
Page 39: To Replace The Printheads
1 . O n the control panel, Clean Printheads – Press the M E N U button to enter the main Change Printhead menu. Firmware Version – S elect M ain ten an c e. S et lab el threshold –... - Page 40 5 . L ift the printhead out of the carriage by pulling the handle on its top. 6. Replace the protective caps on the printhead and then discard it. 7 . S hake the printhead 6 times as shown. 8 . Remove the new printhead from its packaging. 9 .
-
Page 41: Store Printing Supplies
1 1 . Push the printhead firmly into the carriage. N O T E : The printhead will not sit properly if it is in the wrong slot. 1 2 . L ower the printhead latch down to secure the printhead. -
Page 42: Troubleshooting Resources
Disconnect all cables (such as power cord, network cable, and USB cable), wait about 20 seconds, and reconnect the cables. If the problem persists, visit the VIPColor Website (www.vipcolor.com/support) the latest troubleshooting information or product fixes and updates. T R O U B L E S H O O T I N G R E S O U R C E S... -
Page 43: The Printer Is Not Responding (Nothing Prints)
T he prin ter is n o t res po n d in g (n o thin g prin ts ) D id the g reen lig ht fl as h? If YE S, reset printer. If N o, check cables are connected and check spooler for print file. Delete files or reset spooler. -
Page 44: B Lank Or Partial
Chec k the prin ter s o ftw are s ettin g s Print speed is slower when Best or Maximum dpi is selected as the print q uality. To increase the print speed, select different print settings in the printer driver. -
Page 45: Printed Image Is Over The Gap
Chec k the m ed ia s iz e Content on a page might be cut off if the document size is larger than the media that you are using. Make sure the media size selected in the printer driver match the size of media loaded in the printer. -
Page 46: Poor Print Quality And Unex Pected Printouts
P o o r prin t q u ality an d u n ex pec ted prin to u ts This section covers the following topics: Poor q uality printouts Meaningless characters print Ink is smearing O utput is faded or dull colored Colors are printing as black and white Wrong colors are printing Printout shows colors bleeding... -
Page 47: Ink Is Smearing
Chec k the d o c u m en t fi le The document file may be damaged. If you can print other documents from the same application, try printing a backup copy of your document, if available. In k is s m earin g Chec k the m ed ia ty pe Some types of media do not accept ink well. -
Page 48: Wrong Colors Are Printing
W ro n g c o lo rs are prin tin g Chec k the prin t s ettin g s Make sure Print in Grayscale is not selected in the printer driver. Chec k the prin t fi le E nsure that the print file is in RGB mode. -
Page 49: Troubleshoot Installation Issues
T ro u b les ho o t in s tallatio n is s u es If the following topics do not help, see Support and warranty for information about VIPColor support. H ardware installation suggestions Software installation suggestions Clear a jam in the printer... -
Page 50: Software Installation Suggestions
If the computer cannot recognize the “BarTender L abel Printing Software, VIPColor Special E dition” CD in the CD-RO M drive, inspect the CD for damage. You can download the printer driver from the VIPColor Website (www.vipcolor.com/support). -
Page 51: Clear A Jam In The Printer
Clear a jam in the prin ter If the c arriag e is u n ab le to m o v e If the stock is crushed under the carriage and it is unable to move, follow these instructions to clear the jam. 1 . - Page 52 If the s to c k is jam m ed in the prin ter 1 . Press the Power button on the control panel to turn off the printer. 2 . F lip the Power switch at the rear of the printer to the O ff position. 3 .
- Page 53 4 . Cut off the jammed stock from the roll and try to remove it from inside the printer. 5 . Clean any adhesive off with a soft cloth and some isopropyl alcohol. N O T E : Continue with the following steps if you are unable to remove the stock. 6 .
- Page 54 9 . Install the manual cutter and the media feeder back to the printer. 1 0 . Cut off any torn or crumpled stock from the stock roll and then reload the stock for printing. T R O U B L E S H O O T I N G R E S O U R C E S Mantenimiento Periféricos Informáticos C/Canteras, 15 28860 Paracuellos de Jarama (Madrid) Tel: 00 34 917481604 Web: https://mpi.com.es/...
Need help?
Do you have a question about the VP485 and is the answer not in the manual?
Questions and answers