Table of Contents
Advertisement
INSTALLATION, COMMISSIONING AND SERVICING
Please read this document carefully before commencing installation, commissioning and/or servicing.
Leave it with the end user/site agent to be placed in their premises technical file after installation.
Improper installation, adjustment, alteration, service or maintenance can cause property damage, injury or death.
The manufacturer does not take any responsibility in the event of non-observance of the regulations concerning the connection of the apparatus causing a
dangerous operation possibly resulting in damage to the apparatus and/or environment in which the unit is installed.
PH45-LITKIT-UK
Literature Kit UK
MANUAL PART NO. D301310 ISS 0
PHOTON
GAS FIRED UNIT HEATER
MANUAL
These appliances meet the following EC directives
(EU) 2016/426: GAR
(EU) 2016/2281 ErP
DIR 2014/30/EU:EMC
DIR 2014/35/EU:LVD
DIR 2006/42/EC:MD
WARNING
All work must be carried out by appropriately qualified persons.
ErP
ErP Lot 21
Seasonal Efficiency and
2021
NOx compliant
Advertisement
Table of Contents

Related Manuals for Nortek REZNOR PHOTON 10


Summary of Contents for Nortek REZNOR PHOTON 10
- Page 1 ErP Lot 21 Seasonal Efficiency and 2021 NOx compliant PHOTON GAS FIRED UNIT HEATER INSTALLATION, COMMISSIONING AND SERVICING MANUAL These appliances meet the following EC directives (EU) 2016/426: GAR (EU) 2016/2281 ErP DIR 2014/30/EU:EMC DIR 2014/35/EU:LVD DIR 2006/42/EC:MD Please read this document carefully before commencing installation, commissioning and/or servicing. Leave it with the end user/site agent to be placed in their premises technical file after installation.
-
Page 3: Table Of Contents
Contents General Information (G) Maintenance and Servicing (MS) PHOTON range ..........4 Model 10-20 component layout ....29 Using this manual ........4 Model 25-70 component layout ....30 Warranty ............4 Model 100 component layout .....31 Important notice to installers ......5 Model 120 component layout .....32 Health and safety ........6 Maintenance schedule ........33 Uncrating / preparation .......7... -
Page 4: General Information (G)
Warranty PHOTON Range This equipment comes as standard with a General product information manufacturers two year warranty (2 years parts, 1 year labour) unless agreed otherwise PHOTON is the latest generation of gas at the time of order. The warranty is void if: fired unit heaters, CE and UKCA certified to EN17082 for use in non domestic installations. -
Page 5: Important Notice To Installers
In instances where copper pipework is to Important notice to be used for all or part of a gas pipework installers installation, including short length final connections then we advise that installers Before installation, carefully read these consult with the gas supplier or provider and instructions and follow the processes explained satisfy themselves what additional precautions by the manufacturer. -
Page 6: Health And Safety
Health and safety For your safety, if you smell gas: Ensure that anchoring points are suitable for • Do not try to light any the weight and loading of the product and if appliance required, add suitable reinforcement to the •... -
Page 7: Uncrating / Preparation
Uncrating / preparation Prior to crating and shipping, this unit was test operated and inspected at the factory and left in full operating condition. If the unit has incurred damage in shipment, document the damage with the transport company and contact your supplier. -
Page 8: Technical Data (Td) Technical Data
Technical Data Model PHOTON Combustion Air and Flue Type B23 / B53 / C13 / C33 / C53 Heat Input High Fire (HS) 11.28 22.50 32.40 38.80 51.60 64.80 77.40 86.00 119.00 144.00 Heat Input Low Fire (HS) 5.64 10.85 17.82 19.20 26.83... -
Page 9: Dimension Diagrams
Dimension Diagrams Front View Photon 10-100 Front View Photon 120 Side View Photon 10-70 Plan View Photon 10-120 Side View Photon 120 Side View Photon 100 Reznor, Photon, Installation Manual, EN 2021-04, D301310 Iss 0 Page No 9 of 52... - Page 10 Rear View Photon 10-70 Rear View Photon 100 Rear View Photon 120 Page No 10 of 52 Reznor, Photon, Installation Manual, EN 2021-04, D301310 Iss 0...
-
Page 11: Dimension Tables
Dimension Tables Unit Dimensions Dimensions Model PHOTON Unit Width A 1010 1010 Unit Height B 1080 1360 Overall Length C 1160 1180 1180 1160 1190 1160 1140 1160 Side to Gas Connection Centre D Bottom to Gas Connection Centre E Side to Flue Connection Centre F Bottom to Flue Connection Centre G Side to Air Inlet Centre H... -
Page 12: Heater Location
Installation Heater location the unit so that it will discharge directly toward the source of cold air, typically from Flue requirements may affect a distance of 4.5 to 6.0 metres. Alternatively, the location of the heater. Refer air curtains can be installed. Contact the to the "Combustion air supply / manufacturer / distributor for more details. - Page 13 Combustion air supply / flue The unit heater is delivered on a pallet; leave the unit on the pallet until you are ready arrangement to hang it. If the bottom of the unit is not Photon unit heaters may be installed as a protected or supported prior to installation, Type C room sealed heater requiring both damage can occur.
-
Page 14: Type B Appliances
The products of combustion from Type B appliances the unit heater must be flued to the If the unit heater is to be installed as a Type B outside of the building. appliance, air for combustion will be taken from within the space where the heater is installed. -
Page 15: Type C Appliances
When these units are installed Type C appliances in Type B applications, air for Unit heaters used in a balanced flue combustion is taken from the application are designed to be fitted with a space in which it is installed. Do combustion air inlet duct that obtains outdoor not restrict the combustion air air and a flue pipe that exhausts flue products... - Page 16 C33 Roof C13 Wall C33 Wall Figure 4 Approved appliances Type C Photon Model Heater socket and flue diameter Maximum straight length two pipes (combustion air inlet and flue outlet pipe) with wall or roof terminal (Type C appliance Maximum straight length single pipe (flue outlet pipe) with wall or roof terminal Equivalent length of 45°...
-
Page 17: Gas Connection
Gas connection Ensure that a gas supply line includes a filter and has been tested and purged in accordance with A competent and/or qualified engineer is prescribed practice prior to commissioning and required to either install a new gas meter to the taking the air heater into service. -
Page 18: Electrical Supply And Connections
Country Gas Type Nominal Maximum Minimum Category Supply Supply Supply Pressure Pressure Pressure (mbar) (mbar) (mbar) AT, BG, CH, CY, CZ, DK, EE, Natural Gas (G20) ES, FI, GB, GR, HR, IE, IT, LT, LV, NO, PT, RO, SE, SI, SK, TR LU, PL, RO Natural Gas (G20) Natural Gas (G20 / G25) -
Page 19: Thermostat Controls
Thermostat controls Ancillary controls are required to provide timed heat cycles, room comfort temperature level, frost protection, override air circulation etc. These are not included with the appliance and should be ordered separately. Do not attempt to control more than one unit heater from a single thermostat or control panel unless a properly wired relay is fitted. -
Page 20: Wiring Connections
Wiring Connections Remote Enable (0-10VDC) Lockout Lamp (240v) Lockout Reset Fan Only Function Figure 5 Wiring Connections Page No 20 of 52 Reznor, Photon, Installation Manual, EN 2021-04, D301310 Iss 0... -
Page 21: Commissioning And Operation (C)
Commissioning and operation PHOTON unit heaters must be • Press LC3 thermostat reset button to ensure commissioned before putting into it is not in lockout. service. Start up Pre-start checks For your safety, follow the Prior to starting up the unit, carry out the instructions exactly otherwise following checks:- damage or injury could occur! -
Page 22: Air / Gas Ratio Controls
8. The gas pressure must correspond to the data in table 3. If the gas pressure is higher than 50mbar, a pressure regulator must be installed. If the gas pressure is lower than the minimum as shown on the data plate, check the supply pipework to ensure it is correctly sized. -
Page 23: Gas Conversion
Model 120 Upon completion of conversion recommission the heater. Refer to the commissioning section To adjust the throttle use a flat blade screwdriver for more details. to remove the large round cover on top of the gas valve. Using a 3mm hex key on the screw Commissioning checks located on the venturi, rotate counter clockwise Commissioning requires the use of a CO/CO2... -
Page 24: Commissioning - Handover
If the chamber insulation has been replaced To set low fire adjust thermostat to call for the organic binders will burn off during the minimum heat (1V):- first few minutes of operation. This will result • Adjust offset screw to obtain nominal in a temporary increase in CO and CO2 offset pressure +/- 5 Pa for models 10-100. - Page 25 Model Photon CO2 at High Fire (Throttle) G20 8.70 8.70 8.70 8.70 8.70 8.70 8.70 8.70 8.70 8.70 CO G20 < 50 ppm Throttle Turns from Closed 3.0 out 1.5 out 4.5 out 7.0 out 6.0 out 8.5 out 7.5 out 8.0 out 29.5 in 1.0 out...
-
Page 26: Operation
Operation In case the heat exchanger’s temperature is too high, the burner will be switched off by the LC1 limit control (first safety). The burner The appliance requires a 0-10VDC signal to automatically switches on again after cooling control the burner. A value > 1.0VDC will down and re-start will take place. - Page 27 To turn off the air heater for a short period, turn the room thermostat to a lower setting (a Burner On light Lockout reset voltage below 0.8VDC will be deemed as no switch heat demand). To relight, reset the thermostat. To turn off the heater for a prolonged period, Lockout turn the room thermostat to lowest setting and...
- Page 28 Start position The system is not in lock-out and can proceed with the start up sequence upon a demand for heat Pre-purge time This is a period of 35 seconds during which the combustion fan operates prior to activation of the ignition device. Safety time The safety time is the delay between the gas valve being energised and the flame sensor checking for the presence of a flame.
-
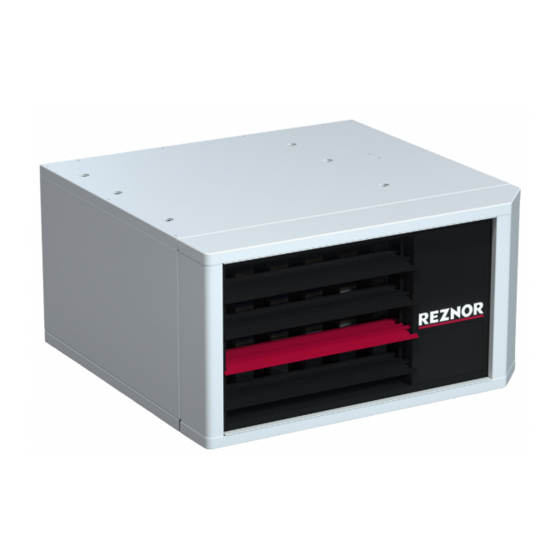
Page 29: Model 10-20 Component Layout
Maintenance Photon 10-20 component layout LC3 limit Axial fan control bracket Venturi Burner Modulating and reset gas valve LC1 limit control mounting bracket Burner on indicator Gas connection LED status light Reset switch and burner Combustion fan Controls lockout bracket Reznor, Photon, Installation Manual, EN 2021-04, D301310 Page No 29 of 52... -
Page 30: Model 25-70 Component Layout
Photon 25-70 component layout LC1 and LC3 Venturi Burner Modulating limit control gas valve bracket Axial fan Burner on indicator Gas connection LED status light Reset switch and burner Combustion fan lockout Controls bracket with LC3 reset Page No 30 of 52 Reznor, Photon, Installation Manual, EN 2021-04, D3013105 Iss 0... -
Page 31: Model 100 Component Layout
Photon 100 component layout Modulating Burner gas valve LC1 and LC3 limit control bracket Venturi Axial fan x2 Burner on indicator LED status Gas connection light Reset switch and burner Combustion fan lockout Controls bracket with LC3 reset Reznor, Photon, Installation Manual, EN 2021-04, D301310 Page No 31 of 52... -
Page 32: Model 120 Component Layout
Photon 120 component layout LC3 limit Modulating Burner control bracket gas valve Venturi LC1 and LC3 limit control bracket LED status light Burner on indicator Gas connection Reset switch and burner lockout Combustion fan Controls bracket with 2 off LC3 reset Page No 32 of 52 Reznor, Photon, Installation Manual, EN 2021-04, D3013105 Iss 0... -
Page 33: Maintenance Schedule
Maintenance schedule Replacement of gas valve Before commencing, turn off the 1. Unplug the gas valve and combustion fan main gas supply and switch off the power cables. main electricity supply after the air circulation fan has stopped valve Combustion Always consult your distributor at the slightest doubt. - Page 34 5. The gas valve can now be disconnected from the venturi by removing the fixing screws. There are 3 screws on Photon models 10-70 and 4 screws on Photon 6 off Fixing models 100-120. To gain access to the screws venturi fixing screws on the gas valves for the Photon 100 and 120 models, the combustion fan must be first removed.
-
Page 35: Venturi Cleaning And Replacement
O ring Photon 120 venturi Photon 120 gas valve inlet flange assembly 4. Before fitting new venturi, ensure throttle 7. Refit gas valve in reverse order ensuring the screw is fully closed (turn throttle clockwise o-ring is fitted between the gas valve and for models 10-70 and anticlockwise for venturi. -
Page 36: Combustion Fan Cleaning And Replacement
Combustion fan cleaning and Burner cleaning and replacement replacement 1. Follow steps 1 to 4 from gas valve replacement. 1. Follow steps 1 to 4 from gas valve replacement and step 3 from venturi 2. Unscrew the burner fixings with a deep replacement. -
Page 37: Burner Chamber / Tube Insulation Check And Replacement
5. Unless wetted, such waste may be dusty and should be properly sealed in containers for disposal. 6. The Material Safety Data Sheet is available from the appliance manufacturer. 7. With the burner removed the integrity of the combustion chamber and tube insulation can be verified. -
Page 38: Cleaning And Replacement Of Burner Probes
Chamber front No gap insulation between tube insert and chamber insulation Chamber side insulation 15. Refit burner probes. Check condition of probe bracket gasket and replace if necessary. 16. Replace the burner gasket if necessary. 17. Refit in reverse order. 12. - Page 39 3. Once removed unscrew the 2 fixings 8. Check spark gap against dimensions with a 10mm socket to release the probe below, if necessary, adjust using long nose mounting bracket. pilers. Be careful not to crack the ceramic sleeve. Spark probe Length of probe = Probe mounting bracket fittings x2...
-
Page 40: Replacement Of Lc1 And Lc3 Safety Thermostats (Models 25-120)
5. The thermostats can now be removed from Replacement of LC1 and LC3 safety the mounting bracket. thermostats (Models 25-120) 6. Replace one or both thermostats as 1. Disconnect LC1 and LC3 electrical needed. Ensure sensor is pushed up to connectors. -
Page 41: Replacement Of Ignition Controller
3. Unscrew the 2 fixing screws. Replacement of fan relay 1. Disconnect all electrical connections, 4. The thermostat can now be removed from including blanking connector. the heater. 2. Unscrew fixings and remove relay. 5. Replace thermostat and refit all parts in reverse order. -
Page 42: Flue And Combustion Air
Unit operation The combustion and correct operation of the appliance should be verified as a part of the normal service routine. Follow the steps in the start up and commissioning procedures to verify. Dimension A Model Distance mm 7. Replace in reverse order. 8. -
Page 43: Fault Finding
Fault Finding Photon Troubleshooting START Guide Ensure gas & electricity supplies are enabled. Turn external controls to call for heat. CHECK: - 1. Voltage is correct – see technical data table. 2. Ignition controller fuse. Does the LED status Is there power to the 3. - Page 44 Page 2 CHECK: - 1. Fan relay coil voltage 230V / 50Hz after 30 seconds from burner ignition. Does the 2. Fan relay. circulation fan 3. Ignition controller. start after 30 4. Voltage supply to circulation fan. seconds? 5. Integrity of wiring connections. 6.
-
Page 45: Spare Parts (Sp) Spare Parts
Spare Parts Description Part Number Application Ignition controller 1030137 10-100 Ignition controller 1031961 Ignition transformer 1030638 10-120 Spark probe with lead 1030466 10-120 Flame sense probe with lead 1030467 10-120 Probe mounting bracket gasket (2 required) 1030619 10-120 Gas valve 03-25800 10-65 Gas valve... - Page 46 Description Part Number Application Premix burner 1030405 Premix burner 1030490 Premix burner 1030630 Premix burner 1030352 Premix burner 1030327 Premix burner 1030135 Premix burner 1030136 Premix burner 1030446 Premix burner 1030280 Premix burner 1030515 Axial fan assembly 10 1037267 Axial fan assembly 20 1037268 Axial fan assembly 25 01-27007-01...
-
Page 47: Erp Table - G20
ErP Table - G20 Reznor, Photon, Installation Manual, EN 2021-04, D301310 Iss 0 Page No 47 of 52... -
Page 48: Erp Table - G25
ErP Table - G25 Page No 48 of 52 Reznor, Photon, Installation Manual, EN 2021-04, D301310 Iss 0... -
Page 49: Erp Table - G25.3
ErP Table - G25.3 Reznor, Photon, Installation Manual, EN 2021-04, D301310 Iss 0 Page No 49 of 52... - Page 50 Notes...
- Page 51 Notes...
- Page 52 Tel +44 (0)1384 489700 Fax +44 (0)1384 489707 reznorsales@nortek.com www.reznor.eu Nortek Global HVAC is a registered trademark of Nortek Global HVAC limited. Because of the continuous product innovation, Nortek Global HVAC reserves the right to change product specification without due notice.
Need help?
Do you have a question about the REZNOR PHOTON 10 and is the answer not in the manual?
Questions and answers