Epson LQ-2180 Manual
Epson lq-2180: specifications
Hide thumbs
Also See for LQ-2180:
- User manual (234 pages) ,
- Service manual (56 pages) ,
- Quick reference manual (17 pages)
Table of Contents
Advertisement
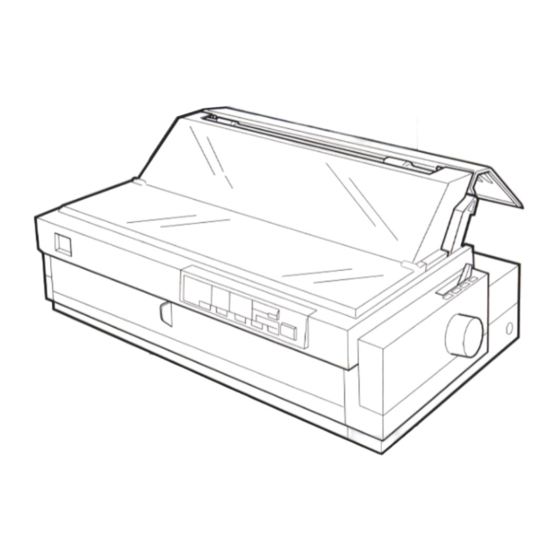
edge guides
paper guide
cover
printer cover
front paper guide
(closed)
control panel
paper thickness
lever
shield plate
parallel interface
tractor
front paper guide
front edge guides
(open)
User Replaceable Parts
User Replaceable Part
Parts Price List Name
Bottom cover
Bottom cover
Connector cover
Upper connector cover
Connector cover screws (2)
C.B. S-tite screw
Front edge guides
Front edge guides
Front paper guide
Front cover
Knob
Knob
Logo plate
Logo plate
paper guide
paper
separator
paper release
lever
knob
ribbon cartridge
paper tension
unit
Part Number
1039404
1037223
1002674
1039456
1039403
1039462
1039774
2/99
User Replaceable Part
Parts Price List Name
Paper guide cover
Rear printer cover
Paper separator
Paper separator
Paper tension unit
Paper eject assembly
Paper thickness lever cap
Lever cap
Printer cover
Printer cover assembly
Rear edge guides
Rear edge guides
Rear push tractor
Rear tractor assembly
Ribbon cartridge
Ribbon cartridge
Tractor (pull or front push)
Front tractor assembly
Options
Paper Handling Options
High-capacity cut-sheet feeder (C80673 )
Feeds up to 150 sheets of paper, 25 plain bond envelopes, or
30 postcards into the printer without reloading. You can also
load a stack of single-sheet multi-part forms up to 0.59 inch
(15 mm) thick in this feeder.
Second-bin cut-sheet feeder (C80674 )
Connects to the high-capacity cut-sheet feeder to create a
double-bin cut-sheet feeder. You can load up to 50 sheets of
ordinary single-sheet paper in the second-bin cut-sheet feeder.
Pull tractor (C80032 )
Improves continuous paper handling and reduces the chance
of paper jams. Using a pull tractor in combination with a
push tractor is especially useful for printing on continuous
preprinted forms, multi-part forms, and labels, and also for
printing high-quality graphics.
Roll paper holder (#8310)
Allows you to use your printer with 8.5-inch roll paper like
that used with telex machines.
Note:
The asterisk ( ) is a substitute for the last digit of the product
number, which varies by country.
EPSON LQ-2180
Part Number
1028340
n/a
1039457
1039412
1025024
1039459
1039012
S015086
1039013
EPSON LQ-2180
- 1
Advertisement
Table of Contents

Related Manuals for Epson LQ-2180


Summary of Contents for Epson LQ-2180
-
Page 1: Paper Handling Options
Roll paper holder (#8310) Allows you to use your printer with 8.5-inch roll paper like that used with telex machines. Note: The asterisk ( ) is a substitute for the last digit of the product number, which varies by country. -
Page 2: Optional Interface Cards
You can install an optional interface card to supplement your printer’s built-in parallel interface and provide added network compatibility. The EPSON interface cards in the table below are compatible with your printer. (Not all interfaces are available in all countries.) -
Page 3: Environmental Specifications
Built-in fonts Bitmap fonts EPSON Draft 10, 12, 15 cpi EPSON Roman 10, 12, 15 cpi, proportional EPSON Sans Serif 10, 12, 15 cpi, proportional EPSON Courier 10, 12, 15 cpi EPSON Prestige 10, 12 cpi EPSON Script 10 cpi... - Page 4 5.8 inches (148 mm) 3.9 to 5.8 inches (100 to 148 mm) Thickness 0.0087 inch (0.22 mm) Weight 51 lb (192 g/m 4 - EPSON LQ-2180 Continuous paper (standard and multi-part): front, rear, and bottom entry Width Length Copies Thickness...
-
Page 5: Paper Alignment
The maximum width is 16.5 inches (420 mm). The maximum printable width is 13.6 inches (345 mm). For paper wider than 13.8 inches (351 mm), the side margins increase to match the width of the paper. 2/99 EPSON LQ-2180 printable area EPSON LQ-2180... -
Page 6: Control Panel Buttons And Lights
Approx. 54 dB (A) (ISO 7779 pattern) CE Marking 230 V model: Low Voltage Directive 73/23/EEC EMC Directive 89/336/EEC 6 - EPSON LQ-2180 Control Panel Buttons and Lights Font button Selects the font. Font lights Indicate which font is selected. -
Page 7: Error Indicators
D and U buttons. Operate button Turns the printer on and off. The printer is off when the top of this button is even with the button protectors. Error Indicators You can identify many common printer problems using the lights on the control panel. -
Page 8: Status Monitor
EPSON LQ-2180 Status Monitor The EPSON Status Monitor 2 utility comes with your printer but is available only for use with Microsoft and 98. It allows you to monitor your printer’s status, alerts you when printer errors occur, and provides troubleshooting instructions when needed. -
Page 9: Printing On Single Sheets
The pull tractor provides the best paper jam prevention, and allows you to load continuous paper from the front, rear, or bottom of the printer. However, you cannot use the tear-off feature with the pull tractor. -
Page 10: Paper Release Lever Positions
10 - EPSON LQ-2180 Paper Release Lever Positions You can load paper in the printer from various paper sources, such as the front push tractor or the paper guide. You set the paper release lever to indicate the paper source you want to use. -
Page 11: Loading Continuous Paper With Labels
2 through 6 use with a tractor feeder. Do not try to print on single sheets with labels because the printer may not feed labels on a shiny backing sheet properly. Thick paper, such as continuous paper with labels, requires a straight or almost straight paper path. -
Page 12: Using The Front Push Tractor
Then remove the guide by grasping both sides and pulling it straight out of the printer. 3. Insert the tractor into the printer’s mounting slots and press down both ends of the tractor to make sure that it is firmly seated. - Page 13 1. Open the front paper guide by pulling the tab at the center of the guide. Then remove the guide by grasping both sides and pulling it straight out of the printer. Check that the tractor is installed in the front push position.
- Page 14 Always close the printer cover before printing. The printer does not print when the cover is open. 10. Turn on the printer. You may need to check and change the printer driver settings. When the printer receives data, it automatically loads the paper and starts printing. The printed pages are fed over the paper guide toward the back of the printer.
-
Page 15: Using The Rear Push Tractor
To remove the remaining paper from the printer, press the button to feed the paper backward to the standby Load/Eject position. Then open the sprocket covers of the tractor and remove the paper. Caution: Always tear off your printed document before you press Load/Eject button. - Page 16 Always close the printer cover before printing. The printer does not print when the cover is open. 10. Turn on the printer. You may need to check and change the printer driver settings. When the printer receives data, it automatically loads the paper and starts printing. The printed pages are fed over the paper guide toward the back of the printer.
-
Page 17: Using The Tractor In The Pull Position
The rear push tractor cannot be removed. To install a tractor in the pull position, follow these steps: 1. Make sure the printer is turned off. Lift the printer cover up and off the printer. 2/99... - Page 18 To load paper onto the pull tractor, follow these steps: 1. Make sure the printer is turned off, and the printer cover is removed. Also check that a tractor is installed in the pull position.
- Page 19 Never use the knob to remove slack in the paper or to adjust the top-of-form position while the printer is turned on; this may damage the printer or cause it to lose the top-of-form position. The knob can be used when the the printer is turned off only.
- Page 20 Never use the knob to remove slack in the paper or to adjust the top-of-form position while the printer is turned on; this may damage the printer or cause it to lose the top-of-form position. The knob can be used when the printer is turned off only.
-
Page 21: Switching Between Printing On Continuous Paper And Printing On Single Sheets
1. Remove any paper loaded on the pull tractor. 2. Turn off the printer. Then remove the printer cover and lift the paper guide up and off the printer. 3. Press the tractor’s lock tabs, tilt the tractor toward you, and lift it off the printer. -
Page 22: Adjusting The Top-Of-Form Position
Note: The printer has a minimum and a maximum top-of-form position. If you try to adjust it beyond these limits, the printer beeps and stops moving the paper. When the paper reaches the default top-of-form position, the printer also beeps and stops moving the paper briefly. You can use the default setting as a reference point when adjusting the top-of-form position. -
Page 23: Advancing The Paper To The Tear-Off Edge
Note: If the Tear Off/Bin lights are flashing, the paper is in the tear-off position. If you press the Tear Off/Bin button, the printer feeds your paper to the next top-of-form position. Advancing paper to the tear-off position automatically... -
Page 24: Replacing The Ribbon Cartridge
Make sure the printer is off and unplugged from the electrical outlet. Moving the print head while the printer is on may damage the printer. 1. Make sure the printer is turned off. The printer is off when the surface of the button is even with the button Operate protectors as shown below. - Page 25 7. Hold the cartridge with the ribbon-tightening knob up. Fit the two front notches (c) of the ribbon cartridge over the small pegs on each side of the printer as shown below. Then lay the cartridge flat so that the rear notches (d) fit over the corresponding pegs.
-
Page 26: Changing Default Settings
4. If continuous paper is jammed in the printer, tear off the fresh supply at the perforation nearest the paper entry slot. 5. Turn the knob on the right side of the printer away from you to eject the paper in the printer. Remove any remaining pieces of paper. -
Page 27: Aligning Vertical Lines In Printout
Follow these steps to perform the bidirectional adjustment: 1. Make sure paper is loaded and the printer is turned off. Caution: Whenever you turn off the printer, wait at least five seconds before turning it back on;... -
Page 28: Cleaning The Printer
Keep the printer cover in place and lower the paper guide cover until it lies flat on the top of the printer to prevent water from getting inside the printer. -
Page 29: Transporting The Printer
You will need to move the print head by hand to remove the ribbon cartridge. If you have just used the printer, the print head may be hot; let it cool for a few minutes before touching it. 1. Turn off the printer.
Need help?
Do you have a question about the LQ-2180 and is the answer not in the manual?
Questions and answers