Table of Contents
Advertisement
Quick Links
Advertisement
Table of Contents

Related Manuals for Etesia MBR50


Summary of Contents for Etesia MBR50
- Page 1 Original user manual Please read carefully before using your machine MBR50...
-
Page 2: Table Of Contents
CONTENTS 1• Foreword ........................................ 3 2• Your safety and that of others ................................4 3• Content upon delivery .................................... 5 4• Description and marking ..................................6 5• Assembly ........................................ 7 6• Putting into service ....................................11 7• Maintenance and servicing .................................. 15 8•... -
Page 3: 1• Foreword
Low branches liable to cause injury to ETESIA has a policy of continuously improving the quality of its the user should also be removed. products, therefore your weed-brush might show slight differences •... -
Page 4: 2• Your Safety And That Of Others
2• YOUR SAFETY AND THAT OF OTHERS • Always follow these instructions when using your weed-brush. • Operate the weed-brush only in broad daylight or with good arti- ficial lighting. • The machine is solely intended for the removal of weed growth •... -
Page 5: 3• Content Upon Delivery
ETESIA. Otherwise, the wheel may break during operation. Have all major • Any modification not authorized by ETESIA could render the ma- servicing operations performed by an authorized ETESIA repairer chine dangerous and lead to serious injury during use. ETESIA shall who has the appropriate tools. -
Page 6: 4• Description And Marking
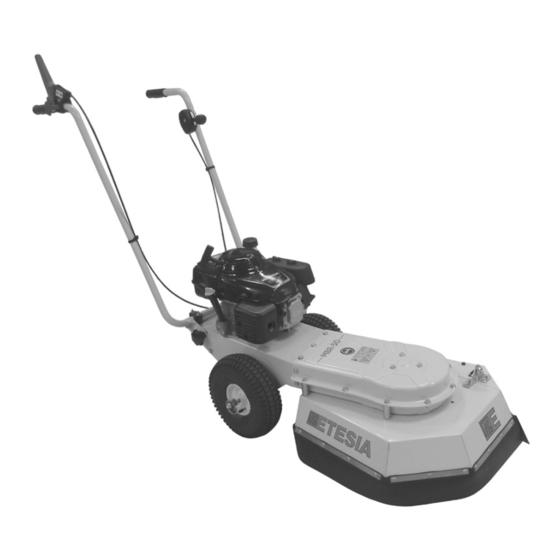
4• DESCRIPTION AND MARKING Ø = 10 m 1. Danger area 9. Engine manufacturer 2. Handlebar, height-adjustable 10. Machine designation 3. Starter 11. Manufacturer’s address 4. Brushes 12. Engage/disengage brush drive lever 5. Manufacturer name 13. Throttle lever 6. CE marking 14. -
Page 7: 5• Assembly
5• ASSEMBLY IMPORTANT! Do not fill with oil or petrol yet. Before doing this, familiarise yourself with the whole machine, the assembly procedure and the tools and parts required. Position the handlebar. Place the handlebar on the pipe brackets. Place the pipe brackets onto the bolts. 4 x M6 Preassemble the handlebar with the washer and lock nut. - Page 8 5• ASSEMBLY Undo the star grip. Adjust the handle according to your height. Secure the handlebar using the star grip. Assemble the throttle lever. Position the throttle cable. Insert the hex bolt with washer. 1 x M6 x 65 1 x 6,4 - 12 - 16,6 Attach the washer.
- Page 9 5• ASSEMBLY Tighten the screws. Install the clutch lever. Undo the hex socket bolt. IMPORTANT: Push the lateral safety button so that the pressure spring does not trip. Keep the lateral safety button pushed in.
- Page 10 5• ASSEMBLY Position both halves of the lever on the han- dlebar pipe so that they can be connected to each other. Connect the two halves of the lever. IMPORTANT ! Check the lateral safety button is func- tioning! Tighten the hex socket bolt. Correctly installed clutch lever.
-
Page 11: 6• Putting Into Service
6• PUTTING INTO SERVICE 6•1 BASIC SAFETY INSTRUCTIONS FOR 6•2 OPERATING THE MACHINE IN WINTER NORMAL OPERATION Check if the air filter is dry at regular intervals. If the filter is damp because of condensation, allow it to dry overnight. Otherwise, there •... - Page 12 6• PUTTING INTO SERVICE 6•4 BRISTLE PRESSURE 1) The height adjustment of the swivel wheel allows 2) Adjusting the height of the bristles. The height is the brush pressure to be adjusted. adjusted by rearranging the washers. 3) Remove the linchpin. Set the required height. 4) Reinsert the linchpin.
- Page 13 3) Lower the clutch lever. 4) By operating the clutch lever, you trigger the brush training. 6•6 STEERABLE FREEWHEEL MBR50 WARNING ! Protect the machine against involuntary starting; disconnect the spark plug cap. The weed brush is fitted with a steerable freewheel. This makes it easier to turn the weed brush.
- Page 14 WARNING ! Protect the machine against involuntary starting; disconnect the spark plug cap. Parts included 6•9 LATERAL PROTECTIVE COVER MBR50 WARNING! Before lifting the lateral protection, protect the machine against involuntary starting; disconnect the spark plug cap. View of the lateral protective cover...
-
Page 15: 7• Maintenance And Servicing
6• PUTTING INTO SERVICE If the lateral protective cover is swung up, the weed brush can be used right up against walls (e.g. of build- ings, kerbs). 7• MAINTENANCE AND SERVICING 7•1 BASIC SAFETY RECOMMENDATIONS • Do not use machine parts as climbing aids. •... - Page 16 7• MAINTENANCE AND SERVICING • Use internal combustion engines only in well ventilated areas! The Remedy defects immediately! Oil projections can cause injury or fire. • Comply with the safety regulations in force for the product when exhaust gases contain toxic carbon monoxide. handling oils, greases or other chemicals! ATTENTION ! •...
- Page 17 7• MAINTENANCE AND SERVICING 7• WARTUNG UND PFLEGE Fuel tank Upper level Dipstick 1) Fuel and oil tank on the Honda engine 2) Honda engine dipstick. - Remove the oil filler cap and wipe the dipstick clean. - Insert the dipstick into the oil filler nozzle but do not screw it in.
- Page 18 7• MAINTENANCE AND SERVICING 7• WARTUNG UND PFLEGE Mount the new bristles between the upper and lower plate. Gently push the upper and lower plate apart so that Mount all 10 bristles between the upper and lower the bristles are held on the opposite side. plate.
- Page 19 7• MAINTENANCE AND SERVICING 7•5 CLEANING THE IMPLEMENT You should clean the weed brush regularly to keep it in good condition. Remove any loose dirt and dust with a soft brush. IMPORTANT! Under no circumstances should you use chemical or aggressive cleaning products. Plastic or painted surfaces will be permanently damaged.
- Page 20 • Check the oil level. Fill up with fuel. • Start the engine. Of course you may leave this seasonal maintenance work to your ETESIA dealer if you wish. He will check that your weed-brush is in good condition...so that it starts first go the following spring.
-
Page 21: 8• Maintenance Plan
8• MAINTENANCE PLAN After a number of hours of service Each time At least At least Each before once every once a time after 3 months year cleaning Check the screws and nuts Check the oil level and top up if necessary First engine oil change Following engine oil changes Check the air filter... -
Page 22: 9• Breakdowns And Remedies
Have the trapezoidal belt replaced by a specialist work- shop Noise at brush level Bristles installed incorrectly Install bristles correctly Bristles loose Check bristles are seated correctly The brush is not an original Replace the brush with original Etesia items. -
Page 23: 10• Transport
10• TRANSPORT WARNING! Switch off the engine and allow to cool. Protect the machine against involuntary starting; disconnect the spark plug cap. Wear strong shoes. 2) The rear axle serves as the fixing point. 1) Front attachment point. 3) Always use both fixing points. 4) The handlebar is folded all the way forward. -
Page 24: 12• Warranty
ETESIA. Should ETESIA (main or secondary residence). not receive these part(s), a warranty claim would automatically be - Professional use = use of an ETESIA machine, in exchange of rejected. money or not, on public areas to maintain companies or institutions like : hospitals, associations,….or on private fields being owned by... - Page 26 13, rue de l’Industrie, 67165 WISSEMBOURG CEDEX declare under our responsibility that the weed brushes, type MBR50 to which this declaration refers, fulfil all the relevant terms of directive 2006/42/EC applicable to them as well as to the provisions of all other applicable European directives :...
- Page 27 Stamp here please ETESIA SERVICE GARANTIE 13 rue de l'Industrie 67165 WISSEMBOURG CEDEX France...
- Page 28 * In accordance with the data protection act of 06/01/1978 amended by the law of 20/06/2018, the user has a right to have access, rectifica- tion and rejection to the personal information concerning them held by Etesia SAS, this should be made in writing to the following address: ETESIA SAS - Warranty service - 13 rue de l’Industrie - 67160 WISSEMBOURG.
Need help?
Do you have a question about the MBR50 and is the answer not in the manual?
Questions and answers