Advertisement
Quick Links
AU: 1800 029 701
NZ: 0800 466 444
For construction in non-cyclonic areas
Wind rating: N2 as per AS4055-2012.
If you require a higher wind rating please contact
us: admin@absco.com.au or 1800 029 701
DOWNLOAD
OUR APP FOR
ASSEMBLY
VIDEOS
Absco Industries
Assembly Instruction Manual
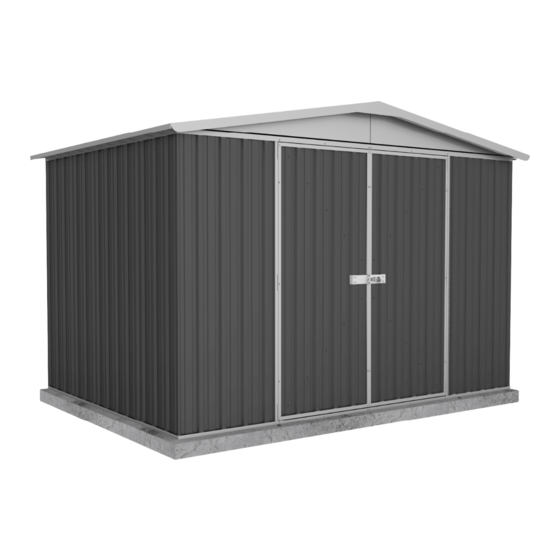
ABSCO REGENT SHED
MODEL: 30222RK
3.00mW x 2.18mD x 2.10mH
admin@absco.com.au
www.abscosheds.com.au
WHEN LAYING YOUR CONCRETE
SLAB, ENSURE THERE IS A
REBATED EDGE 25mm DEEP
AROUND THE PERIMETER
THIS WILL HELP WATER EGRESS
FROM THE BASE OF THE SHED
We thank you for choosing an Australian made
shed. For further assistance please visit our detailed
instructional video library at
Http://www.abscosheds.com.au/watch-videos
At ABSCO Industries we are always looking to be
number ONE, so please let us know what you think
of our instructions. Feedback makes us better.
feedback@absco.com.au
ABSCO INDUSTRIES
ASSEMBLY INSTRUCTION MANUAL
Absco Industries
Premier Shed Model: 23151GK
When laying concrete slab, ensure there
is a rebated edge 25mm deep around
the perimeter. This will help water egress
from the base of the shed.
LEAVE A REVIEW
SHED MODEL: 23151GK
Tell us about your experience and
receive a $20 Coles Gift Card.
Visit www.abscosheds.com.au/review
Model: 30222RK
FRONT: 2.26m
SIDE:
HEIGHT: 1.95m
BOTTOM CHANNEL
REBATED EDGE
75mm WIDE REBATE
CONCRETE SLAB
21-11-2017
17/03/21
1.1
1.52m
PAGE 01
1
Advertisement

Related Manuals for ABSCO SHEDS 30222RK


Summary of Contents for ABSCO SHEDS 30222RK
- Page 1 ABSCO REGENT SHED MODEL: 30222RK 3.00mW x 2.18mD x 2.10mH AU: 1800 029 701 admin@absco.com.au NZ: 0800 466 444 www.abscosheds.com.au Absco Industries Premier Shed Model: 23151GK FRONT: 2.26m SIDE: 1.52m HEIGHT: 1.95m WHEN LAYING YOUR CONCRETE SLAB, ENSURE THERE IS A...
- Page 2 ABSCO REGENT SHED MODEL: 30222RK 3.00mW x 2.18mD x 2.10mH GENERAL INSTRUCTIONS • Before commencing any assembly, read through these instructions in detail to gain a thorough understanding of assembly methods and associated details. • Unpack the carton and carefully identify and check off all the parts against the parts described and illustrated on "COMPONENTS PACKING LIST"...
- Page 3 ABSCO REGENT SHED MODEL: 30222RK 3.00mW x 2.18mD x 2.10mH COMPONENT PACKING LIST Check off all components. COMPONENT PART COMPONENT PART CHECK CHECK DESCRIPTION DESCRIPTION GABLE L/H STEEL SHEET L=1475mm 1785mm X 773mm GABLE R/H STEEL SHEET L=1475mm 1785mm X 773mm...
- Page 4 ABSCO REGENT SHED MODEL: 30222RK 3.00mW x 2.18mD x 2.10mH COMPONENT PACKING LIST COMPONENT PART COMPONENT PART CHECK CHECK DESCRIPTION DESCRIPTION 55CL 55CR CHANNEL CHANNEL L = 1496.5mm L = 1496.5mm 77AL 77AR CHANNEL CHANNEL L = 1496.5mm L = 1496.5mm...
- Page 5 ABSCO REGENT SHED MODEL: 30222RK 3.00mW x 2.18mD x 2.10mH COMPONENT PACKING LIST COMPONENT PART COMPONENT PART CHECK CHECK DESCRIPTION DESCRIPTION JAMB L= 1785mm JAMB L= 1120mm LIP TRIM L= 1546mm JAMB L= 1725mm JAMB L= 1568mm CONTENTS OF FITTINGS PACKET...
- Page 6 ABSCO REGENT SHED MODEL: 30222RK 3.00mW x 2.18mD x 2.10mH SNAPTiTE ASSEMBLY GUIDE The Snaptite Assembly System locks end channels to all roof and wall sheets without the need for tools and fasteners. To assemble each panel, the perimeter channels are secured to the top and bottom of each panel.
- Page 7 ABSCO REGENT SHED MODEL: 30222RK 3.00mW x 2.18mD x 2.10mH Guide on Joining Spliced Channels The text marked on all parts must be shown on the same side as each other JOIN>> JOIN>> <<JOIN JOIN>> Step 1. Step 2. Position the channels and the...
- Page 8 ABSCO REGENT SHED MODEL: 30222RK 3.00mW x 2.18mD x 2.10mH PRE-ASSEMBLY OF SPLICED CHANNELS Join together 24 x channel sections using 12 x channel joiners (Part CSJ) NOTE: Some channels may have holes in them - You will 1 x 55C need to redrill holes where CSJ joining channel covers them.
- Page 9 ABSCO REGENT SHED MODEL: 30222RK 3.00mW x 2.18mD x 2.10mH Guide on Joining a Spliced Ridge Beam Follow these three steps to assemble a ridge beam. ZARSP 225mm 50mm Step 1. NOTE. Step 2. Place two ridge beams as There is a 50mm overlap of the Use the ZARSP to connect at shown and push them together.
- Page 10 ABSCO REGENT SHED MODEL: 30222RK 3.00mW x 2.18mD x 2.10mH PRE-ASSEMBLY OF SPLICED RIDGE BEAM ZARSP = 1x 97B 1x 97BL 1x 97BR Absco Industries Assembly Instruction Manual Model: 30222RK 17/03/21...
- Page 11 ABSCO REGENT SHED MODEL: 30222RK 3.00mW x 2.18mD x 2.10mH OVERVIEW OF ROOF COMPONENTS Absco Industries Assembly Instruction Manual Model: 30222RK 17/03/21...
- Page 12 ABSCO REGENT SHED MODEL: 30222RK 3.00mW x 2.18mD x 2.10mH OVERVIEW OF WALL COMPONENTS Absco Industries Assembly Instruction Manual Model: 30222RK 17/03/21...
-
Page 13: Rear Panel Assembly
ABSCO REGENT SHED MODEL: 30222RK 3.00mW x 2.18mD x 2.10mH REAR PANEL ASSEMBLY 1x required. Absco Industries Assembly Instruction Manual Model: 30222RK 17/03/21... - Page 14 ABSCO REGENT SHED MODEL: 30222RK 3.00mW x 2.18mD x 2.10mH ROOF PANEL ASSEMBLY 2x required. Fit 81C to edge of sheet with pre- punched holes. Absco Industries Assembly Instruction Manual Model: 30222RK 17/03/21...
-
Page 15: Side Panel Assembly
ABSCO REGENT SHED MODEL: 30222RK 3.00mW x 2.18mD x 2.10mH SIDE PANEL ASSEMBLY 2x required. SMALL PAN SMALL PAN Absco Industries Assembly Instruction Manual Model: 30222RK 17/03/21... -
Page 16: Front Panel Assembly
ABSCO REGENT SHED MODEL: 30222RK 3.00mW x 2.18mD x 2.10mH FRONT PANEL ASSEMBLY 1x required. Absco Industries Assembly Instruction Manual Model: 30222RK 17/03/21... -
Page 17: Door Panel Assembly
ABSCO REGENT SHED MODEL: 30222RK 3.00mW x 2.18mD x 2.10mH DOOR PANEL ASSEMBLY 1x required. Vertical door channels are installed in the opposite orientation compared to the horizontal door channels. Long Short fl ange fl ange of of channel channel Four hole set for padbolt connection. - Page 18 ABSCO REGENT SHED MODEL: 30222RK 3.00mW x 2.18mD x 2.10mH DOOR PANEL ASSEMBLY Nuts and bolts may be used instead of pop rivets by drilling out hinge holes using a 4mm drill bit. Both are supplied. The two holes required to connect the padbolt hasp for each door have not been pre-punched, to allow for proper alignment, position each hasp centrally over the padbolt shaft and drill 3mm holes and secure with screws.
- Page 19 ABSCO REGENT SHED MODEL: 30222RK 3.00mW x 2.18mD x 2.10mH PANEL CONSTRUCTION NOTE: Take care to ensure that all wall panels are not upside down. The top channels of each panel are pre-punched for attaching roof sheeting. The base channels are not pre- punched.
- Page 20 ABSCO REGENT SHED MODEL: 30222RK 3.00mW x 2.18mD x 2.10mH OUTSIDE VIEW INSIDE VIEW OF FIXING Secure ridge beam to ROOR OVERHANGS gable sections with ALL WALL PANELS two screws at each BY 37mm end. Secure each roof panel with one screw...
- Page 21 ABSCO REGENT SHED MODEL: 30222RK 3.00mW x 2.18mD x 2.10mH FINAL CONSTRUCTION Bend the top and bottom flanges as shown, then hook the bottom flanges under the top channel and screw top to the ridge beam with two screws. ANCHORING OF...
- Page 22 ABSCO REGENT SHED MODEL: 30222RK 3.00mW x 2.18mD x 2.10mH Absco Gable Roof Shed Notes General • 1.G This instruction manual shall be read in conjunction with other consultants drawings, specifi cations and written instructions provided by Absco and/or their representatives.
- Page 23 ABSCO REGENT SHED MODEL: 30222RK 3.00mW x 2.18mD x 2.10mH Absco Gable Roof Shed Notes Steelwork • 1.S All structural steelwork shall have a corrosion protection system applied consistent with AS/NZS 2312- 2002. • 2.S All structural steelwork detailed within this installation manual shall be minimum Grade •...
- Page 24 Absco Sheds Storage Guidelines • Absco Sheds are designed to be weatherproof for normal weather conditions. In the event of extreme weather conditions such as heavy rain, combined with high wind gusts, the ridge capping, sheeting joins, screw fi xings etc., may exhibit minor deformations which may allow some water entry. These areas should be checked regularly to ensure that maximum strength and protection is maintained.
- Page 25 Lifetime Warranty Statement This warranty against defects is given by: Absco Industries (ABN: 77 869 708 678) Address: PO Box 119 Acacia Ridge QLD 4110 Ph: 1800 029 701 Fax: 07 3344 1191 Email: admin@absco.com.au Date of issue: 19 December 2018 Details of Manufacturer’s Warranty This product comes with a Lifetime structural warranty from the date of purchase.
- Page 26 IMPORTANT 1. Manufacturer’s Disclosure This warranty against defects shall not apply in the following situations: A) Where the product is not assembled in accordance with the instructions provided in the product kit; B) Where the product is used to store corrosive materials such as fertilizer, chlorine etc; C) The warranty does NOT cover damage caused by storms, wind, rain, snow or poor foundations;...
Need help?
Do you have a question about the 30222RK and is the answer not in the manual?
Questions and answers