Advertisement
Advertisement
Table of Contents

Related Manuals for Shoprider 889XLSBN


Summary of Contents for Shoprider 889XLSBN
- Page 1 Instruction Manual 889XLSBN...
-
Page 2: Table Of Contents
Table of Contents Contents Introduction........................3 EMI Warning........................4 Safety Guidelines ......................6 Features ..........................8 Free Wheel Mode ......................13 Operating Your Scooter....................14 Battery Charging & Maintenance..................18 Inspection & Maintenance ....................20 Trouble Shooting ......................23 Warranty.......................... 24 Specifications ........................ -
Page 3: Introduction
Introduction Congratulations on the purchase of your Shoprider scooter. Please carefully read this owner’s manual before attempting to use your scooter. After reading the manual if you still have any questions or concerns please feel free to contact your local authorized dealer. -
Page 4: Emi Warning
EMI Warning Electromagnetic Interface (EMI) From Radio Wave Sources Powered motorized scooters may be susceptible to electromagnetic interference (EMI), which is interfering electromagnetic energy (EM) emitted from sources such as radio stations, TV stations, amateur radio (HAM) transmitters, two-way radios, and cellular phones. - Page 5 Warnings The warnings listed below should reduce the chance of unintended brake release or powered scooter movement, which could result in serious injury. 1. Do not operate hand-held transceivers (transmitters-receivers) such as citizens band (CB) radios, or turn on personal communication devices, such as cellular phones, while the powered scooter is turned ON.
-
Page 6: Safety Guidelines
Safety Guidelines You will need to be familiar with the operation of your scooter before using it. Please read the following notes carefully to ensure safety at all times. Always make certain your scooter is in full working order before use. 1. - Page 7 15. Always keep your feet on the scooter when driving. 16. Always proceed carefully while riding your scooter, especially when approaching a ramp or hill. 17. Always proceed carefully while riding on uneven surfaces. 18. Do not sit on your scooter while being transported in a moving vehicle. Always tie- down your scooter and transfer yourself to a vehicle seat.
-
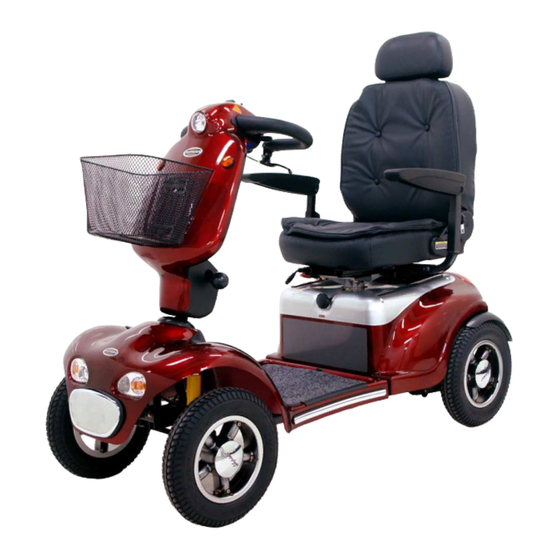
Page 8: Features
Features Adjustment Tiller The tiller of your scooter is uniquely designed to allow you to position it to a comfortable driving position. Your scooter’s tiller is very versatile, and can be adjusted to different positions. To decide which position best fits your needs, carefully pull the black lever that is located on the left side of tiller, and gently lower or raise the tiller. - Page 9 Hand tool required - Hex Key Wrench (4mm) "Position-adjustable Hole" Steps for Adjustment - The spring force can be adjusted by a hand tool to twist position-adjustable hole clockwise (from position 5 to 1) or counterclockwise (from Softer Harder position 1 to 5) to set at the desired one of 5 stages to be softer or harder.
- Page 10 Tiller Control Horn Right side of the scooter: Hi/Low Switch...
- Page 11 Left side of the scooter: Your controls are located on the handle bar console, and they are: (1) Front Headlights: To turn on and off your front headlight, simply press the round blue button located on the left side of the tiller, just under your backwards lever. To shut off the headlight, press the blue button again.
- Page 12 damage the main electronic speed control unit. Be extremely cautious on slopes. Sit upright in your seat or your scooter may become less stable. (5) Battery Indicator Gauge: Located at the top of your console. When your scooter is switched on the bar on the gauge will move across the scale from the left towards the right, indicating fully charged batteries.
-
Page 13: Free Wheel Mode
Free Wheel Mode Free-wheeling is used when you want to move your unit without riding on it. If for reasons of convenience you need to free wheel your scooter please follow the instructions below. To disengage the electromagnetic brake (RED LEVER ONLY): Turn the key switch to the off position and remove the key. -
Page 14: Operating Your Scooter
Operating Your Scooter Mounting For your first drive, make sure that you and your scooter are on a level surface. Make sure that the unit is off before sitting on it. Make certain that both of your feet are on the deck of the scooter. - Page 15 the path of the front ones, instead of cutting short. Cutting short on pavement corners can mean that a back wheel will go off the pavement, causing a stability problem. Avoid this at all times by steering an exaggerated, wide arc around the obstacle. If you must steer in a tight spot, such as entering a doorway or when turning around, stop and turn the handle bars to where you want to go, then apply the power gently.
- Page 16 doorjamb. This is an easy technique. Practice makes perfect. Remember; let your scooter do the work without wearing you out! Control on Ramps More and more buildings have ramps for wheelchair access. Some have a change of direction in the middle, and good cornering is required. Make a wide maneuver with your front wheel(s) around tight corners, so that your back wheels follow a wide arc to stay clear of the corner.
- Page 17 PLEASE NOTE: The rear stability of your scooter is dependent on a number of factors which you should consider before attempting to climb a steep slope or other obstacle: a) your height; b) the angle of your backrest; c) your weight; and d) the angle of slope or height of the obstacle you are attempting to climb.
-
Page 18: Battery Charging & Maintenance
PLEASE NOTE: Each carrier reserves the right to carry what may be termed “HAZARDOUS CARGO” Shoprider cannot be responsible for their final decision. BATTERY CHARGER The battery charger supplied is special to your scooter, and may not be suitable for any other power mobility product. - Page 19 3. Plug the round tip into the scooters charging receptacle. The receptacle is located on the left inside of the delta tiller. Flip up the safety cap and carefully plug in the charger. Remember to make sure you line up the pins when inserting. Depending on the depth of the discharge, the minimum time to recharge serviceable batteries fully will take overnight.
-
Page 20: Inspection & Maintenance
ELECTRONICS: Servicing of the drive electronics and charger should only be carried out by your local Shoprider service dealer. These units are sealed and should not be opened. BROKEN SEALS WILL VOID YOUR WARRANTY. You will find that the distance that your scooter can travel will gradually increase over the first few weeks of use, as the batteries reach their optimum efficiency after approximately 12 cycles of discharge and recharge. - Page 21 If your scooter can be pushed as described above, the motor brake(s) may be faulty. Please do not use the scooter and contact your Shoprider dealer immediately. SAFETY NOTE: For your own safety, we recommend that you check the function of your scooter brakes prior to a journey.
- Page 22 (12 to 24 months or longer). When you need to replace the batteries, always insist on the model fitted as standard equipment to your scooter. If in doubt, consult your local Shoprider authorized dealer. Tire Pressure The correct tire pressure should be between 15-30 PSI for FRONT and REAR tires.
-
Page 23: Trouble Shooting
If you feel for any reason that your scooter is not driving correctly, or is making an unusual noise, stop using the scooter. Be SAFE, Contact your Shoprider dealer, who will be able to advise you. -
Page 24: Warranty
This warranty only covers failures due to defects in materials or workmanship which occurs during normal use and does not cover damage that occurs in shipment or failures which are caused by products not supplied by Shoprider or failures resulting from accident, misuse, abuse, neglect, mishandling, misapplication, alteration, modification, commercial use, or by anyone other than an authorized dealer, or damage that is attributable to acts of God. -
Page 25: Specifications
Specifications Shoprider 889XLSBN Overall Dimensions: L x W x H mm(in) 1430(56) x 680(27) x 1300(51) Number, Size of Tires Front & Rear 2 x 14" Total Weight kg(lb) 147(323) (w/ 75Ah Batteries, Seat, etc.) Battery Capacity _V_Ah x Pcs...
Need help?
Do you have a question about the 889XLSBN and is the answer not in the manual?
Questions and answers
What tyre pressure should I maintain?
The recommended tyre pressure for the Shoprider 889XLSBN is 30 psi for the rear tyres and 25 psi for the front tyres.
This answer is automatically generated
BOTH FRONT TIRES ON MY SCOOTER WILL NOT SPIN EVER SINCE I CHANGED BOTH TIRES AND TUBES
The front tires on your Shoprider scooter model 889XLSBN may not spin after changing both tires and tubes due to one or more of the following reasons:
1. The inner tube may not have been deflated before removing and refitting, causing improper installation.
2. The rim may not have been properly reassembled or the four bolts may not have been securely tightened.
3. The freewheeling device may be in the wrong position; ensure the lever is down in the drive position.
4. The circuit breaker may have tripped; check and reset it if needed.
5. If the freewheel device was operated while the scooter was on, the scooter will beep continuously and won’t operate until the ignition key is turned off and then on again.
Check each of these points to identify and fix the issue.
This answer is automatically generated