Table of Contents
Advertisement
Quick Links
Advertisement
Table of Contents

Related Manuals for GROM Audio VLINE LEX6RT

Summary of Contents for GROM Audio VLINE LEX6RT
- Page 1 INSTALLATION MANUAL LEX6RT www.gromaudio.com www.gromaudio.com/support.html...
-
Page 2: Table Of Contents
CONTENTS Package contents......................3 CHAPTER 1 — INSTALLATION...............3 1.1 Before Installation 1.2 Tools 1.3 Vehicle Installation 1.4 Safety Guidelines & Appropriate Use Connect Display Harness Cable to factory Display..........5 Connect VLine Interface cable to Vehicle............6 Multimedia interface ECU Location . -
Page 3: Package Contents
GROM-VLINE SYSTEM PACKAGE CONTENTS VLine module GVMF MCFLEX6F Display Harness Power Harness GPS Antenna Microphone USB Extension cable CHAPTER 1 — INSTALLATION 1.1 Before Installation Before starting work with any wiring, please wait 90 seconds after turning the Ignition to the OFF position and disconnecting the negative (-) terminal of the battery. -
Page 4: Safety Guidelines & Appropriate Use
wiring installation requires special technical skills and experience. If you do not feel comfortable doing the installation please consult with your local car audio shop or installation professional for instructions or assistance if necessary. Carefully remove the factory Stereo and Display out of the dash cavity with proper tools. -
Page 5: Connect Display Harness Cable To Factory Display
Connect supplied Display Harness Cable to factory Display Locate BLUE Display port on rear of Multi Display ECU. If the port is Empty, plug in supplied video cable (GVMF) into port and leave female portion of cable with nothing attached. If there is cable plugged in, disconnect factory Display cable (typically Blue in color). -
Page 6: Connect Vline Interface Cable To Vehicle
Connect VLine Interface cable to Vehicle Locate the factory Multi-Media Interface ECU (see section for location) Unplug the 12-pin plug that is connected to the Multi-Media Interface ECU . Plug in Supplied Power Audio Interface Cable (MFCLEX6F) into 12-pin that was unplugged. -
Page 7: Multimedia Interface Ecu Location
Multimedia Interface ECU Location 2011-2012 CT200h 2012 LFA... - Page 8 2010-2012 HS250h...
-
Page 9: Connecting To Vline
2010-2012 RX350/450h Connecting to VLine Route the unused end of Display Cable and Power Audio Cable to the VLine module and connect them to the correctly labeled ports. Display Harness Display Harness Power Audio Harness Power Audio Harness... -
Page 10: Routing The Gps Antenna
Routing the GPS Antenna The GPS Antenna module is magnetic as well as supplied with double sided tape. It can be mounted to the top of dashboard or to outside of vehicle whichever you prefer. Route to desired location. We recommend mounting on inside of vehicle on passenger side of the Dashboard as shown below. -
Page 11: Routing The Microphone
Routing the Microphone Route microphone to a location where it will be able to pick up voice clearly. We recommend to mount MIC nearby the rear view mirror but not directly on windshield glass. Avoid sticking to the hard surface as it will pick up more noise. -
Page 12: Mounting The Vline Module
Mounting the VLine Module Mount module in location free of any moving parts. We strongly recommend mounting the module in an easily accessible location such as the glove compartment for easy access to the USB ports and in case of needing to upgrade firmware on the VLine module. -
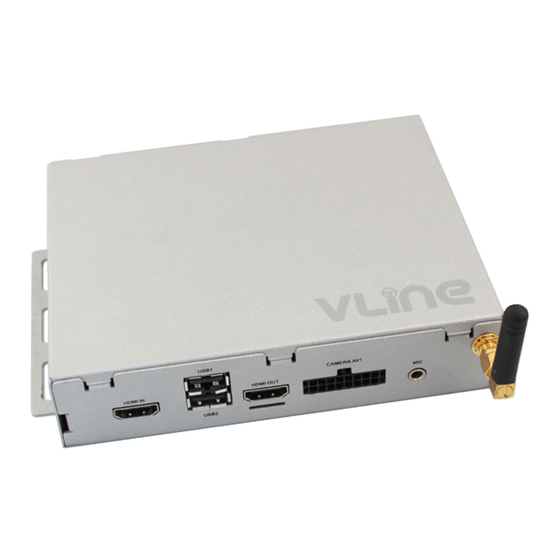
Page 13: Understanding Vline Ports
Understanding VLine Ports WiFi / Bluetooth Not Used Antenna USB1 iPhone GPS / AV / Camera Input USB 1 HDMI IN HDMI OUT USB 2 CAMERA AV1 HDMI Input MicroSD Card Microphone (Pin side up*) USB2 OTG/USB storage USB1 iPhone connection Any other USB device (Keyboard / Mouse) USB2 USB flash drive... -
Page 14: Chapter 2 - Getting Started
CHAPTER 2 — GETTING STARTED 2.1 Initializing After connecting the VLine module to the stereo, an Ignition Cycle will have to be performed for the stereo to discover Vline and allow Vline to self configure. To INITIALIZE: 1. Put Ignition Switch to “ACC” or “ON” position 2. - Page 15 Adjusting Audio Bass, Treble, Balance/Fade for VLINE Mode. To adjust, press DISP button 3 (three) times on factory Joystick controller. Factory Display will switch from VLINE interface into factory USB interface to adjust Audio settings. To switch back to VLine, switch out to different source mode (such as FM) and then back into USB (VLINE) via DISC-AUX button.
-
Page 16: Support
Unless otherwise prescribed by law, GROM Audio shall not be liable for any personal injury, property damage and or any incidental or consequential damages of any kind (including water damage) resulting from malfunctions, defects, misuse, improper installation or alteration of this product. -
Page 17: Grant Of License
BETWEEN YOU, AS “THE END USER”, AND GROM Audio (“GROM”). PLEASE CAREFULLY READ THE TERMS AND CONDITIONS OF THIS AGREEMENT BEFORE USING THE GROM PRODUCTS. BY USING THE GROM PRODUCT AND THE SOFTWARE INSTALLED ON THE GROM PRODUCT, YOU ARE AGREEING TO BE BOUND BY THE TERMS OF AGREEMENT. -
Page 18: Operational Warning And Safety Instructions
IN CONNECTION WITH ANY BUSINESS, LOSS OF ANY GOODWILL, OR DAMAGES. THE TERM ‘INCIDENTAL DAMAGES’ REFERS TO THE EXPENSES OF TRANSPORTING THE PRODUCTS TO THE GROM AUDIO SERVICE CENTER, LOSS OF THE END-USERS [ORIGINAL PURCHASER’S] TIME, LOSS OF THE USE OF THE PRODUCT, BUS FARES, CAR RENTALS OR OTHER COSTS RELATED TO THE CARE AND CUSTODY OF THE PRODUCT. - Page 19 INJURY OR DEATH. IF YOU, THE END-USER ALLOW ANOTHER PERSON TO USE THE VEHICLE, IT IS YOUR RESPONSIBILITY TO THOROUGHLY BRIEF THAT OTHER USER, ON THE SAFETY REQUIREMENTS FOR OPERATING THE VEHICLE AND THE PRODUCTS INSTALLED THEREIN. (B) SAID DISCLAIMERS SHALL APPLY TO THE USE OF SAID PRODUCTS, EVEN IF GROM HAS BEEN INFORMED OF, KNEW OF, OR SHOULD HAVE KNOWN OF THE LIKELIHOOD OF SUCH DAMAGES.
- Page 20 - in a manner that would distract the driver or that may otherwise cause injury or death to vehicle occupants or bystanders. GROM Audio is not in any way responsible for any such use by you. In all cases, GROM Audio may limit or revoke your use for any reason and at any time.
- Page 21 By using the Third Party Materials, you agree to comply with the use terms of the provider of such Third-Party Materials. GROM AUDIO does not warrant or endorse and does not assume and will not have any liability or responsibility to you or any other person for any Third Party Materials or for any other materials, products, or services of third parties.
- Page 22 A. INDEMNIFICATION OF GROM AUDIO, ITS AGENTS AND EMPLOYEES. By Purchasing, Installing and Using the Products, You, the End- User, agree to indemnify, defend and hold harmless, GROM AUDIO, and it s Affiliates, Directors, Officers, Agents and Employees from any Liabilities, Damage, Loss, Claim and Expense (including reasonable Attorney’s Fees) arising out of the...
- Page 23 Should you experience incompatibility issues, you may contact us via our support page. GROM Audio also carries a standard 30 day return policy. ENGINE/SYSTEM NOISE DISCLAIMER Engine / system noise may occur in some installations and is not easily predictable.
- Page 24 Copyright © 2018 GROM Audio REV 1.1...
Need help?
Do you have a question about the VLINE LEX6RT and is the answer not in the manual?
Questions and answers