Advertisement
Quick Links
Advertisement

Related Manuals for V&A VA8051 Series


Summary of Contents for V&A VA8051 Series
- Page 1 LIGHT INTENSITY METER SERIES VA8051 Users Manual...
-
Page 2: Table Of Contents
Contents Introduction ..........3 Features ............5 Names of parts ..........7 Operation instruction ........9 Keys instruction .......... 11 6. Reference table of illumination standard ..13 Maintenance ..........14... -
Page 3: Introduction
1. Introduction Thank you for purchasing the light intensity meter series from us. The product includes two type: Type A(Basic), Type B(Light sensor can be rotated in 270°to make measure more easy and fast). Please take a few minutes to browse through this user manual before you begin to operate the meter to ensure that you are fully familiarized with how best to operate the meter as accurately and safely as possible. - Page 4 normally used measure illuminances, e.g.at workplaces. 1.1 Precautions safety measures To get the best service from this meter, please read this user's manual carefully and observe the detailed safety precautions strictly. 1.1.1 During use 1. If the OL symbol will show on the LCD, it means the readings is outside the measuring range.
-
Page 5: Features
guarantee correct readings: Hold instrument horizontally so that the light sensor is directed upwards. When not using the instrument for a long time, please remove the battery and avoid storing in high temperature and high humidity. 2. Features 1. - Page 6 6. Sample rate: 2 time /sec 7. auto power off: about 20 minutes 8. low battery indicator 9. Operating environment: 0℃ ~ 50 ℃(32℉~122℉),0 ~ 80%RH 10. Storage environment: -20℃ ~ 60℃(-4℉~140℉),0 ~ 80%RH 11. Dimension and Weight: 121(L)x60(W)x30(H)mm, about 180g 12.
-
Page 7: Names Of Parts
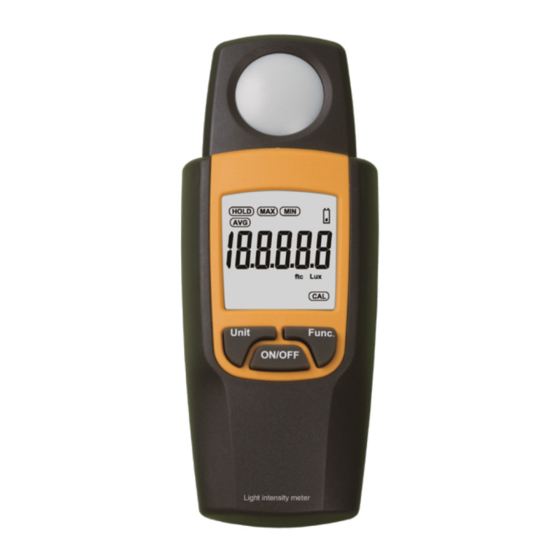
3. Names of parts Instrument Familiarization 1. Sensor cover 2. Light sensor (270°adjustable only for type B) 3. LCD display 4. Function key Func . Unit ON/OFF Light intensity meter... - Page 8 LCD Display The meaning of the symbols represented by the following table Number Symbol Functions of Order Indicating it is now in the data-holding mode Indicating the display value being the maximum value(MAX) Indicating the display value being the...
-
Page 9: Operation Instruction
minimum value(MIN) Measure values parameter unit parameter unit Indication to the calibration mode Indication low power of batteries. Batteries should be replaced. 4. Operation instruction 1. Please install new batteries on the meter . 2. Put the meter on the environment to be measured and hold it horizontally so that the light sensor is directed upwards. - Page 10 4. After power on, press the Unit key to select the needed units. 5. When the reading has been stable, read the illumination value. * If you still need more operations, please see the description of keys instruction. -10-...
-
Page 11: Keys Instruction
5.Keys instruction 1. ON/OFF key Press the key to turn the power ON and press the key once more to turn the power OFF. 2. Func. key Press the key can select the state of MAX、MIN、 HOLD. The cycle of views shows as following figure: Mode key Mode key Measure mode... - Page 12 was last switched on or last reset. Min mode: Minimum values since the instrument was last switched on or last reset. 3. Unit key 1) Unit set Press the key can change the parameter unit: lux, ftc. 2) Back light contrl If press the key >2sec.
-
Page 13: Reference Table Of Illumination Standard
Reference table illumination standard Place Illumination - Office Conference Room, 200 ~ 750 Living room Administration 700 ~ 1,500 Typing 1000 ~ 2,000 - Factory Packaging, Access 150 ~ 300 Assembly line 300 ~ 750 Check 750 ~ 1,500 Electronic components 1,500 ~ 3,000 assembly line - Hotel... -
Page 14: Maintenance
Ward, Warehouse 100 ~ 200 Medical examination 300 ~ 750 room Operating room, 750 ~ 1,500 Emergency Room - School Hall, Indoor stadium, 200 ~ 750 Classroom Laboratory, Library 500 ~ 1,500 7.Maintenance 1. CLEANING INSTRUCTIONS The meter may be wiped down with a wet sponge or cloth using a mild water based detergent or anti-bacterial soap and rinsed under a gentle stream of cold water. - Page 15 washing in water. 2. BATTERY REPLACEMENT Use the following procedure: When the battery voltage drop below proper operation range the symbol will appear on the LCD display and the battery need to be replaced. Press the battery cover and towards arrowhead direction to open the battery cover.
- Page 16 -16-...
Need help?
Do you have a question about the VA8051 Series and is the answer not in the manual?
Questions and answers