Table of Contents
Advertisement
Quick Links
Advertisement
Table of Contents

Related Manuals for Woom UP


Summary of Contents for Woom UP
- Page 1 Instructions for use 05.20...
- Page 3 WARRANTY · GARANTIE 24-month warranty from date of purchase 24 Monate Garantee ab Kaufdatum* Bike · Fahrrad Frame No. · Rahmennr. Colour · Farbe Size · Größe Date of purchase · Kaufdatum Dealer stamp · Händlerstempel * see conditions of warranty in chapter 13 · siehe Garantiebedingungen in Kapitel 13...
- Page 4 UP DE Bedienungsanleitung..........1 EN Instructions for use ..........33 CS Návod k obsluze ..........65 PL Instrukcja obsługi ..........97 SL Navodila za uporabo .........129...
-
Page 5: Table Of Contents
Meaning of the symbols ......................36 2 Important information about the woom UP ���������������������������������������������������� 37 What the woom UP is built for ....................37 What the woom UP has not been designed for ..............37 Disclaimer ..........................38 3 Important safety instructions ���������������������������������������������������������������������������� 39 4 woom UP components ������������������������������������������������������������������������������������������... - Page 6 Reproduction, translation and conversion into an electronic or any other machine-readable form in whole or in part is prohibited. These instructions have been written to the best of our knowledge. However, woom GmbH assumes no responsibility for the completeness and correctness of the information.
-
Page 7: Important Information About This Document
Teach your child how to use the woom UP in a safe and responsible way in the area where the bike will be used. -
Page 8: Meaning Of The Symbols
1�2 Meaning of the symbols The following symbols are used in these instructions: HINT Non-observance can cause malfunctions or damage. CAUTION/WARNING/DANGER Non-observance can lead to damage and serious injury (danger to life). Indicates useful tips for use. -
Page 9: Important Information About The Woom Up
ATTENTION Improper or incorrect use of the woom UP may result in material failure, falls and serious injury. Please pay attention to the hints given under 2.1 and 2.2. Maintain and service the woom UP regularly and follow the maintenance schedule recom- mended in Section 10. -
Page 10: Disclaimer
2�3 Disclaimer The information, specifications and hints provided in these instructions were up to date at the time of printing. The figures used are symbolic representations and do not have to correspond to reality. The information, figures and descriptions in these instructions do not give rise to any claims for changes to products already supplied. -
Page 11: Important Safety Instructions
In darkness or poor visibility, switch on the light (not included). Reliable and safe use of the woom UP can only be guaranteed if the assembly and installation are carried out according to the specifications of woom GmbH. -
Page 12: Woom Up Components
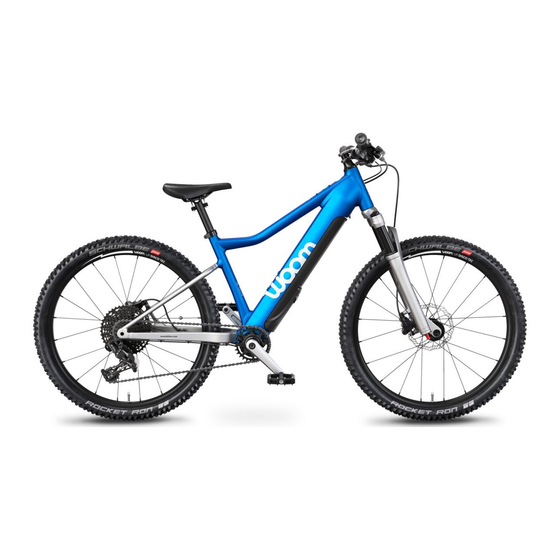
UP components See figure on cover sheet for numbering Seatpost Brake caliper Saddle Drive unit Seatpost clamp Pedals Frame Crank Remote fX 21 Bottom bracket (in frame) Cover Chain Stem Speed sensor Handlebars Rear derailleur Brake lever Rims Shifter... -
Page 13: The Functions Of The Most Important Components
5�5 Stopping in time – the brakes The woom UP has two hydraulic disc brakes, one on the front wheel and one on the rear wheel. When braking, the brake pads are pressed against the brake discs attached to the hub and the wheel is braked in this way. -
Page 14: Getting The Woom Up Ready
Remove the plastic protective disc from the rear derailleur. You should write down the woom UP frame number. This number uniquely iden- tifies the bike and is important in the event of theft and insurance matters. The number can be found at the back of the seat tube (see figure). -
Page 15: Assembling
6�2 Assembling See Section 11.1 on page 60 for tightening torques. Mounting the handlebar 4 mm Unscrew the clamps from the stem. Turn the handlebar 90° clockwise and insert into the stem. ATTENTION The brake cables and the shift cable must be to the left of the head tube. - Page 16 4 mm Screw on the clamps, tighten The cross mark must be in Adjust the tilt of the handlebar. the screws only slightly. the middle between the two Default setting: 0°. Tighten the clamps. clamps. HINT Make sure that the gap between clamps and stem is the same at the top and bottom!
- Page 17 Mounting the front wheel (not necessary for woom online shop customers) Remove the plastic spacer from Unscrew the through axle from Remove the plastic protective the brake caliper. the front fork. The quick-re- disc from the brake disc (do not lease lever must be located in pull the spacer sleeve with it!).
- Page 18 Mounting the saddle 4 mm 4 mm Open seatpost clamp with hex Position the seat post at the Tighten the seatpost clamp key. appropriate height (see hints with a hex key. on page 15 for adjusting seat height). ATTENTION Observe minimum insertion depth! See min.
- Page 19 HINTS Correct seat height: With your child sitting on the saddle, have them place their heel on the pedal (the one in the lowest position) and stretch out their leg. Sitting on the saddle and with the saddle height adjusted, your child should be able to touch the ground with both feet and remain in a stable position.
-
Page 20: Adjusting Handlebar And Brake Lever
HINT Disc brakes need some time until they are "braked in". You can speed up this process by braking several times from medium speed until you come to a standstill. 6�3 Adjusting handlebar and brake lever See Section 11.1 on page 60 for tightening torques. - Page 21 Never unscrew the adjusting screw completely from the handlebar grip. Shifter spacing The default shifter position is set according to the woom UP model. To change the shifter position, loosen the shifter clamping screw with a 5 mm hex key and position the shifter according to your child's requirements.
-
Page 22: Suspension Fork
6�4 Suspension fork The woom UP comes with preset air pressure. If you want to adjust the air pressure, please proceed as follows: To adjust the correct air pressure in the air suspension fork you need a special absorber pump. First remove the valve cap (see figure) from the upper left end of the air suspension fork by turning it counter clockwise. - Page 23 Adjusting compression damping Compression damping and compression speed of the air suspension fork can be adjusted with the adjustment knob at the upper right end of the suspension fork. To increase com- pression speed and reduce compression damping, turn the adjustment knob clockwise.
-
Page 24: Electric Drive
6�5 Electric drive The woom UP is equipped with a Fazua Evation drive. This supports children’s pedalling with 55 Nm and 250 W (max. 400 W). Your child can decide how much help they want from the drive by adjusting the top tube controls. They can select from four support modes, from neutral to maximum support (white: 0%, green: 30%, blue: 60%, pink: 100%). -
Page 25: Cycling Correctly
Do not let the brakes slip when driving downhill! Always brake strongly and briefly (less than five seconds) and then release the brakes again. HINT Letting the brakes slip may excessively heat up the brake discs and brake fluid. This can cause the brake to deteriorate or even fail. HINT ... -
Page 26: Cleaning
Cleaning Clean the woom UP regularly so that it remains intact and your child is always safe on the road. HINT Do not use a pressure cleaner as this may damage the bearings and attachments. Never clean the bike with acids, hot oil or liquids containing solvents. -
Page 27: Maintenance
The headset is located in the head tube; it connects the fork to the frame and allows easy turning of the handlebar. When cycling, it is exposed to heavy loads and must therefore be seated correctly. The woom UP must be handed to professionals if the headset or the handlebar: wiggles or exhibits backlash,... -
Page 28: Gearshift System
9�4 Gearshift system Over time, the gearshift system may change. Therefore, it may be necessary to readjust it after some time. If an accident or other event causes problems with the gearshift system, it must be repaired or readjusted by a specialist. Adjust rear derailleur Lower limit: Shift to the smallest sprocket and adjust the rear derailleur (1) by turning the screw (H) so that it is in line under the smallest sprocket. -
Page 29: Brakes
9�5 Brakes WARNING Have repairs and adjustments to brakes carried out only by qualified personnel. Brake discs and brake pads are wear parts, which means they need to be inspected regularly (see Section 10 on page 59). The brakes must always be checked or serviced by a specialist if: the brake pads are thinner than 0.5 mm (see figure) the brake lever touches the handlebar... -
Page 30: Bottom Bracket
9�7 Bottom bracket Bottom brackets can wear out after a certain time. Have damaged bottom brackets repaired or replaced by a specialist if necessary. 9�8 Spokes and wheels Spokes connect the hubs to the rims. They must be sufficiently tensioned and influence the concentricity of the wheel. -
Page 31: 10 Maintenance Schedule
10 Maintenance schedule Regular inspections of the woom UP by a specialist are important for the safety of your child. When you need to have the woom UP serviced by a professional bike repair shop: After 200 kilometres and at least once a year: Check the tyres and wheels for damage and proper condition. -
Page 32: 11 Technical Data
11 Technical data 11�1 Tightening torques Component Recommended torque Brake lever on handlebar (M5) 4 Nm Pedals 20 Nm Seat post on frame 4 Nm Shifter on handlebar (M5) 4 Nm Rear through axle (M12) 10-15 Nm Front through axle (M15) 18-22 Nm Component Minimum torque... -
Page 33: Specifications
• SRAM NX Trigger shifter Gears • SRAM NX rear derailleur • Superlight woom UP DISCO TEC double-chamber aluminium rims • Aluminium hubs with sealed industrial bearings • Through axles for maximum torsional strength (135 x 12 mm rear) • with 24˝: 20 G14 spokes, double-crossed spoking Wheels •... - Page 34 • UP 5: 15.80 kg (without pedals) • UP 6: 16.60 kg (without pedals) Weight Colours • Electric blue Colours Weight • Cyclist, luggage and bike: UP 5: 80 kg / UP 6: 90 kg Weight limits...
-
Page 35: 12 Environmental Protection
12 Environmental protection 12�1 Disposing of transport packaging The packaging materials have been selected with environmental and disposal considerations in mind and are therefore almost completely recyclable. Recycling packaging material saves raw materials and reduces the amount of waste. 12�2 Disposing of an old bike Old appliances often contain valuable materials. -
Page 36: 13 Warranty
Please send us a photo of the defect. We will help find a quick and simple solution. If you have bought your woom bike from one of our retailers, please contact them directly. The retailer will then take care of the rest. - Page 37 Founder and CEO Founder and CEO woom woom +43 2243 23923 woom@woom.com +855-966-6872 usa@woombikes.com woom woom GmbH · Inkustraße 1-7 / Halle 14 / Top 5 · 3400 Klosterneuburg · Europe / Austria woom@woom.com · +43 2243 23923 · woom.com us.woombikes.com...
Need help?
Do you have a question about the UP and is the answer not in the manual?
Questions and answers