Advertisement
- 1 Important facts about your woom bike
- 2 The components on your woom bike
-
3
Preparing your woom bike for the first ride
- 3.1 Unpacking your bike
-
3.2
Assembly and set-up
- 3.2.1 Installing the handlebars
- 3.2.2 Setting the brake lever position and reach
- 3.2.3 Adjusting the trigger shifter reach
- 3.2.4 Setting up the MTB grips
- 3.2.5 Installing the front wheel
- 3.2.6 Installing the pedals
- 3.2.7 Installing and correctly positioning the saddle
- 3.2.8 Setting up the suspension fork (woom OFF AIR)
- 3.2.9 Installing the reflectors
- 3.3 Optional modifications to your bike
- 4 How to ride
- 5 Looking after your woom bike
- 6 Recommended tightening torques
- 7 Important info about this document
- 8 Important safety information
- 9 Documents / Resources
Important facts about your woom bike

Improper use of your woom bike other than for its intended purpose can lead to material failure, falls and serious injury. Follow the following instructions carefully! Care for and maintain your woom bike regularly and follow the maintenance schedule recommended in Maintenance schedule section.
- When replacing parts, use only compatible original spare parts and observe the notes in the manufacturer's manual. For additional information on compatible spare parts, contact our customer service team (woom.com) or your local dealer.
- To avoid damage due to overloading your woom bike, do not exceed the maximum weight of rider and load or the maximum gross weight (rider, load and bike) under any circumstances (see table).
| Bike model | Weight (without pedals) [kg] | Maximum weight Rider + load [kg] | Maximum total weight Rider + load + bike [kg] |
| woom OFF 4 / 5 / 6 | 8.1 / 9.1 / 10 | 52 / 71 / 80 | 60 / 80 / 90 |
| woom OFF AIR 4 / 5 / 6 | 9.2 / 10.3 / 11.2 | 51 / 69 / 79 | 60 / 80 / 90 |
What your woom bike was built for
- Developed for cross-country mountain biking and off-road cycling away from traffic.
- Depending on the size of the woom bike, these models are designed for children measuring between 118 and 165 cm in height (roughly ages 6 to 14 years).
What your woom bike was NOT built for
- For jumps above 30 cm, stunts and extreme sports, like downhilling
- For use with a luggage rack
- For use by adults
- For use by more than one person, even if the maximum permissible weight is not exceeded
- For use with a child's seat
- For use with a bicycle trailer
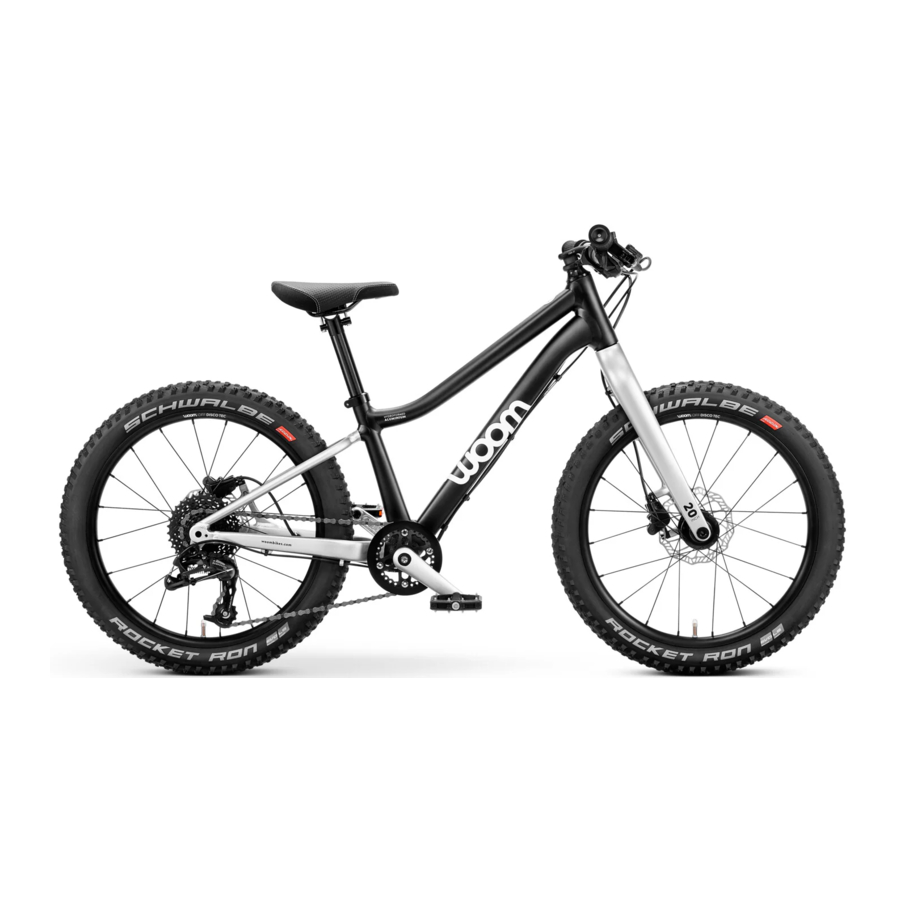
The components on your woom bike

- Seatpost clamp
- Seatpost
- Saddle
- Frame
- Cable routing opening for dropper seatpost (sizes 5 & 6)
- Dust cap
- Headset clamp
- Stem
- Handlebar clamps
- MTB grip
- Brake lever
- Trigger shifter
- Handlebars
- Head tube
- Headset (in head tube)
16a. Carbon fork
16b. Suspension fork
- Brake caliper
- Hub
- Disc brake rotor
- Rims
- Tire
- Spokes
- Bottom bracket (in frame)
- Crank
- Pedal
- Chainguard
- Chainstay protector
- Chain
- Derailleur
- Cassette
Preparing your woom bike for the first ride
 Please note: The designations "left" and "right" in these instructions always refer to the left and right sides of the bike in the direction of travel as seen from above. In the Service & Info section on the woom website (woom.com), you will find videos to help you assemble your woom bike.
Unpacking your bike
 TOP TIP
New and used tires can leave visible marks on the ground. That's why it's a good idea to place something (e.g. cardboard) underneath your bike while assembling it to keep the floor clean.
On all future occasions, avoid standing your woom bike on floors that are marked easily.
- Remove the packaging, carefully cut the cable ties and remove the protective plastic.
![warning]() Note down the frame number of your woom bike. This number is unique to your bike and provides an important way of identifying it when reporting a theft to the police and liaising with your insurance provider. You'll find the number on the frame in the area of the bottom bracket. You can write the frame number on your warranty card – see inside cover.
Note down the frame number of your woom bike. This number is unique to your bike and provides an important way of identifying it when reporting a theft to the police and liaising with your insurance provider. You'll find the number on the frame in the area of the bottom bracket. You can write the frame number on your warranty card – see inside cover.
Check your woom bike against the illustration to make sure it is complete.

Assembly and set-up
Installing the handlebars
- Unscrew the clamp bolts on the front of the stem.
![]()
- Place the handlebars in the stem.

- The gear cable and brake hoses must both run along the left side of the head tube.

- Replace the clamps and slightly tighten the bolts.
Check that the cross mark is centered between the two clamps.
![]()
- Adjust the angle of the handlebars to suit the rider. Your child should be able to reach the bars easily while sitting on the saddle and leaning forward a bit with slightly bent arms.
![]()
- Tighten the clamp bolts alternately diagonally and keep going until the required torque is reached (see Recommended tightening torques chapter). Make sure that the handlebars cannot be rotated when the bolts are tightened.
![]()
- Make sure that the gap between the clamp and the stem is the same at the top and bottom.


Setting the brake lever position and reach
Your woom bike arrives with a preset distance between the handlebar grip and the brake lever. To reduce the distance between the brake lever and the handlebar grip, turn the brake lever adjustment screw (1) anti-clockwise.

Brake lever adjustment screw and clamp bolt
To increase the distance, turn the screw clockwise. Turn the screw just far enough to ensure that the brake lever can never touch the handlebar grip, even when applied under serious force. Never completely unscrew it from the brake lever. To adjust the position of the brake lever on the handlebars, loosen the clamp bolt (2) by turning it anti-clockwise and reposition the lever. Finish up by tightening the clamp bolt to the required torque (see Recommended tightening torques chapter.). Make sure that your child is comfortably able to reach and operate the brake levers.
Adjusting the trigger shifter reach
Your woom bike comes with the trigger shifter in a standardized position. To change the position (and the distance to the trigger shifter), loosen its clamp bolt using a 5 mm hex key and reposition as necessary to suit the rider. When in position, retighten the clamp bolt to the required torque (see Recommended tightening torques chapter). Make sure that your child is comfortably able to reach and operate the trigger shifter.

Trigger shifter clamp bolt
Setting up the MTB grips
- When your child is holding the grips in a normal riding position, their wrists should be slightly bent.

- We recommend positioning the grips so that the clamp bolts face forward and the woom logo on the clamps faces upwards.
![]()
- To adjust, use a 3 mm hex key to loosen the clamp bolt on the inner edge of the grips.

- Turn the grip into the desired position before tightening the clamp bolt to the required torque (see Recommended tightening torques chapter).


Installing the front wheel
When installing the front wheel, make sure that the spacer sleeves are mounted on both sides of the hub.
woom OFF: Remove the thru-axle from the fork. Remove the safety spacers from the brake calipers and store them somewhere safe in case you travel with the bike in future.
After removing the spacers, do not operate the front brake lever without the disc brake rotor in place as this will lock up the brake pads.

woom OFF AIR: Open the quick-release lever and remove the thru-axle from the fork. Remove the safety spacers from the brake calipers and store them somewhere safe in case you travel with the bike in future.
After removing the spacers, do not operate the front brake lever without the disc brake rotor in place as this will lock up the brake pads.

Remove the protective plastic disc from the disc brake rotor. Make sure that the black distance spacer remains on the hub. This can sometimes get stuck on the protective plastic disc. If this happens, pull it off and simply insert it back into the hub.

- Install the front wheel. The disc brake rotor must be on the left! Ensure that the disc brake rotor sits centrally between the brake pads in the caliper.

- woom OFF: Insert the thru-axle and tighten to the required torque (see Recommended tightening torques chapter).

- woom OFF AIR: Insert the thru-axle and tighten it. Use the dial underneath the lever to adjust the tension of the quick-release lever.

- woom OFF AIR: Then close the quick-release lever. If the quick-release lever is hard to close, ease off the tension by turning the dial. In the closed position, the lever should point upwards.


Installing the pedals
- Screw the pedal marked "R" into the right crank arm in the direction of the arrow and tighten it with the hex key to the required torque Recommended tightening torques chapter).

- Screw the pedal marked "L" into the left crank arm in the direction of the arrow and tighten it with the hex key to the required torque Recommended tightening torques chapter).


Installing and correctly positioning the saddle
- Open the quick-release lever.
![]()
- Insert the seatpost and position it at the correct height.
![]()
- Close the quick-release lever completely.
![]()


The following table details the minimum and maximum saddle height allowed on each woom model.
| Model | Minimum saddle height [mm] | Maximum saddle height [mm] |
| woom OFF 4 / 5 / 6 | 575 / 690 / 765 | 725 / 845 / 960 |
| woom OFF AIR 4 / 5 / 6 | 580 / 705 / 770 | 735 / 855 / 970 |

Setting the saddle height
Correct saddle height
When sitting on the saddle, the rider needs to place their heel on the pedal in the lowest position. Their leg should be straight, without the need for them to twist their hips. When sitting on the saddle, the child should always be able to touch the ground with both feet and have a stable stance once the saddle height has been adjusted.

For beginners, set the saddle lower.
Setting up the suspension fork (woom OFF AIR)
Setting the correct air pressure in the fork
The woom OFF AIR comes with a preset air pressure.
If you want to change this, you will need a shock pump. Here's what to do:
- First, unscrew the valve cap (see picture) on the upper left of the fork by turning it anti-clockwise.
- Use the table below to determine how much air the fork needs for the rider's weight.
- Replace and tighten the valve cap.


20"
| Rider's weight [kg] | Air pressure [psi]* |
| <20 | 20–25 |
| 20–25 | 25–30 |
| 25–30 | 30–35 |
| 30–35 | 35–40 |
24 and 26"
| Rider's weight [kg] | Air pressure [psi]* |
| 20–30 | 40–50 |
| 30–45 | 50–65 |
| 45–65 | 65–85 |
| >65 | 85–100 |
* Max. permissible air pressure: 150 psi
Setting the rebound damping
The rebound damping and rebound speed of the air suspension fork can be adjusted with the red dial on the lower right end of the fork.
- Turn the red dial in the - direction to increase the rebound speed and reduce the rebound damping.
- Turn the dial in the + direction to reduce the rebound speed and increase the rebound damping.


Setting the compression damping
The compression damping and compression speed of the air suspension fork can be adjusted with the adjustment dial on the upper right end of the fork.
- Turn the adjustment dial clockwise to increase the compression speed and reduce the compression damping.
- Turn the adjustment dial anti-clockwise to reduce the compression speed and increase the compression damping.


Lockout function
To activate the lockout function (which turns the suspension fork into a rigid fork), turn the compression damping adjustment lever anti-clockwise as far as it will go. Do this on uphills and flat, smooth stretches where you don't need suspension.
How to set up your fork
When adjusting the damping, always start with the lowest rebound and compression damping (= highest deflection or compression speed) and increase these in small incremental steps (do not adjust rebound and compression at the same time). Then have your child ride a test stretch several times to check and compare the settings. When adjusting the rebound damping, the fork should extend slightly slower than it compresses. To check, push the fork down with the handlebars in a sudden motion with the front brake applied and allow the fork to deflect without applying pressure to the handlebars. Depending on whether the fork rebounds too slowly or too quickly, increase or decrease the rebound damping. When adjusting the compression damping, the suspension fork should not bottom out or compress to the stop under any circumstances on large obstacles and jumps. If the fork does bottom out, increase the compression damping and also check the air pressure setting in the suspension fork.
Installing the reflectors
- Attach the clip-on reflectors to the spokes.
![]()
- Mount the white reflector on the handlebars and the red reflector on the seatpost.


Optional modifications to your bike
If you have any doubts about the process or consider yourself inexperienced when it comes to servicing and installing components onto bikes, we recommend that a professional bike mechanic carries out such work. For safety reasons, having a mechanic deal with your bike is the most sensible option.
Retrofitting a dropper seatpost
The woom OFF and woom OFF AIR models from model years 2023 onward in size 5 (24') and size 6 (26') can be retrofitted with an internally routed dropper seatpost. Make sure you purchase the correct diameter and length model as it needs to be compatible with your frame.

Size 5:
- Diameter: 27.2 mm
- Maximum insertion length (A): 220 mm
- Minimum insertion length (B): 60 mm
- Maximum saddle height: 845 mm (woom OFF) /855 mm (woom OFF AIR)
Size 6:
- Diameter: 27.2 mm
- Maximum insertion length (A): 270 mm
- Minimum insertion length (B): 60 mm
- Maximum saddle height: 960 mm (woom OFF) / 970 mm (woom OFF AIR)
In the FAQ section on the woom website, you'll find further information on how to retrofit a dropper seatpost.
Transitioning to tubeless tires
All sizes of the woom OFF and woom OFF AIR models from model years 2023 onward are equipped with tubeless-compatible rims and tires, which means you can transition to a tubeless set-up on your woom bike if you want. In the FAQ section on the woom website, you'll find further information on how to transition to a tubeless set-up on your woom bike.
How to ride
How to brake
- The left brake lever operates the front brake.
- The right brake lever operates the rear brake.
To get the most out of your disc brakes, please note the following points:
- Your child should always apply both brakes at the same time.
- Optimal braking performance depends on the surface. In most cases, use 70% of the front brake and 30% of the rear.
- When descending, make sure you pump the brakes rather than having a consistent hold on them because extended periods of braking will cause overheating.
- Pulling on the brakes for a long period can cause the whole braking system, including the rotors and fluid, to overheat. This impacts the braking performance and could lead to potential failure.
- Depending on the surface and conditions, braking distance may vary. On wet and slippery surfaces in particular, make sure that the rider accounts for a longer braking distance.
How to use the gears
- Your child can shift to the next lowest gear (for slower speeds) with the rear trigger shifter (1).
- Your child can shift to the next highest gear (for faster speeds) with the front trigger shifter (2).


Looking after your woom bike
Repairs and maintenance work of any kind require expertise, experience and special tools. If you're in any doubt about the process, enlist the help of a professional mechanic to safely carry out any repairs, adjustments or maintenance work.
The tires
- Regularly check the tread and condition of the tires. Replace worn or damaged tires immediately.
- The permissible pressure range is indicated on the tire sidewalls and the pressure must not be above or below this range.
- Use a pressure gauge to set the correct tire pressure. Squeezing the tires is an unreliable method when it comes to checking tire pressure.
If there's too little tire pressure, there's a higher risk of damaging your tire, tube or rim and therefore puncturing. Check the tire pressure before each ride.
TOP TIP
A pressure loss of about 1 bar per month is considered normal. If a tire loses significantly more air, the tube is defective and must be repaired or replaced.
The chain
As the chain wears, it becomes longer. If it wears too much, it can damage the cassette. The chain and cassette should therefore be checked regularly for wear (Maintenance schedule section).
Check for chain wear
The easiest way to check for chain wear is by using a special chain wear tool, which is widely available. Slot the chain wear tool into the chain. The deeper it sits into the chain links, the more wear the chain has. If it slots in completely without any resistance, you'll need to replace the chain. If it only partially goes into the links, the chain is still good to go. If you don't have a chain wear tool, you can measure it loosely by hand. Pinch a link between your forefinger and thumb and pull the chain away from the top and bottom of the chainring. Now do the same from the frontside of the chainring. The chain should stay in place. If you can pull the chain away by more than 2 mm, you will need to replace it.
Oiling the chain
The chain must be cleaned and lubricated regularly. See Cleaning your woom bike section for details on how to clean the chain and other drivetrain components. Use a suitable chain oil to lubricate the chain. Be careful not to apply too much oil. Remove any excess oil with a rag. Make sure that oil does NOT come into contact with the brake pads or disc brake rotors. If oil gets on the brake pads, they must be replaced.
The handlebars, headset and fork
The headset, located in the head tube, connects the fork to the frame and enables the handlebars to turn easily. The woom bike must be inspected by a specialist if the headset or the handlebars
- wobble or have play,
- can no longer be turned easily or are difficult to move.
The gearing
Over time, your gears can become misaligned. For this reason, they may have to be readjusted after a certain period. If an accident or another incident causes problems with the gears, they should be repaired or readjusted by a specialist.
Adjusting the derailleur
Lower stop
Shift to the smallest sprocket and turn the adjustment screw (H) to adjust the stop so that the jockey wheel (1) sits in line with the smallest sprocket.
Upper stop
Shift to the largest sprocket and turn the adjustment screw (L) to adjust the stop so that the jockey wheel (1) sits in line with the largest sprocket.
- Turning the adjustment screw (H) clockwise OR the adjustment screw (L) anti-clockwise will move the jockey wheel (1) towards the wheel.
- Turning the adjustment screw (H) anti-clockwise OR the adjustment screw (L) clockwise will move the jockey wheel (1) away from the wheel.
Gear adjustment: Shift through all gears starting with the smallest sprocket. If the chain does not shift to the next largest sprocket after activating the trigger shifter, tighten the gear cable by turning the barrel adjuster (2) on the trigger shifter anti-clockwise. If the chain skips several sprockets during a single shift, reduce the gear cable tension by turning the barrel adjuster (2) on the trigger shifter clockwise.

The brakes
Brake pads must not come into contact with oil or grease. Be careful not to touch hot surfaces (e.g. hot disc brake rotor after heavy use). Your disc brake rotors and brake pads are all parts susceptible to wear and tear, so they need to be inspected at regular intervals (see Maintenance schedule section). The brakes must be checked or serviced by a specialist in any case if:
- the brake pads are less than 0.5 mm in thickness;
- the brake lever touches the handlebars when braking;
- the brakes screech or vibrate;
- braking power decreases;
- the brakes "float", i.e. have a variable bite point.
Checking the thickness of the brake pads

TOP TIP
We recommend fully servicing your brakes every 12–24 months, depending on how often the bike is used. However, remember that brake fluid will still age even if the bike is rarely used.
The cranks, bottom bracket and pedals
Cranks and pedals can loosen and wear over time.
- Check your cranks and pedals regularly for any looseness. If in doubt, get them checked and tightened by a mechanic.
- Damaged cranks and a hard-to-rotate or damaged bottom bracket will need to be repaired by a professional and replaced if necessary.
The wheels and spokes
The spokes connect the hub of each wheel to the rims. They must be properly tensioned because they have an influence on how the wheel rotates.
- Check the spokes regularly for damage and adequate tension or have them checked by a specialist.
- Have damaged spokes repaired by a professional and replaced if necessary.
- If a wheel has excessive lateral or vertical runout (more than 1 mm), have it repaired or trued by a professional.
Maintenance schedule
Having your woom bike regularly serviced is important for the safety of your child.
After 200 kilometers and at least once a year:
- Have the tires and wheels checked for soundness and proper condition.
- Have the tightening torques checked for the handlebars, headset, cranks, pedals, saddle, seatpost and all bolted fastenings and connections.
Every 1,000 kilometers, get a professional mechanic to thoroughly inspect, clean, lubricate and, if necessary, replace the following components:
Hubs, pedals, headset, brakes, gearing, chain and drivetrain components, tires and suspension fork.
Cleaning your woom bike
Clean your woom bike regularly to prevent damage and keep your child safe on the road. Do not use a high-pressure washer as this may damage bearings and similar components. Never clean the bicycle with acids, cleaning agents containing oil or liquids containing solvents.
Frame, handlebars, fork, wheels
Clean these components with warm water, mild detergent and a soft cloth or sponge.
Chain, cassette, front chainring
Clean these components with an oily cloth or with a cleaning agent suitable for chains and a brush. After cleaning the chain, it should be oiled with a suitable lubricant (see The chain section).
Brakes
If the brakes are very dirty, you can clean them with warm water and detergent. To clean the disc brake rotors, use a brake cleaner designed for this purpose. Never use cleaning agents that contain oil.
Recommended tightening torques
Please consult a mechanic or bike shop if you have any doubts or concerns about the tightness of your bolted fastenings and connections or if you do not have a suitable tool to determine the correct tightness. The table below details the torque specifications for individual parts on your woom bike.
| Part | Tightening torque [Nm] |
| Bolts that clamp the stem to the steerer tube | 6 |
| Stem to handlebars | 4.5 |
| Locking bolt (bearing must be adjusted so that there is no play) | 0.5–1.5 |
| Brake lever to handlebars | 4 |
| MTB grips to handlebars | 3 |
| Trigger shifter to handlebars | 4 |
| Saddle rails (saddle to seatpost) | 4 |
| Front wheel thru-axle | 15 (OFF) |
| Rear wheel thru-axle | 10–15 |
| Pedals | 20 |
| Brake caliper to frame | 6 |
| Cranks | 40 |
Important info about this document
Please read these instructions carefully prior to the first use and keep them in a safe place.

As rules for cyclists and their equipment vary from country to country, find out about the regulations applicable to riding your woom bicycle in road traffic in your country or region, particularly regarding the use of lights, reflectors and other obligatory equipment.
The following symbols are used in these instructions:
Failure to observe this information can result in material damage, severe damage to health (danger to life) or death.
Failure to observe this information can result in malfunction, material damage, dangerous situations and injury.
TOP TIP
Indicates useful tips.
Read these instructions for use carefully and observe all warnings and maintenance notes. If another adult is supervising your child or if you loan your woom bike to someone else, ensure that everyone involved has read and understood these instructions for use.
Important safety information
Failing to observe the warnings listed in this chapter can result in material damage, severe damage to health (danger to life) or death.
- Be careful when assembling the bike
There is a choking hazard due to small parts, so it is not suitable for children under 3 years. Keep loose parts and plastic bags out of the reach of children. Failure to observe these guidelines may result in a choking hazard. - Remove the packaging material carefully
When cutting the cable ties, take care not to damage the bike, especially the tires and brake hoses. - Do not modify your woom bike in any way
Do not push or pull your woom bike using tow bars or tow ropes and do not use any other components that are not explicitly authorized by woom. Do not add a motor to the woom bike. - The assembly and setting up of the woom bike should only be carried out by an adult or qualified bike mechanic
Your woom bike is delivered in a partially assembled state. Before the first ride on this bike, it must be assembled and set up in the correct manner as specified by woom GmbH to ensure it is fit to ride. The saddle, handlebars and pedals have to be adjusted properly and tightened sufficiently – for more details, observe the required tightening torques as outlined in Recommended tightening torques chapter.
![warning]() Note the minimum insertion height for the seatpost and insert it correctly, following the marking on the post itself. The saddle is the only part of the bike designed to be sat on.
Note the minimum insertion height for the seatpost and insert it correctly, following the marking on the post itself. The saddle is the only part of the bike designed to be sat on. - Before every ride, check that the components are working properly
Be sure to check before each ride that certain components – such as the brakes, wheels, drivetrain and handlebar unit – are in good order to ensure a safe ride for your child. - Pay particular attention to the disc brakes
Disc brakes will take some time to get "bedded in" at the beginning. You can speed up this process by riding around a small area at a medium speed and repeatedly braking to come to a stop. - Make sure all quick-release levers are closed
When closing quick-release levers, make sure that they are securely closed and do not bump against other components in this position. When the quick-release lever is in the closed position, you will be able to see the word "CLOSE" on the outside of the lever. - This woom bike is not suitable for carrying passengers
- You may not install a child's seat onto this woom bike
- You may not pull other bicycles, trailers or similar using this woom bike
- Make sure your child always wears a suitable helmet and clothing appropriate for cycling
When riding the woom bike, make sure the rider always has brightly colored, close-fitting clothing, suitable, robust shoes and protective equipment, including a certified bicycle helmet. - Accurately assess the rider's ability
Your child must be mentally and physically able to operate their woom bike safely. As with any sport, bike riding entails the risk of personal injury and material damage. - Be visible for other road users
Use bike lights at night or in low-light conditions (not included with the delivery). Reflectors must be clean, straight, unobscured and securely mounted. Damaged or missing reflectors must be replaced. Be aware that there is a higher risk involved when riding in low-light conditions or at night due to limited visibility. When riding in such conditions, make sure that the rider's bike lights and clothing comply with any national and regional regulations. It's important to understand that these conditions make it harder for other users to see cyclists. - Risk of injury from crashing!
Watch what's under the tires! Wet or icy ground surfaces can significantly affect the braking and steering on your woom bike. - Risk of injury from damaged, worn or protruding parts!
Only use this woom bike when everything is working properly. woom GmbH accepts no liability for damage caused by defective or worn parts (e.g. brakes). Periodically check your bike and its components (particularly the frame and fork) for damage, such as cracks, altered shape and wear, in order to prevent malfunctions. After every crash or impact, check it closely again. If your woom bike shows signs of damage, it must not be used under any circumstances. Damaged or non-functioning components must be replaced or serviced by a specialist. If your woom bike is used extensively, wear will occur more quickly and maintenance will have to be carried out earlier than the maintenance schedule specified in Maintenance schedule section. - Risk of injury due to rotating parts!
Rotating parts, such as wheels and disc brake rotors, increase the risk of injury. Always maintain a safe distance from rotating parts when using or maintaining the woom bike. - Risk of injury through improper service or neglecting maintenance!
To keep your woom bike in tip-top condition, please respect the maintenance recommendations provided for the various parts as outlined in Looking after your woom bike chapter and the recommended maintenance schedule as specified in Maintenance schedule section. All repairs should be carried out by a capable adult or qualified bike mechanic. - Avoid high temperatures Avoid exposure to high temperatures (above 80°C or 176°F) because it can cause damage to parts made of composite materials – in this case, the carbon fiber fork.
- Risk of injury through road traffic behavior!
If your child wants to use their woom bike on public roadways, find out about the applicable national regulations and equip the woom bike with the required accessories.
Failure to obey the rules of the road may result in injury to the rider or other road users.
Documents / Resources
References
Download manual
Here you can download full pdf version of manual, it may contain additional safety instructions, warranty information, FCC rules, etc.
Advertisement


Need help?
Do you have a question about the OFF 4 and is the answer not in the manual?
Questions and answers