Advertisement
Quick Links
MOTION ACTIVATED
THANK YOU FOR PURCHASING THE MOTION ACTIVATED
CAMSTICK
CAMSTICK
Please read this manual before operating the motion activated
camstick and keep it handy.
SKU: CAMSTICKMA
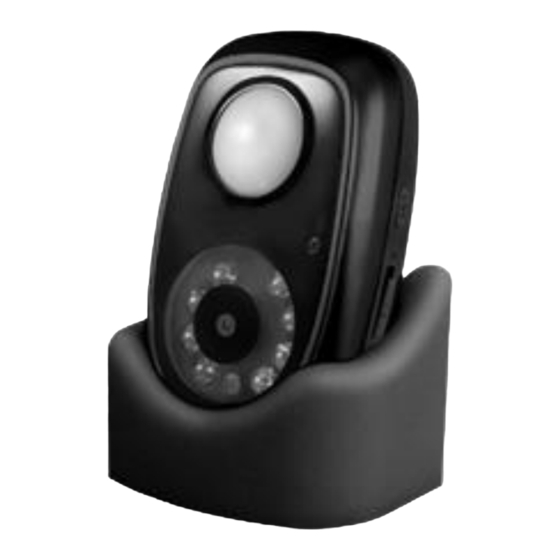
The motion activated camstick is designed to be the go-to choice for a
camera that is both small and discreet and capable of recording over
a long period of time. This easily portable unit sits securely in its stand
and can be placed quickly anywhere you need low-profile
surveillance. The motion activated camstick foregoes the need for
remotes, menus, and excessive buttons. All you need to do is turn the
unit on and place it facing the area you want to record.
The high-end motion detection sensors will activate automatically
whenever they sense motion and record for up to 30 seconds. The
rechargeable battery can last up to 10 days in standby and record up
to two hours of continuous footage.
Your purchase should include:
1 x Motion Activated Camstick
1 x Stand
1 x USB Cable
1 x AC Adapter
1 x Instruction Booklet
Advertisement

Related Manuals for Mini Gadgets CAMSTICKMA


Summary of Contents for Mini Gadgets CAMSTICKMA
- Page 1 Please read this manual before operating the motion activated camstick and keep it handy. SKU: CAMSTICKMA The motion activated camstick is designed to be the go-to choice for a camera that is both small and discreet and capable of recording over a long period of time.
- Page 2 GET FAMILIAR WITH YOUR MOTION ACTIVATED CAMSTICK PIR Sensor SD Card Slot Camera Lens Figure 1: Front View Figure 2: Back View...
- Page 3 Power Switch “SET” Button Figure 3: Side View 1 USB Port Figure 4: Side View 2...
- Page 4 HOW TO RECORD OPERATING THE MOTION ACTIVATED CAMSTICK The motion activated camstick can record video while plugged into and unplugged from a power source. IMPORTANT NOTICE: Allow the device to charge 4 – 6 hours before 1. Place the camstick in a hidden location, but be sure the PIR using.
- Page 5 7. Go to Start > Computer > Removable Disk > Right click the area beside the DCIM folder > Paste camstickma.exe should now be in the root folder of the camstick. 11. Slide the switch to OFF and unplug the camstick from the computer.
- Page 6 5. Open the Removable Disk drive. RETRIEVE THE FILES TO YOUR PC 6. Open the VIDEO folder. The videos are saved in automatically created folders 1. Plug the device into your PC using the USB cable. such as “13050700”. 2.
-
Page 7: Troubleshooting
TROUBLESHOOTING SPECIFICATIONS THE DEVICE WON’T TURN ON Video Resolution 640*480 Charge the device for at least 4 hours before the first use. Video Format Make sure the charging cable is securely inserted into the Frames per Second 15fps device and into the power source.
Need help?
Do you have a question about the CAMSTICKMA and is the answer not in the manual?
Questions and answers