Table of Contents
Advertisement
Available languages
Available languages
Quick Links
Advertisement
Table of Contents

Related Manuals for Denver MCU-5301


Summary of Contents for Denver MCU-5301
- Page 1 MCU-5301 PLEASE READ THIS USER MANUAL COMPLETELY BEFORE OPERATING THIS UNIT AND RETAIN THIS BOOKLET FOR FUTURE REFERENCE. BITTE LESEN SIE DIE BEDIENUNGSANLEITUNG VOR INBETRIEBNAHME VOLLSTÄNDIG DURCH UND BEWAHREN SIE SIE FÜR SPÄTERES NACHSCHLAGEN AUF.
-
Page 2: Important Safety Instructions
WARNING TO PREVENT FIRE OR SHOCK HAZARD, DO NOT USE THIS PLUG WITH AN EXTENSION CORD, RECEPTACLE OR OTHER OUTLET UNLESS THE BLADES CAN BE FULLY INSERTED TO PREVENT BLADE EXPOSURE. TO PREVENT FIRE OR SHOCK HAZARD, DO NOT EXPOSE THIS APPLIANCE TO RAIN OR MOISTURE. The lightning flash with arrowhead symbol, within CAUTION: TO REDUCE THE RISK OF... - Page 3 Refer all servicing to qualified service personnel. Servicing is required when the apparatus has been damaged in any way, such as power-supply cord or plug is damaged, liquid has been spilled or objects have fallen into the apparatus, the apparatus has been exposed to rain or moisture, does not operate normally, or has been dropped.
-
Page 4: Compliance With Fcc Regulations
CAUTION Follow the advice below for safe operations. ON PROTECTION AGAINST LASER ENERGY EXPOSURE • As the laser beam used in this compact disc player is harmful to the eyes, do not attempt to disassemble the casing. • Stop operation immediately if any liquid or solid object should fall into the cabinet. •... -
Page 5: Protect Your Furniture
PROTECT YOUR FURNITURE!! This system is equipped with non-skid rubber ‘feet’ to prevent the product from moving when you operate the controls. These ‘feet’ are made from non-migrating rubber material specially formulated to avoid leaving any marks or stains on your furniture. However certain types of oil based furniture polishes, wood preservatives, or cleaning sprays may cause the rubber ‘feet’... -
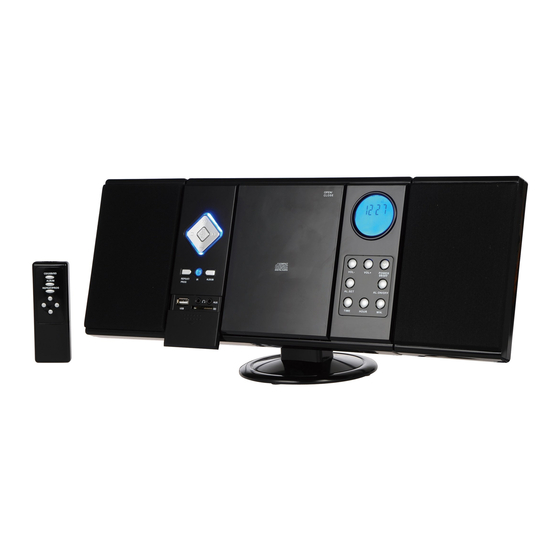
Page 6: Remote Control Unit
1. TUNING CONTROL 18. SKIP/SEARCH FORWARD BUTTON 2. BAND SELECTOR (AM/FM/FM STEREO) 19. STOP BUTTON 3. FUNCTION SELECTOR (AUX/RADIO/CD/ALARM) 20. SKIP/SEARCH BACKWARD BUTTON 4. CD DOOR (OPEN/CLOSE) 21. REPEAT/PROG(PROGRAM) BUTTON 5. LCD DISPLAY 22. REMOTE SENSOR 6. VOLUME CONTROL (-) BUTTON 23. -
Page 7: Installing The Speakers
INSTALLING THE SPEAKERS WALL MOUNTING IMPORTANT NOTES... - Page 8 Avoid installing the unit in locations described below: • Places exposed to direct sunlight or close to heat radiating appliances such as electric heaters. • Dusty places. • Places subject to constant vibration. • Humid or moist places. POWER SOURCES This Music System operates on 220V~ 50Hz.
- Page 9 SETTING THE CLOCK The clock has to be set before using the system for the first time. When you connect the System to the AC outlet for the first time the clock display will show "12:00" and will need to be set. For example set the clock time at 7:30 AM.
-
Page 10: Repeat All
REPEAT 1 When the REPEAT BUTTON is pressed once, the REPEAT 1 Indicator, ‘REP 1’, will appear in the LCD DISPLAY. The current track will be played repeatedly REPEAT ALL When the REPEAT BUTTON is pressed twice, the REPEAT INDICATOR, “REP ALL” will light in the LCD DISPLAY. - Page 11 To cancel program play, press the STOP BUTTON twice while program play is running or open the CD DOOR in stop mode. Press ALBUM Bottom to choose the album. Press CD/USB/SD SHIFT BOTTM to change the sound source. To turn the Player off, press the POWER BUTTON. The LCD DISPLAY backlight will go “off”. AUXILIARY (AUX) OPERATION You can play other music sources (iPod, MP3 player or other digital audio player) through the speakers of this System by connecting the AUX IN Jack to your external player’s LINE OUT jack or headphone jack.
-
Page 12: Care And Maintenance
3. Slide the FUNCTION SELECTOR to “RADIO” and the BAND SELECTOR to AM, FM or FM ST as desired. 4. Tune to your desired station, and adjust the volume level that you wish to hear when the wake up time is reached then press the POWER BUTTON again to turn off the System. - Page 13 Additional information is available at the technical department of your city. ALL RIGHTS RESERVED COPYRIGHT DENVER ELECTRONICS A/S WWW.DENVER-ELECTRONICS.COM Imported by: Inter Sales A/S...
-
Page 14: Wichtige Sicherheitshinweise
WARNUNG ZUR VERMEIDUNG VON FEUER UND STROMSCHLAG SCHLIEßEN SIE DAS GERÄT NUR AN EINER GEERDETEN STECKDOSE AN. ZUR VERMEIDUNG VON FEUER UND STROMSCHLAG SETZEN SIE DAS GERÄT NICHT REGEN ODER FEUCHTIGKEIT AUS. VORSICHT STROMSCHLAGGEFAHR NICHT ÖFFNEN WARNUNG: ZUR Der Blitz im gleichseitigen Das Ausrufungszeichen im VERMEIDUNG VON Dreieck weist auf gefährliche... - Page 15 Fremdkörper in das Gerät eingedrungen sind, das Gerät Regen oder Feuchtigkeit ausgesetzt war, nicht wie gewöhnlich funktioniert oder fallen gelassen wurde. Setzen Sie das Gerät nicht Spritzwasser oder Tropfwasser aus und stellen Sie keine mit Wasser gefüllten Gegenstände auf dem Gerät ab. Überlasten Sie Steckdosen nicht.
- Page 16 BEWAHREN SIE DIE BEDIENUNGSANLEITUNG AUF VORSICHT KLASSE 1 LASERPRODUKT VORSICHT CLASS 1 LASER PRODUCT UNSICHTBARE LASERSTRAHLUNG, APPAREIL LASER DE CLASSE 1 WENN GERÄT GEÖFFNET UND PRODUCTO LASER DE CLASE 1 SICHERHEITSMECHANISMEN UMGANGEN. NICHT IN DEN LASERSTRAHL BLICKEN. Dieses Gerät enthält einen Laser mit geringer Leistung. Beachten Sie alle Sicherheitshinweise.
-
Page 17: Bedienelemente Und Funktionen
BEDIENELEMENTE UND FUNKTIONEN SENDERWAHL WIEDERGABE/PAUSE BANDUMSCHALTER (AM/FM/FM SKIP/SUCHE VORWÄRTS STEREO) STOPP FUNKTIONSUMSCHALTER SKIP/ SUCHE RÜCKWÄRTS (AUX/RADIO/CD/ALARM) WIEDERHOLUNG/PROGRAMM CD-LAUFWERK (ÖFFNEN/SCHLIEßEN) SENSOR FERNBEDIENUNG LCD-DISPLAY ALBUM LAUTSTÄRKE (-) LAUTSPRECHER LAUTSTÄRKE (+) WANDAUFHÄNGUNG EIN/AUS AUSKLAPPBARE AUFSTELLER UHRZEIT BATTERIEFACH ALARM EINSTELLEN UKW-WURFANTENNE STUNDEN EINSTELLEN AUFSTELLER ALARM EIN/AUS BEFESTIGUNG LAUTSPRECHER MINUTEN EINSTELLEN... - Page 18 FERNBEDIENUNG LAUTSPRECHER INSTALLIEREN DE-5...
- Page 19 WANDMONTAGE WICHTIGE HINWEISE Stellen Sie das Gerät nicht in folgenden Umgebungen auf: • Orte, die direkter Sonneneinstrahlung oder Wärmequellen ausgesetzt sind. • Staubige Orte. • Orte mit ständiger Vibration. • Feuchte Orte. SPANNUNGSVERSORGUNG Dieses Musiksystem wird mit 220 V~ 50 Hz betrieben. Betreiben Sie es mit keiner anderen Spannungsversorgung, um das Gerät nicht zu beschädigen;...
- Page 20 III. Bei längerer Nichtbenutzung entnehmen Sie bitte die Batterien. Alte Batterien können auslaufen und das Gerät beschädigen; Sie verlieren außerdem Ihre Garantieansprüche. IV. Verbrennen Sie Batterien nicht, sie können explodieren. NETZBETRIEB Schließen Sie das NETZTEIL an einer 110 V AC~ 60 Hz Steckdose an.. Drücken Sie EIN/AUS, um das Gerät einzuschalten.
- Page 21 2. Schieben Sie den FUNKTIONSUMSCHALTER auf „CD“. „- -“ blinkt im LCD-DISPLAY, während der Player die Inhalte der CD liest. „ o“ wird während des Ladens angezeigt. 3. Öffnen Sie das CD-LAUFWERK, indem Sie auf das CD-LAUFWERK im Bereich „OPEN/CLOSE“ drücken, laden Sie eine CD mit dem Aufdruck nach oben und schließen Sie das CD- Laufwerk wieder.
-
Page 22: Weckzeit Einstellen
Am Ende der Programmvorschau blinken die Programmnummer „01“ und „PROG“ im LCD-DISPLAY. Drücken Sie WIEDERGABE/PAUSE um das Programm in der gespeicherten Reihenfolge wiederzugeben. Mit SKIP VORWÄRTS GEHEN Sie zur nächsten Programmnummer, mit zweifachem Tastendruck auf SKIP RÜCKWÄRTS gehen Sie zum vorherigen Track. Mit REPEAT wiederholen Sie einen bestimmten Track (1 wiederholen) oder alle Tracks im Programm (Alle wiederholen). -
Page 23: Wartung Und Pflege
2. Drücken Sie erneut AL.ON/OFF, um die Alarmfunktion zu deaktivieren. Die ALARMANZEIGE erlischt im DISPLAY. WECKZEIT ÜBERPRÜFEN Zum Überprüfen der Weckzeit drücken Sie AL SET. Das Display schaltet von der Uhrzeit zur eingestellten Weckzeit um. Beim Loslassen der Taste AL SET kehrt das Display zur Uhrzeit zurück. WECKEN MIT RADIO 1. - Page 24 Städte und Gemeinden haben Sammelstellen eingerichtet, an denen elektrische und elektronische Altgeräte kostenfrei zum Recycling abgegeben werden können, alternativ erfolgt auch Abholung. Weitere Informationen erhalten Sie bei der Umweltbehörde Ihrer Gemeinde. ALLE RECHTE VORBEHALTEN URHEBERRECHTE DENVER ELECTRONICS A/S WWW.DENVER-ELECTRONICS.COM Imported by: Inter Sales A/S Stavneagervej 22...
Need help?
Do you have a question about the MCU-5301 and is the answer not in the manual?
Questions and answers