Table of Contents
Advertisement
Quick Links
Advertisement
Table of Contents

Related Manuals for MICROPOINT eStation II MBI92


Summary of Contents for MICROPOINT eStation II MBI92
- Page 1 MBI92 eStation II User's Manual...
-
Page 2: Table Of Contents
Table of Contents 1.Product Introduction ............3 1.1.Intended Use ...................3 1.2.List of Accessories ................3 2.Product Overview ..............4 3.Precautions and Warnings ........... 6 4.Installation Instructions ............7 4.1.Connect the Base ................7 4.2.Install Thermal Paper ...............8 4.3.Charge the Meter ................10 4.4.Connect the Bluetooth ..............10 5.Operating Instructions ............ - Page 3 This page intentionally left blank.
-
Page 4: Product Introduction
Electrometer with REF number Q-3, Q-3 Pro, Q-3 Plus and QV-3 Plus (“Meter”) for testing Coagulation assay manufactured by Micropoint Biotechnologies Co., Ltd. (“Micropoint”) to provide extended functions such as power supply, printing and data transmission etc. 1.2.List of Accessories •... -
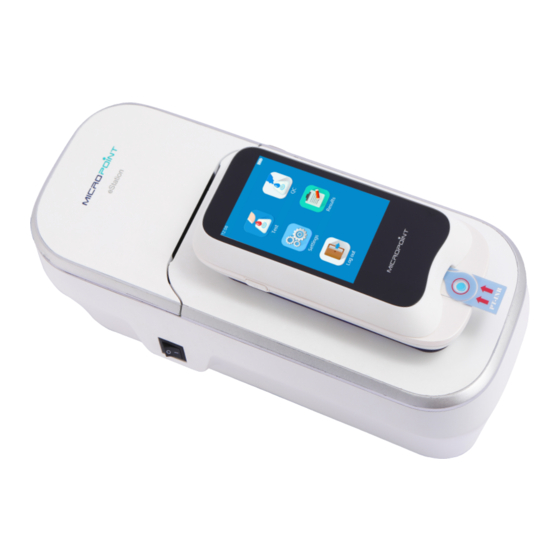
Page 5: Product Overview
2.Product Overview... - Page 6 A. ON-OFF Button The ON-OFF button controls the power supply of the Base. B. Printer Cover Open the printer cover to replace the thermal paper. C. Printer Cover Button Rotate this button to open the printer cover. D. Charging Port The charging port will charge the Meter.
-
Page 7: Precautions And Warnings
Please read this manual carefully before use and should strictly abide by it. ☻ Please use the device in accordance with the method specified by Micropoint, failure to do so may damage the protection provided by the device. -
Page 8: Installation Instructions
4.Installation Instructions 4.1.Connect the Base 1). Connect the Base to the AC power supply with the power adapter supplied with the Base (For detailed specification, please see the working voltage in Chapter 6). 2). Connect the Base to the USB port on the PC with the USB cable supplied with the Base. -
Page 9: Install Thermal Paper
4.2.Install Thermal Paper Rotate down the printer cover button to open the thermal printer cover. Rotate down the printer cover button... - Page 10 Place the new thermal paper into the paper roll slot. (Note that the curled side of the paper as shown below, allow a small portion of the paper extended outside of the printer cover). CAUTION: The printer head may generate high temperature during printing. Please take care to prevent burns.
-
Page 11: Charge The Meter
4.3.Charge the Meter Charge the Meter by placing onto the charging port slot. Please pay attention to the direction of the Base. (The interface of the charging port is magnetic and will properly align the Meter automatically.) 4.4.Connect the Bluetooth Locate the Bluetooth setting from the settings screen of the Meter. -
Page 12: Operating Instructions
5.Operating Instructions 5.1.Print Report 1) Print test/QC results immediately After the Bluetooth connection is established between the Meter and the Base, select the report to be printed via the Meter print screen, the Base will print the selected report. Please refer to the User Manual of the Meter for details. 2) Print history test record If you select a test/QC record from the history record screen of the test/QC results, the specific information of the record will be displayed. -
Page 13: Product Specifications
6.Product Specifications Input voltage: 100-240V~1.6A (max), Working voltage 50~60Hz Output voltage: +12V 4.17A Working temperature 10 ° C ~ 35 ° C Relative humidity 10% ~ 90% (without condensation) Communication Interface Type-B data cable, network port Thermal paper width 58mm Max diameter of thermal paper Φ... -
Page 14: Troubleshooting
Meter and Base. Base is remained. × Replace with new The thermal paper thermal paper. runs out. MICROPOINT PART # 4.50.450-00005 If the problem persists, please contact Micropoint’s Customer Service by emailing customerservice@micropointbio.com or calling +86 755 21600849 for technical support. -
Page 15: Symbol
8.Symbol Symbol Explanation Symbol Explanation In Vitro Diagnostics Expiry Date Caution. Read Fragile Carefully Keep Dry Biological Risk Separate Collection Do Not Reuse Temperature Manufacturer Limitation Authorized Consult Representative Instructions For in the European Community Catalogue Number Serial Number CE Marking Lot Number... - Page 16 Tel.: +86 755 21600849 Fax: +32 2 732 60 03 Fax: +86 755 86673903 www.obelis.net Email: customerservice@micropointbio.com www.micropointbio.com ©2021 Micropoint Biotechnologies Co., Ltd. All rights reserved.Printed in China. Micropoint are registered trademarks of Micropoint Biotechnologies Co., Ltd. ® P/N 630-00238 Rev.A5 2021-01...
Need help?
Do you have a question about the eStation II MBI92 and is the answer not in the manual?
Questions and answers