Table of Contents
Advertisement
Quick Links
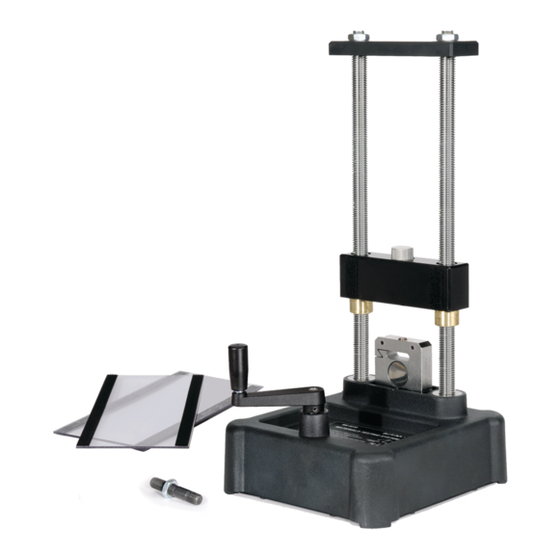
Materials Testing Machine
Materials Testing System
WARNING: Provide proper eye
protection when using the Materials
Testing Machine or its Accessories.
Operate the Materials Testing Machine
behind protective Safety Shields.
USB Link*
*Items from the
ME-8230 Materials
Testing System
Tensile Samples*
(60)
Velcro® Hook
Material
Safety Shield (2)
Sensor
Cable
Load Bar
Round Nut
ME-8236
Part of the
ME-8230
Velcro® Loop
Material
Crankshaft
Calibration
Rod and Nut
Instruction Ma nual
Leadscrews
Load Bar
(crosshead)
7100 N
Load Cell
Materials Testing
Machine
0 1 2 - 1 3 7 6 2 C
Base
Advertisement
Table of Contents

Subscribe to Our Youtube Channel
Related Manuals for PASCO ME-8236


Summary of Contents for PASCO ME-8236
- Page 1 Instruction Ma nual 0 1 2 - 1 3 7 6 2 C Materials Testing Machine ME-8236 Part of the Materials Testing System ME-8230 WARNING: Provide proper eye protection when using the Materials Testing Machine or its Accessories. Operate the Materials Testing Machine behind protective Safety Shields.
-
Page 2: Included Equipment
PASCO Interface with PASCO Data Acquisition Software. The sensor cable from the Materials Testing Machine con- UI-5401 PASCO Capstone Software nects to a PASPORT input port. (See the PASCO catalog or ME-8231 Tensile Sample, Aluminum (10) web site at www.pasco.com for more information about PASCO interfaces and data acquisition software.) -
Page 3: Accessories And Replacement Items
Materials Testing Machine for compression or tension. The samples each of four different plastics, and the Metal Cou- PASCO Capstone data acquisition software includes a “wiz- pons (AP-8223) with ten samples each of five different met- ard” that allows the calibration data for the Materials Testing als. -
Page 4: Attach The Safety Shields
(crosshead) Calibration PASPORT Input Port Load Crank Start the PASCO Capstone software. Prepare to use the soft- Cell Handle ware to calibrate the Material Testing Machine. Optional: Change Sign Note that the default for the Materials Testing Machine in the software shows force and position as ‘negative’... - Page 5 M o d e l N o . M E - 8 2 3 6 O p e r a ti o n • Click the “Hardware Setup” icon to close the “Hardware Step Three Setup” window. • Click “Next” to show the illustration in Step Three, Calibration “Install the calibration rod”.
- Page 6 M a t e r i a l s T e s t in g M a c h in e Operation “Seating” the Calibration Rod Before Recording Calibration Data See the Appendix at the end of the manual for information on preparing the calibration rod.Click “Record”...
-
Page 7: Mount A Tensile Sample
Experiment Guide that can be down- Record Data loaded from the PASCO web page. Prepare PASCO Capstone software to record data. (If there is Mount a Tensile Sample a stored calibration file that is to be used, select it in the “Calibration”... -
Page 8: Materials Coupon Adapter (Me-8238)
M a t e r i a l s T e s t in g M a c h in e Operation Use the sample nut to secure the plunger in place on the load Loosen but do not remove the hex nut on each clamp. The bar. -
Page 9: Materials Shear Accessory (Me-8239)
M o d e l N o . M E - 8 2 3 6 O p e r a ti o n Materials Shear Accessory (ME-8239) The Materials Shear Accessory consists of two pieces of hardened steel - a front piece and a back piece - held together by a pair of permanent screws, and a package of Materials Shear Samples. -
Page 10: Materials Structure Beam Adapter (Me-8242)
The Photoelastic I-Beams are similar to the #3 I-Beams and structures beam so that it can be tested under tension and #4 I-Beams that are part of the PASCO Structures Systems compression. (such as the Truss Set, ME-6990). However, the Photoelastic... -
Page 11: Maintenance
I-beams. The #3 I-Beam is 11.5 cm long, and the #4 I-Beam ries and classrooms, and are not sold for profit. Reproduction under is 17 cm long. any other circumstances, without the written consent of PASCO sci- entific, is prohibited. Trademarks PASCO, PASCO Capstone, Maintenance... -
Page 12: Calibration Procedure
M a t e r i a l s T e s t in g M a c h in e Appendix: • In the “Properties” window, click the check box for “Change Sign” Load Bar Round Load Bar (crosshead) Calibration Load Crank... -
Page 13: Prepare To Record Calibration Data
PASPORT Input Port USB Link Start the PASCO Capstone software. Click the “Hardware Setup” icon in the Tools palette and confirm that the icon for the Materials Testing System is linked to the icon for the interface. Step One In the software, select the “Calibration” icon in the Tools palette to open “Calibration” window. - Page 14 M a t e r i a l s T e s t in g M a c h in e Appendix: Step Two • Click “Next” to show Step Two, the “Choose Calibration Action” menu. Create New Calibration: Default choice Use Calibration: Use this to select an existing calibration.
- Page 15 M o d e l N o . M E - 8 2 3 6 A p p e n d i x : Step Three • Click “Next” to show the illustration in Step Three, “Install the calibration rod”. Figure: Step Three, “Install the calibration In addition to the illustration, a Graph display of Position (m) versus Force (N) opens.
- Page 16 M a t e r i a l s T e s t in g M a c h in e Appendix: Step Four • Click “Next” to open Step Four, “Record a smooth data run”. Figure: Step Four, Record a smooth data run “Seating”...
- Page 17 M o d e l N o . M E - 8 2 3 6 A p p e n d i x : Step Five • Click “Next” to open Step Five, “Polynomial Fit”. NOTE: By default, the “Show Curve Fit Editor” window is open. Polynomial Fit: The software automatically applies a polynomial curve fit to the data.
- Page 18 Tools palette • From the “File” menu, save the Capstone file for future use. Figure: Save Experiment As... More Help • See the Online Help System for the PASCO Capstone software. • Contact PASCO Technical Support. 012-13762C...
Need help?
Do you have a question about the ME-8236 and is the answer not in the manual?
Questions and answers