Advertisement
Quick Links
ClareOne Auxiliary Touchpanel
Quick Start Guide
Content
Introduction ...................................................................................................... 1
Included ........................................................................................................... 1
Installation options ........................................................................................... 2
Setting up the ClareOne Auxiliary Touchpanel ................................................ 6
Warranty Information ..................................................................................... 14
Support .......................................................................................................... 14
Last modified: 12/14/20
Introduction
Thank you for choosing Clare Controls. In today's competitive marketplace, we
can appreciate that you have many choices for your home automation needs.
This document is intended as a quick-start guide, not a full product guide. For
more information, view the full
(DOC ID
2019).
Included
The following items are included with the ClareOne Auxiliary Touchpanel.
• 1 × Power supply
• 1 × Mounting bracket
• 1 ×Tabletop stand
• 2 × Base grips
• 4 × Screws
• 4 × Wall anchors
DOC ID - 2021 Rev 01
ClareOne Auxiliary Touchpanel User Manual
1 / 14
Advertisement

Subscribe to Our Youtube Channel
Related Manuals for Clare Controls ClareOne


Summary of Contents for Clare Controls ClareOne
-
Page 1: Table Of Contents
Last modified: 12/14/20 Introduction Thank you for choosing Clare Controls. In today’s competitive marketplace, we can appreciate that you have many choices for your home automation needs. This document is intended as a quick-start guide, not a full product guide. For... -
Page 2: Installation Options
Installation options Installation option 1: Desktop Option 1 uses the included panel tabletop stand. To desktop mount the panel: 1. Press the kickstand to the rear of the panel in the desired orientation. The stand pops into place, locking to the panel. Note: There are 2 options for tabletop stand orientation. - Page 3 3. Plug the included power supply into the rear of the ClareOne Auxiliary Touchpanel. 4. Plug the opposite end of the power supply into an electrical outlet. The Touchpanel automatically powers up. Note: If remote power is required for installation, please refer to...
- Page 4 Installation option 2: Wall mounted Option 2 requires the panel to be wall mounted. Use the included screws and metal plate to mount the panel flush with the wall. To wall mount the panel: 1. When mounting on drywall, install at least two of the provided wall anchors in the desired location.
- Page 5 4. Plug the included power supply into the rear of the ClareOne Auxiliary Touchpanel. The Touchpanel automatically powers up. Note: If remote power is required for installation, please refer to Clare Touchpanel Power Extension Kit Installation Sheet (DOC ID 1854) 5.
-
Page 6: Setting Up The Clareone Auxiliary Touchpanel
Setting up the ClareOne Auxiliary Touchpanel Once the panel is installed, connect the panel to the home’s Wi-Fi network. To setup the panel: 1. Tap the screen. – or – Press the power button on the right-side of the panel. - Page 7 4. Read the End User License Agreement (EULA) and tap I Agree. 5. Tap Start on the Setup Wizard screen to initiate device setup. DOC ID – 2021 Rev 01 7 / 14...
- Page 8 6. Tap the arrow and a dropdown menu will appear with available WiFi networks to choose from. Select your WiFi network from the dropdown. 7. Enter the WiFi network password and press Connect. Note: If the Forget Network button is visible, the selected network is already saved to the device.
- Page 9 Note: If the WiFi network name or password information is incorrect, the text will appear red in color. If the provided information is correct, a screen will show a successful connection to the WiFi. DOC ID – 2021 Rev 01 9 / 14...
- Page 10 8. Upon successful login, tap Next. This will bring to the “Check for Updates” page of the wizard. Tap Check for Update. This will launch another application which will automatically check for updates. Note: If no updates are available, the device will say “Device up to date.” Tap Cancel or the back arrow at the bottom of the screen to continue.
- Page 11 9. Tap Next to go to the “Connect to System” page of the setup wizard. It will display three dots and text stating “Searching for systems on your network. This may take a few seconds.” 10. It will display “System Found” along with the name given to the system. Tap Connect.
- Page 12 - OR – You may enter the system information manually. Tap Didn’t find your system? Try Manual Entry. Tap the box under “IP Address” to display keyboard. Enter the IP address of the system you wish to connect to and tap Connect. 11.
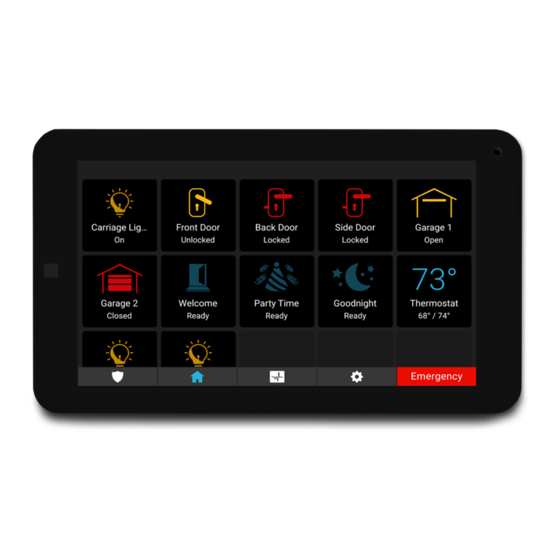
- Page 13 12. Tap Done on the “Setup Complete” page to complete setup. 13. This will bring you to the Security Page. The panel will automatically connect to your controller. Note: If multiple security partitions or systems are present on your system, a dropdown menu will appear.
-
Page 14: Warranty Information
100% the Touchpanel will reboot. 5. The device is now updated to the latest software. Warranty Information Clare Controls offers a two (2) year limited warranty on original Clare Controls components, from the date of shipment from Clare Controls. Support Dealer Support –...
Need help?
Do you have a question about the ClareOne and is the answer not in the manual?
Questions and answers