
Related Manuals for Smart+ Products SPP-4PC-1000

Summary of Contents for Smart+ Products SPP-4PC-1000
- Page 1 INFRARED ZONE HEATING SYSTEM OWNER’S MANUAL Model No. SPP-4PC-1000 WARNING: READ THIS ENTIRE OWNER’S MANUAL CAREFULLY BEFORE USE.
- Page 2 Thank you for choosing a SMART+ PRODUCTS Infrared Zone Heating System. This owner’s manual will provide you with valuable information necessary for the proper care and maintenance of your new product. Please take a few moments to thoroughly read the instructions and familiarize yourself with all the operational aspects of your new heater.
-
Page 3: Important Safety Instructions
IMPORTANT SAFETY INSTRUCTIONS READ AND UNDERSTAND ALL INSTRUCTIONS, SAFETY WARNINGS, AND FAQ’s BEFORE USING THE HEATER WARNING! ! POTENTIAL FOR ELECTRICAL HAZARD IF NOT ADHERED TO! When using electrical appliances, basic precautions should always be followed to reduce the risk of fire, electric shock, and injury to persons, including the following: 1. - Page 4 9. This heater is not intended for use in bathrooms, laundry areas and similar indoor locations, nor any locations that use GFCI outlets. 10. Never place heater where it may fall into a bathtub or other water receptacles. 11. Do not run cord under carpet. Do not cover cord with throw rugs, runners, or similar coverings.
-
Page 5: Frequently Asked Questions (Faqs)
SMART+ PRODUCTS). All parts may be purchased through SMART+ PRODUCTS if your product is out of warranty. Note: If you feel that the elements are definitely faulty right out of the box, contact SMART+ PRODUCTS Tech Support first (for troubleshooting). - Page 6 Why doesn’t the temperature on my heater match the temperature display on my wall, or external thermostat? This is completely normal. The temperature display on your heater may vary from the temperature display on another thermostat (like the one mounted to your wall or a purchased external thermostat).
- Page 7 I purchased my heater so that it could cut my heating costs, but my electric bill has gone up. Why? The compact SMART+ PRODUCTS heater can definitely save you on heating costs, when compared to the existing central heating system in place in your home, and when used as directed.
-
Page 8: Specifications
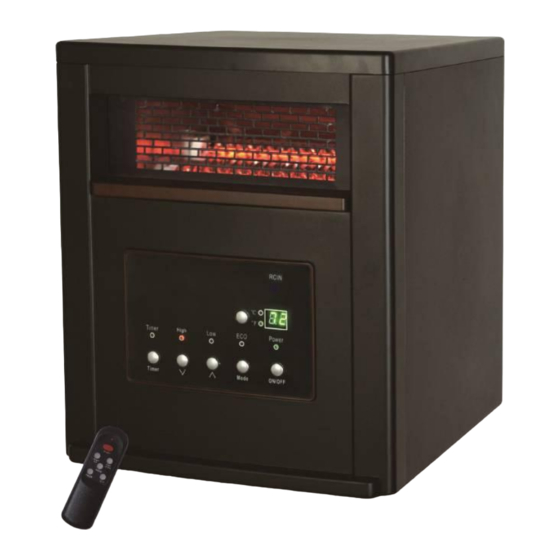
SPECIFICATIONS Voltage Rating 120 V (60Hz) Power Consumption 1500W Unit Size 13.1 in. (W) x 16.6 in. (D) x 16.9 in. (H) Unit Weight 19 lbs SAFETY FEATURES Tip-Over Safety Feature This heater is equipped with a tip-over safety feature. Once the heater is tipped over, an internal switch will automatically shut the heater off. - Page 9 IN THE BOX INFRARED ZONE HEATING SYSTEM INSTRUCTION BOOKLET REMOTE CONTROL (2 AAA batteries not Included) PRODUCT DIAGRAM Remote Control Air Intake Air Outlet Front Panel Control Panel Rear Power Toggle Wheels Cord Clamp Control Panel (Ref Fig. 1 next page) 1.
- Page 10 Fig. 1 RCIN Temp./Time ¡ æ ¨ H Timer High Power Timer ON/OFF Mode Remote Control ON/OFF button: Used to power the digital display on or off Temp up button: To increase set temperature Temp down button: To decrease set temperature Mode button: Used to select between the available heat modes ℃/℉button : Button for alternating between Fahrenheit and Celsius.
- Page 11 PREPARATION Place the heater on a firm, level surface and plug into a grounded 120V 60Hz power outlet, and turn on the power switch in the rear of the unit. Only operate heater in upright position with caster wheels attached. Insert 2 AAA batteries into the remote control before using (Batteries Sold Separately).
- Page 12 OPERATING INSTRUCTIONS 1. Power the Display On/Off and Select Desired Mode Turn the heater on by pressing the ON/OFF button on the control panel or by pressing the Power button on the supplied remote control. Turn the heater off by pressing the ON/OFF button on the control panel or by pressing the Power button on the supplied remote control.
- Page 13 Press ℃/℉ button to change the display temperature between Fahrenheit and Celsius. The Fahrenheit indicator LED will light, when the temperature is displayed in Fahrenheit. The Celsius LED will light, when the temperature is displayed in Celsius. 3. Setting the Function POWER OFF TIMER Note: The Power-Off-Timer Function will allow for the heater to power OFF after a certain set time, and can...
- Page 14 The digital display shows the “hours” option for the timer. Continue to press the timer button to change the number of hours you would like the heater’s internal clock to count down before powering itself on. The hour options for the timer are from 0 to 12 hrs (in 1 hr increments).
-
Page 15: Maintenance
MAINTENANCE 1. Unplug the unit and let it cool completely. 2. To keep the heater clean, the outer shell may be cleaned with a soft, damp cloth. You may use a mild detergent if necessary. After cleaning, dry the unit with a soft cloth. CAUTION: DO NOT let liquid enter the heater. -
Page 16: Basic Troubleshooting
PUSH Battery STORAGE Store the heater in a cool, dry location when not in use. To prevent dust and dirt build-up, use the original packaging to repack the unit. BASIC TROUBLESHOOTING If the heater will not operate, please check the following before seeking repair advice: 1.