Advertisement
Quick Links
INSTALLATION MANUAL – Height Strip with 2MP Pinhole Network Camera
Unpacking
Unpack carefully. This is mechanical equipment and should
be handled with care. If an item appears to have been
damaged in shipment, replace it properly in its carton and
notify the shipper. If any items are missing, notify the
vendor. The shipping carton is the safest container in which
the unit may be transported. Save it for possible future use.
Service
If the unit ever needs repair service, the customer should
contact the vendor for a return materials authorization (RMA)
and shipping instructions.
Care and Maintenance
Perform routine maintenance to keep the unit dust free.
Model Designation
SKK-CH601/US
Height Strip with Hanwha SNB-6010N 2MP
Pinhole Network Camera
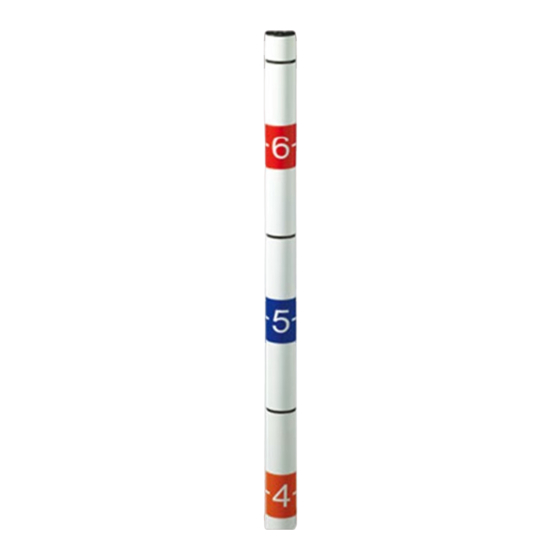
Description
This unit is designed to be installed at eye-level at the exit of
an establishment. The Height Strip includes height labels
allowing a store employee to quickly gauge the height of a
perpetrator exiting the establishment while the camera
captures a facial shot.
Hardware Kit
2 x Cable Ties
2 x Cable Tie Mounts
3 x Plastic Wall Anchors
3 x #8 Cross Recessed self-tapping screw
Tools Required
#2 Cross Recessed Screwdriver (Phillips)
Level
Wire Splice and Crimper or Wire Nuts
Drill with 3/16" Bit (Optional 1/8" Bit)
Optional: Drill with 9/16" Bit
Optional: De-burr Tool
Certification
Installation should be performed by a licensed professional
and conform to the National Electrical Code (NEC) and any
applicable local codes.
Installation
1.
Choose desired location for camera installation. Verify
mounting structure and surface is capable of supporting
the camera and no obstacle or interference is present
from existing installed devices or wiring.
2.
Measure a distance of 5 feet from the finished floor and
mark vertical location.
3.
Mark centerline of horizontal location.
4.
If routing camera cable into wall, measure 10.25" below
location and mark new vertical location. Use level from
upper location to mark centerline of horizontal location
for lower location. Drill a 9/16" hole at this location.
5.
For upper hole, if using plastic anchors, drill a 3/16" hole
at intersection of the vertical and horizontal marks. If the
Made in the USA by Broadsight Systems, Inc. for Hanwha Techwin
Available from A1 Security Cameras
www.a1securitycameras.com email: sales@a1securitycameras.com
anchors are not being used, drill a 1/8" hole in mounting
surface.
6.
Install plastic anchor and/or #8 screw. Do not tighten.
7.
Remove cover from Height Marker Camera by removing
screw from top cover, then slide cover up and away.
8.
If routing camera cable through top knockout, pull cable
back through camera base and re-route to top knockout.
Feed cable through top cap; it will hang loosely until final
step. Route cable to network box and plug in.
9.
If routing cable through wall, feed camera cable through
lower mounting hole, routing as needed to network box
installation location. Plug cable into network box.
10. Place center mounting keyhole in base over installed #8
screw. Level and align camera base and frame.
11. Mark top and bottom mounting locations.
12. Hang camera base frame from upper cable hole.
13. Drill 3/16" (or 1/8" if not using anchors) holes at
mounting locations marks and install anchors (if used).
14. Replace base over installed #8 screw, tighten screw,
install and tighten top and bottom mounting screws.
15. Adjust camera field of view by loosen thumb wheel above
camera bracket and rotating camera assembly to desired
position.
16. Place cover over base frame about 3/4" inch above
bottom of frame. With light pressure, push toward base
and down until cover is seated against bottom of frame
and cover is secure.
17.
Place top cover plate in position
and tighten screw with light
pressure. Do not over torque.
18.
Refer to Quick Installation Guide
for instructions on camera setup
and installation of network box.
Remove top screw
to access camera
Loosen thumbwheel to
adjust field of view
Page 1 of 2
Advertisement

Related Manuals for Samsung SKK-CH601/US


Summary of Contents for Samsung SKK-CH601/US
- Page 1 Level and align camera base and frame. 11. Mark top and bottom mounting locations. Model Designation 12. Hang camera base frame from upper cable hole. SKK-CH601/US Height Strip with Hanwha SNB-6010N 2MP Pinhole Network Camera 13. Drill 3/16” (or 1/8” if not using anchors) holes at mounting locations marks and install anchors (if used).
- Page 2 IMPORTANT SAFEGUARDS 1. Read Instructions - All the safety and operating instructions should be read before the unit is operated. 2. Retain Instructions - The safety and operating instructions should be retained for future reference. 3. Heed Warnings - All warnings on the unit and in the operating instructions should be adhered to. 4.