Advertisement
Quick Links
Advertisement

Subscribe to Our Youtube Channel
Related Manuals for Kogan Ovela Santee OVSANTEEWDA


Summary of Contents for Kogan Ovela Santee OVSANTEEWDA
- Page 1 SANTEE METAL WARDROBE OVSANTEEWDA...
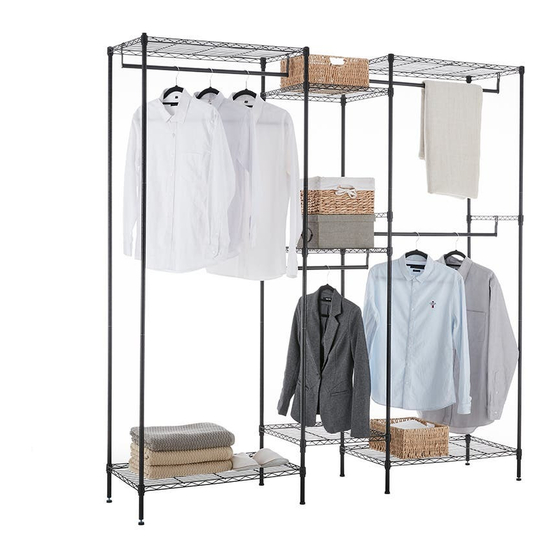
- Page 3 COMPONENTS A Large Shelf (x4) B Small Shelf (x3) C Support Rail (x2) D Lower Pole (x8) G Long Clothes H Hook Bracket E Middle Pole (x8) F Upper Pole (x8) Hanger Rod (x3) (x8) J Short Clothes L Leveling Feet I Screw (x8) K Plastic clip (x64) Hanger Rod (x1)
- Page 4 OVERVIEW...
- Page 5 ASSEMBLY Step 1: Screw the x8 Leveling Feet (L) into the bottom of the Lower Poles (D). Snap the Plastic Clips (K) into the pole grooves of the Lower Poles, each at the same position, and ensuring that the arrow on each plastic clip is pointed up. Arrow points up...
- Page 6 Step 2: Take Large Shelf (A) and ensure it is positioned the correct way up, as per the image below. Hold the shelf on its side and slide the top of 4 pieces lower poles through the bottom of the shelf at its corners until there is snug fit.
- Page 7 Step 3 Repeat step 2 again to create the other base assembly, ensuring the height for the shelving is identical between the two. Step 4 Snap plastic clips onto the same grooves of the centre four lower poles at your desired height for the first Small Shelf (B).
- Page 8 Step 5 The Middle Poles (E) are fitted with screw connectors (shown in the image below). Use these connectors to attach the middle poles to the lower poles. Repeat the same method to attach the Upper Poles (F) to the middle poles (E).
- Page 9 Step 6 Snap the plastic clips (as per step 4) to snap plastic clips at the same height grooves of the centre four poles and install the second small shelf in the middle of the rack. To attach the Support Rails (F), fit another x4 plastic clips on the poles making up the right- hand side frame assembly (see image below for reference), then slide the support rails down from the tops of the poles, onto the plastic clips.
- Page 10 Step 7 Connect the Long Clothes Hanger Rod (G) with the two assembled support rails via Hook Bracket (H) and Screw (I) as per the below image. Hang the remaining two long clothes hanger rods respectively onto the two top large shelves at their frames by hook bracket and screw.
- Page 11 Step 8 Use a rubber mallet to ensure the shelf is firmly in place over the plastic clips. To ensure stability, adjust the levelling feet on each of the 8 lower poles, ensuring the wardrobe can stand straight upright with no imbalance. High...
- Page 12 Step 9 Fasten the wardrobe to the wall with the anti-toppling kit included in the package. TOPPLING FURNITURE WARNING: • It is strongly recommended that this product is permanently fixed to the wall. • Please seek professional advice if you are in doubt of what fixing device to use. •...
- Page 13 Anti-Tip Device (2Sets) Assembly complete...
- Page 14 NOTES...
- Page 16 Need more information? We hope that this user guide has given you the assistance needed for a simple set-up. For the most up-to-date guide for your product, as well as any additional assistance you may require, head online to help.kogan.com.
Need help?
Do you have a question about the Ovela Santee OVSANTEEWDA and is the answer not in the manual?
Questions and answers